11.2. Creating rST Documents
Note
It is assumed that you have created a GitHub account and been given the proper permissions to work within this repository for training. If you can read this, you probably have, but double-check with your friendly FTC Support person.
Now that we have created our branch, now we can begin making our own special changes to our branch - i.e. adding or modifying content. Remember, our branch is our place to make any kinds of changes we want, we just have to understand where and how to make those changes.
11.2.1. Understanding the ftcdocs Structure
The ftcdocs repository is a “map” of the files and how they’ll be presented to users on the website. Filenames and where they’re located in the folder structure of the repository define the ultimate web experience users will have interacting with your final documentation.
11.2.1.1. Quick GitHub Folder Listing Intro
For those unfamiliar with the GitHub folder (also known as “directories”) structure listing, here’s a quick introduction:
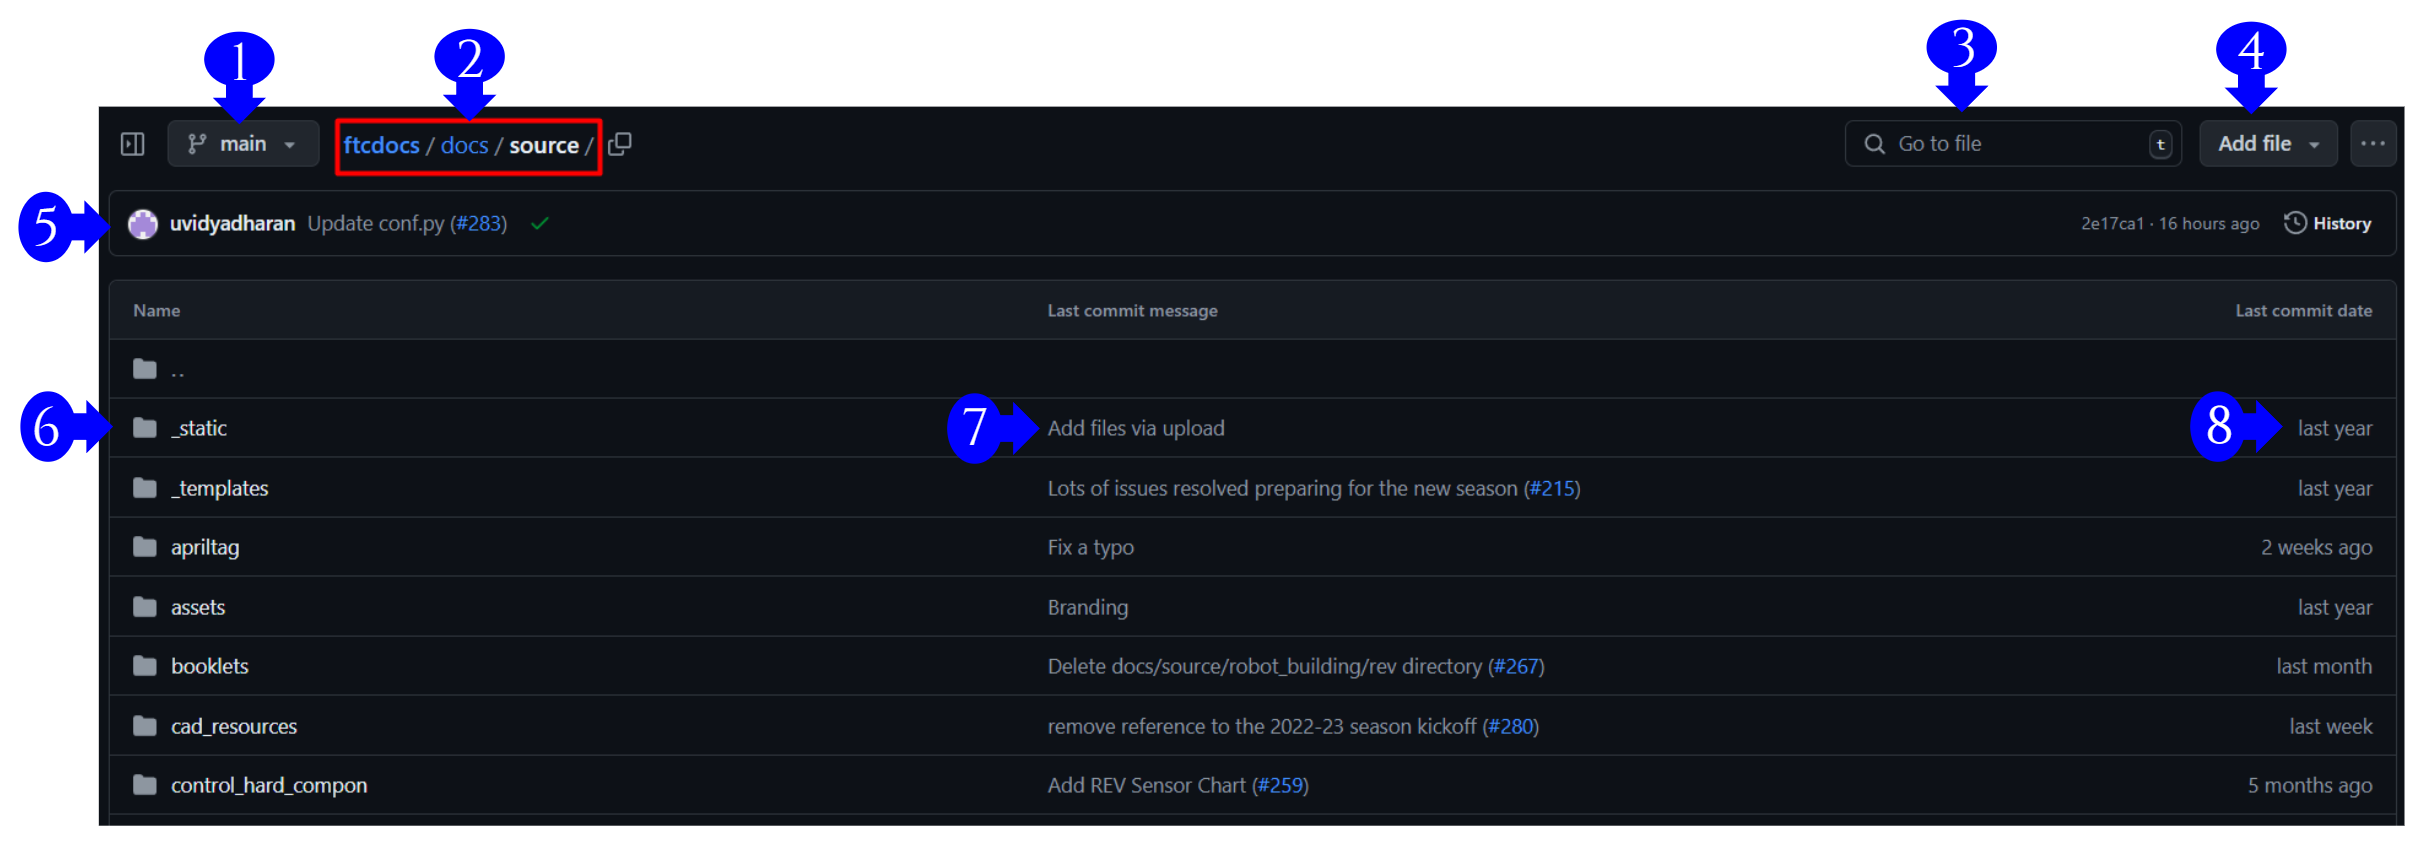
GitHub Folder Listing Info
Branch Indicator and Selection - Here you can see which branch you’re viewing, and select another branch if you want to view a different one. Test 123
Repository Path Location of the currently viewed folder - This helps you understand where you are within the Repository. On the main page of the repository there is no path shown, but on all other locations within the repository the path indicates where you are.
File Search Tool - If you can’t find a file by browsing through the folder, or you want to “quick-find” a particular file (useful for listing all of the “index.rst” files especially) this tool can help you out.
New File Creation Tool (can also create folders) - this can help you create new files (or files within new folders) via the web client.
Last user to commit a change, and description of the change - this is helpful to understand what the last changes were to the repository you’re looking at. This is mostly useful when trying to remember what change was last made to a particular branch.
Folder/File Name - Within the row, this shows you a given folder or file for fast navigation.
Last Commit Description for changes within the Folder/File - new users often mistake this for a description of the folder or file that this row is referring to, but this is actually the description of the last commit made to the folder or file and generally has absolutely nothing to do with what content is within the folder or file. This can be really confusing for new users, FYI.
How long ago the last commit was made - this way you can see how long ago changes were made to folders or files. This information shows you how potentially outdated content may be.
11.2.1.2. Repository Main Folder
We’re going to call the first folder in the repository the “repository main folder”. This is the main folder where viewers of the repository can get important information regarding what the repo is for, what license the repository is managed by, and so on. As a contributor of this repository, most of the content here will not be important to you.
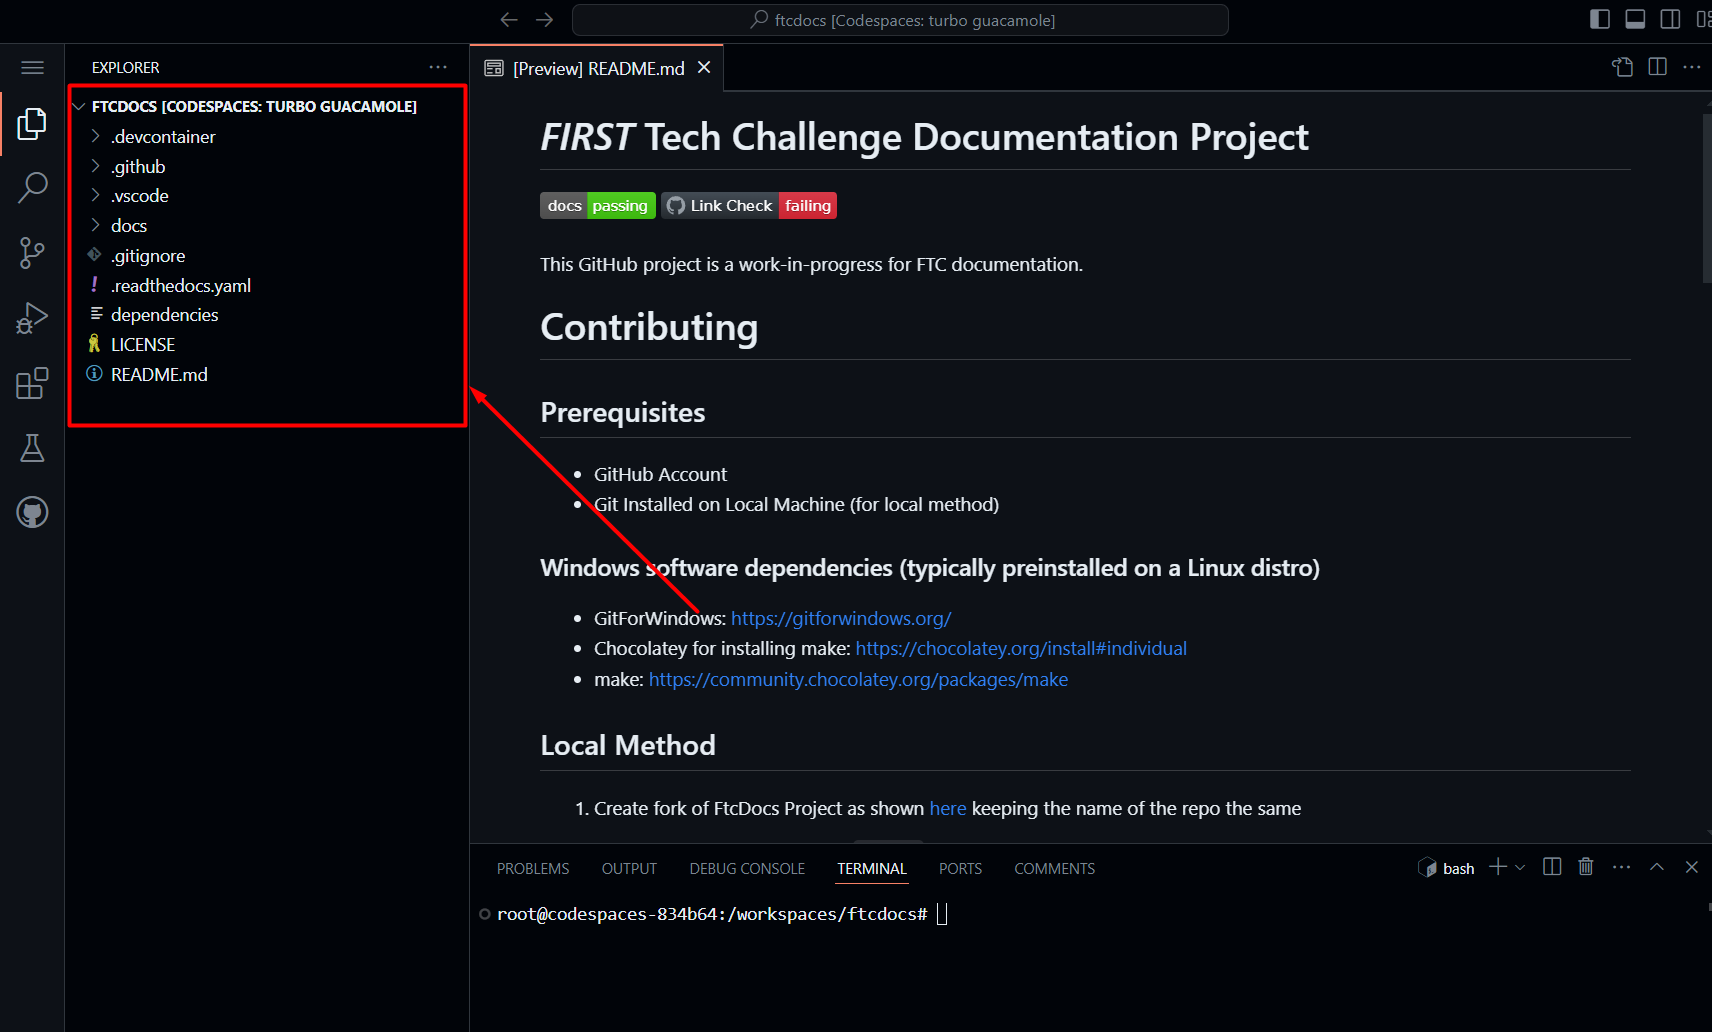
Repository Main folder for rst-primer the quick brown fox
11.2.1.3. Docs Folder
Within the repository main folder will almost always be a folder that
contains the actual project files for the project - for the rST-Primer
repository, that folder is the docs/ folder. The docs/ folder
is where the top-level build definitions are for building the documentation.

Docs Folder
Again, as a documentation contributor the contents of this folder will
likely not be of interest to you right now, but for project builders and
maintainers this is where the “magic happens.” The important element here is
that this is where the source/ folder is located. The source/
folder is the actual starting point for the documentation and the rST-primer
website.
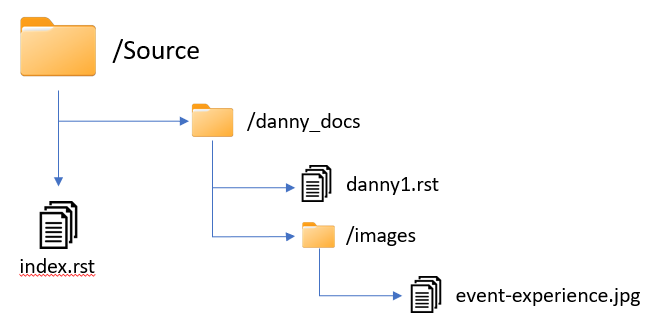
11.2.1.4. Source Folder
Within the docs/ folder you will find the source/ folder. Please
take careful notice that above the folder listing we can see the full
repository path of where these files and folders are within the repository;
we are currently viewing the current contents of rst-primer/docs/source.
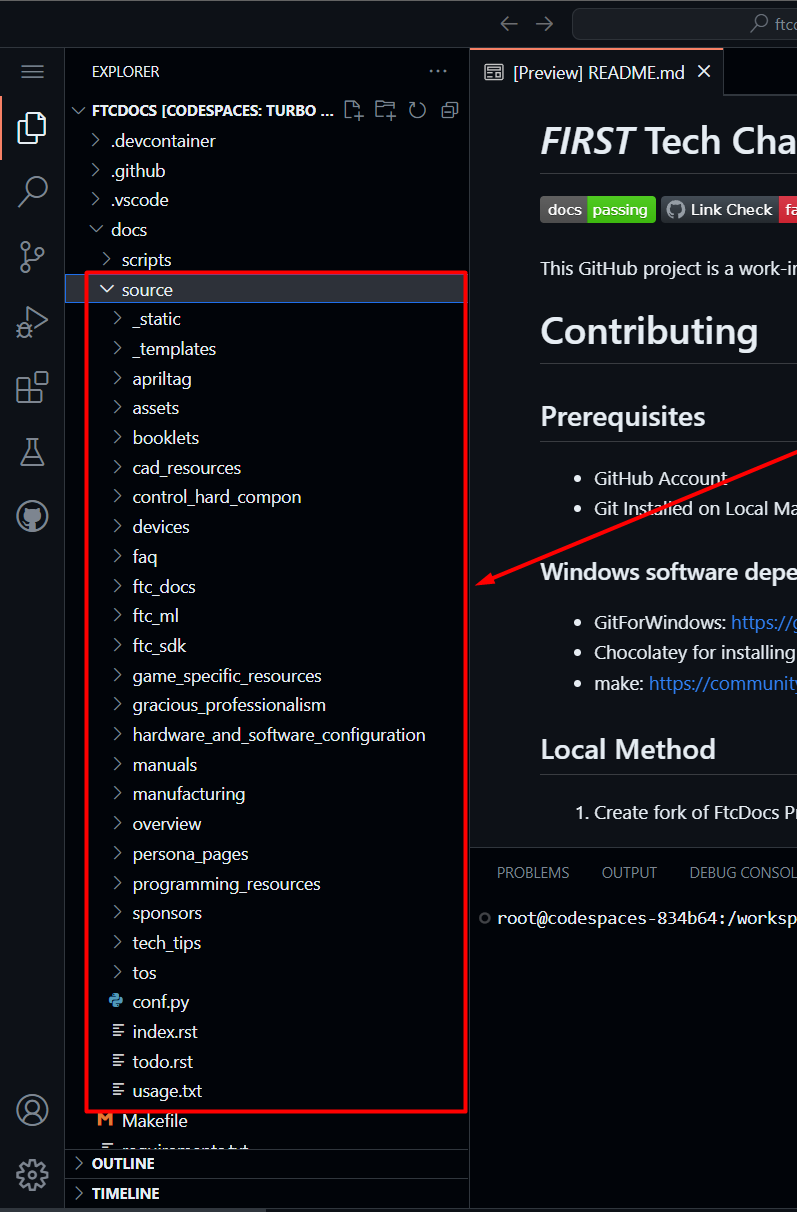
Source Folder
When we work on documentation, it’s important to understand that there are TWO related paths that we must keep track of:
- Repository Location
This is the location of the file within the repository. This is conveniently shown in the path within GitHub. This location is only used as a reference within GitHub, where the full repository location is sometimes needed.
- Document Location
This is the location within the final website where the document will exist. The document location for files is the same as the repository location minus the
rst-primer/docs/source. For example, a file with a repository location ofrst-primer/docs/source/tutorial/overview/overview.rstwould have a document location of/tutorial/overview/overview.rst. We will use this document location within our documents.
We will refer to these different document locations within this and future documents.
As previously stated, this rst-primer/docs/source repository location is
the main starting point for the documentation in all forms that it can take -
e.g. this is the “root” location for the site’s PDF document, is the “root”
location for the html website, and so on. This “root” location has some very
special files and folders:
- _assets
The _assets folder contains asset files that are used site-wide, such as the FIRST Tech Challenge logos and icon. Assets that could be included on all pages of the site, regardless of the content on the page, can be placed here for easy inclusion within templates and static content. However, any assets that are specific to content on the site should be placed with the content documentation instead. This folder starts with an `_` underscore symbol, meaning it’s designated as a special folder whose contents should only be modified with the help of site administrators.
- _static
The _static folder, a special folder signified by the underscore prefix in its name, contains HTML-specific code that is necessary to format the documentation in HTML. This code should never need to be edited or updated by a document contributor, but if you feel you do then please coordinate any changes with an administrator.
- _templates
The _templates folder, a special folder signified by the underscore prefix in its name, is used by Sphinx’s templating engine, Jinja, to override the way Sphinx manages its basic theme to allow customizations of the page layout, the header content, and the footer content (among others). Again, this isn’t likely something a document contributor should need to edit (other than possibly adding content if you feel the need) but please work with an administrator to coordinate any updates to the HTML site templates.
- conf.py
The conf.py file is a special file for sphinx that defines all of the modules, parameters, and tools used to build the documentation in all forms (HTML, PDF, etc…). This file does not have an underscore prefix, however this file should never be modified without first consulting an administrator.
- index.rst
The index.rst file here in the “root” documentation location is the primary organization and layout file for the HTML version of the documentation. This index.rst defines the Table of Contents (typically seen on the left-hand pane of the HTML website) as well as the content on the main page of the website. There may be multiple index.rst files within the website, but this particular file is the master index file for the website.
- todo.rst
The todo.rst file is an auto-filled file by the “To-Do” module. This will be discussed in a much later tutorial, but for now we’re just going to pretend that this file doesn’t exist.
11.2.2. Understanding Content Structure
Once you understand the rst-Primer repository structure, now we’re ready to
understand how to add content to this structure. A basic example of the
content structure can be found in the
/tutorial folder structure. The general rules are defined as:
Each content page is defined by a reStructuredText file with an .rst extension.
Each .rst file is defined within its own folder.
Each .rst file generally has supporting files (images, included files, etc…) and so it will have subfolders that include those files (
/images,/includes, etc…)Content categories can have category-specific landing pages, and those landing pages are
index.rstfiles. These category pages don’t generally contain content themselves, except as an introduction to the content linked from those pages (similar to the master indexindex.rstfile).Content Categories is used heavily within ftcdocs, but we will likely cover this topic in a much later tutorial.
.rst files must be referenced from at least one
index.rstpage.
The best way to describe these rules are to show an example of these rules in practice.
11.2.2.1. Simple Content Example
For a simple example, let’s take a look at the folder hierarchy of the Gracious Professionalism content on the ftcdocs website. The Gracious Professionalism content is a single page on the site devoted to describing GP to site visitors and honoring Dr. Flowers.
Here is a view of all of the folders and files that are involved within the structure of the Gracious Professionalism content:
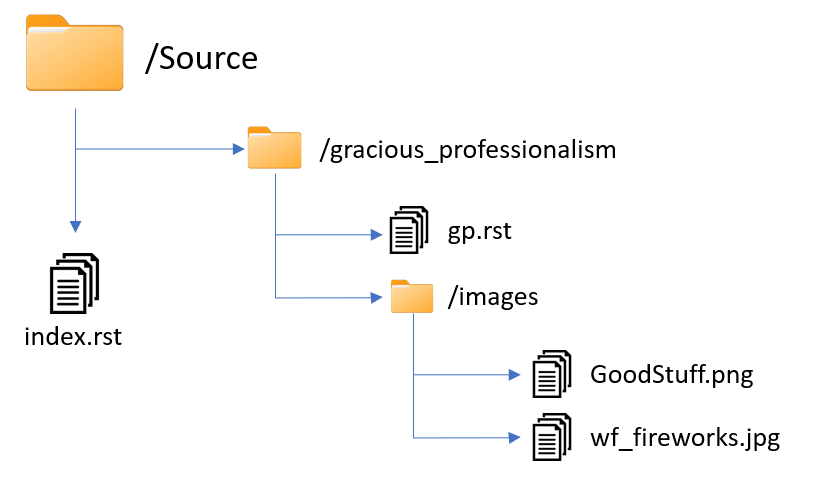
ftcdocs structure for Gracious Professionalism content
Let’s pick this apart a little to understand the structure of the content better. We will learn later why this structure is important once we start creating our own content.
The site’s
/sourceroot forftcdocs, similar torST-Primer, is in theftcdocs/docs/sourcerepository folder.The main content file is named
gp.rstand lives within the/gracious_professionalismfol der within the/sourcefolder. Files and folder names cannot include spaces, so the general site-wide style is to use underscores_for folders and dashes-for filenames where spaces would otherwise be used. You can see this is more of a “guideline” rather than a rule, especially when dealing with externally-sourced files.The
gp.rstfile references/uses two locally-stored images, and so those two images are stored within a/imagesfolder located immediately within the same folder that the .rst file is stored.Because the content is a single page with high-level content, it is included within the main site
index.rstfile (we’ll see how it’s included a little later).
Feel free to browse the content folder on the ftcdocs github repo.
11.2.3. Creating a New Content Document
Note
The process of creating a new content document is the same whether you’re doing it locally or via codespaces as they both use vscode as the editor.
We’re now going to create our first document. Let’s have our document follow a similar structure as the Gracious Professionalism document above. Let’s follow this structure:
Folder Structure for Danny Content
Of course it’s best to create your own folder and document names, so that you
don’t overlap other people’s work. This is being done within your own branch
so even if others use the same folder structure you won’t collide, but we do
eventually want to merge your branch back to the main branch, and we don’t
want thing colliding there. So just like your branch name, use your name as the
unique key for the folder name at least.
11.2.3.1. Step 1: Create the initial content file
Our first step in creating content is to create the core document. We’re just going to create a “stub” file initially that we’ll edit later.
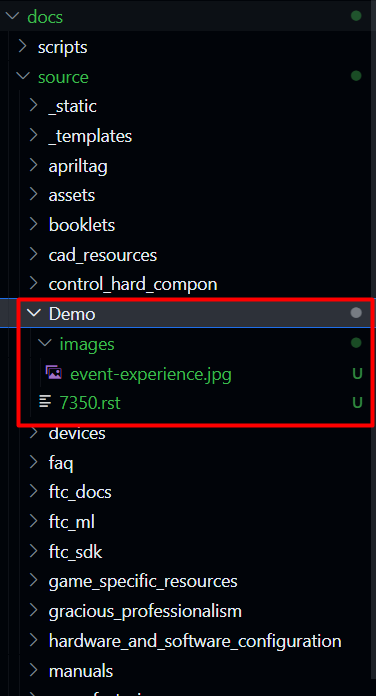
Navigate to the
/rst-primer/docs/sourcefolder in VS Code.Create a new folder with your name (or a unique name) within the
/sourcefolder. You can do this by right-clicking on thesourcefolder and selecting “New Folder” and then typing in your name. E.g. “Demo”.Create a new file within the folder you just created. You can do this by right-clicking on the folder you just created and selecting “New File” and then typing in the name of the file. E.g. “7350.rst”.
11.2.3.2. Step 2: Upload image file to use
Next let’s upload an image file that we’re going to use in our document. reStructured Text allows you to use images in your documents, and those images can be local images (saved/stored in the repository) or remote images (using HTTP links). We’re going to use both in our document, but we need an image to use. I downloaded this file locally:
Navigate to the folder you created in the previous step.
Create a new folder within your folder called
images. E.g./source/Demo/images. This can be done by right-clicking on your folder (Demo) and selecting “New Folder” and then typing in “images”.Add the image file you downloaded to the
imagesfolder you just created. You can do this by opening the downloaded image file in your file explorer, and then dragging and dropping the file into theimagesfolder you just created.
Completed Demo Folder
Congrats! Now we’re ready to add content to our reStructured Text document!