11.3. Basic rST Content
This section should be used as a reference for building basic documents using ReStructured Text. When building a document, you generally have the actual content that the text is meant to include; if you ONLY included this content then your document is just one long text document - boooring! In order to add formatting and pizzazz to your document, authors usually add formatting such as titles, links, text formatting, bulleted and numbered lists, and so on. This section introduces the basics of creating text and many of the simple add-ons that are common for web documents.
It’s also important to note that all of these basic formatting commands are all supported by the basic preview within GitHub. More complex formatting commands (admonitions, drop-downs, advanced formatting, and so on) are not supported by the basic preview and requires full rendering in order to preview. Those commands will be covered by intermediate and advanced content tutorials.
This tutorial covers these basic building blocks of simple documents (these are quick links within the document):
Okay, so now let’s cover these topics one by one.
11.3.1. Simple Table of Contents
The first thing you’ll want to do when creating a document is to add or update the Table of Contents (TOC). The TOC is what creates the connections between all the documents in a project. If you are creating a subcategory that resides in the docs/source/contrib directory, you will need to add the document to the toctree directive in the docs/source/index.rst file. Generally speaking, the toctree that you will add the document to is the one that is one layer above the document you are creating.
Adding a document to the TOC is done by simply adding the relative path to the document in the toctree directive as shown below:
Before
.. toctree::
   :maxdepth: 2
   :caption: Contents:

   previous-doc/source.rst
After
.. toctree::
   :maxdepth: 2
   :caption: Contents:

   previous-doc/source.rst
   Demo/7350.rst
11.3.2. Simple Paragraph Content
ReStructured Text is based on the Python programming language (yes, the name was inspired after reading scripts from “Monty Python’s Flying Circus”, a comedy series from the 1970’s). In Python, text indentation is incredibly important - normal text should start in the first column of the line, and anything that is indented (meaning whitespace precedes the text on a line) has a specific meaning based on what was written on the preceding lines. Blank lines and whitespace is also very important, and rules for these must be followed explicitly. It will initially seem like there are a TON of rules to creating documents - and there are - but once you start making documents yourself hopefully most of the rules will “just make sense” and they will fly out your fingertips without thinking about them.
When writing basic text, there are things to keep in mind:
Where text starts is important. Main text should start on the first column of the line, SO DO NOT INDENT the beginnings of paragraphs like your teacher in grade school taught you to do. Anything indented “has special meaning” and introduces special formatting to the text - the indentation rules will be explained later when introducing those formatting elements.
Lines and paragraphs do not necessarily end with newlines. All text within a paragraph continues until a completely blank line is reached. What this means is that your paragraph content is allowed to be on as many consecutive lines as you want. For example, the following content:
This is a sentence, it is a normal sentence of normal length.
This is the next sentence, it is shorter.
This is a third sentence, you can see how the text wraps.

This is a sentence after a blank line.
would be ultimately rendered on a webpage as:
This is a sentence, it is a normal sentence of normal length. This is the next sentence, it is shorter. This is a third sentence, you can see how the text wraps.
This is a sentence after a blank line, it starts a new paragraph.
Notice how the lines are combined into a single paragraph ignoring any newlines at the end of each sentence. In order to start a new paragraph, you must separate paragraph content with blank lines (no text).
Because of (2), we generally tend to create documents with a “text width” of 80 - meaning lines in the source document are kept to about 80 characters, give or take. It is less important to keep to 80 characters as it is to be consistent within your document. If this doesn’t make sense, just ask anyone who has made a few documents and they can explain it - once you understand, you understand.
Remember we talked about indentation? Indenting paragraphs requires 3 or more whitespaces of indentation from the last beginning column of the previous paragraph. Let’s look at a practical example.
This is the first paragraph. It might
be one or more lines.

   Here's an indented paragraph. It must start 3 or more
   whitespace characters from the last paragraph. Lines can
   continue as long as they are at the same indentation as
   the new paragraph, like these 4 lines.

      Here's a second indentation.
      Note that everything is indented nicely.
      Also note a blank line between each paragraph level.

   This is aligned with the first indented paragraph. It is
   at the same indentation. Note blank lines between levels.

This is a second main paragraph. This is at the
same level as the first main paragraph.
This will be rendered as:
This is the first paragraph. It might be one or more lines.
Here’s an indented paragraph. It must start 3 or more whitespace characters from the last paragraph. Lines can continue as long as they are at the same indentation as the new paragraph, like these 4 lines.
Here’s a second indentation. Note that everything is indented nicely. Also note a blank line between each paragraph level.
This is aligned with the first indented paragraph. It is at the same indentation. Note blank lines between levels.
This is a second main paragraph. This is at the same level as the first main paragraph.
11.3.3. Transitions
You might notice the “separator lines” between sections in this document - those are not done automatically, those are special elements knows as “transitions.” Transitions are simply four or more punctuation characters between blank lines (meaning there’s a blank line before and after the transition). Any punctuation characters can be used, but it’s recommended to keep to a consistent style in your documentation. Hence, it’s recommended to use dashes (-).
For example:
----
Creates a line transition separator in a document.
11.3.4. Document Title
When you’re editing a file, your document title header should be on the first line of your document. GitHub is really nice in that it provides line numbers for all your document lines. Documents are NOT required to have title headers, however, so when we do use a title header we put special characters underneath the titles to indicate that the text should be formatted as a Title. As a general rule of thumb, we use Equal Signs (=) as our document title indicator. A document title has the following rules:
Title Text should be on the first line, and must start in column 1 (no indentation).
Special Characters - in this case equal signs (=) - must be used on the next line, and must be as long or longer than the Title Text.
There should be a blank line after the special character line.
So below we can see an example of creating a document title. Note that the title text is on the first line, the special characters are below the title and start and extend the full width of the title, and there is a blank line after the special characters. Then we can start a new line to start the actual text of the document (remember, you can click on any image to see the full resolution image):
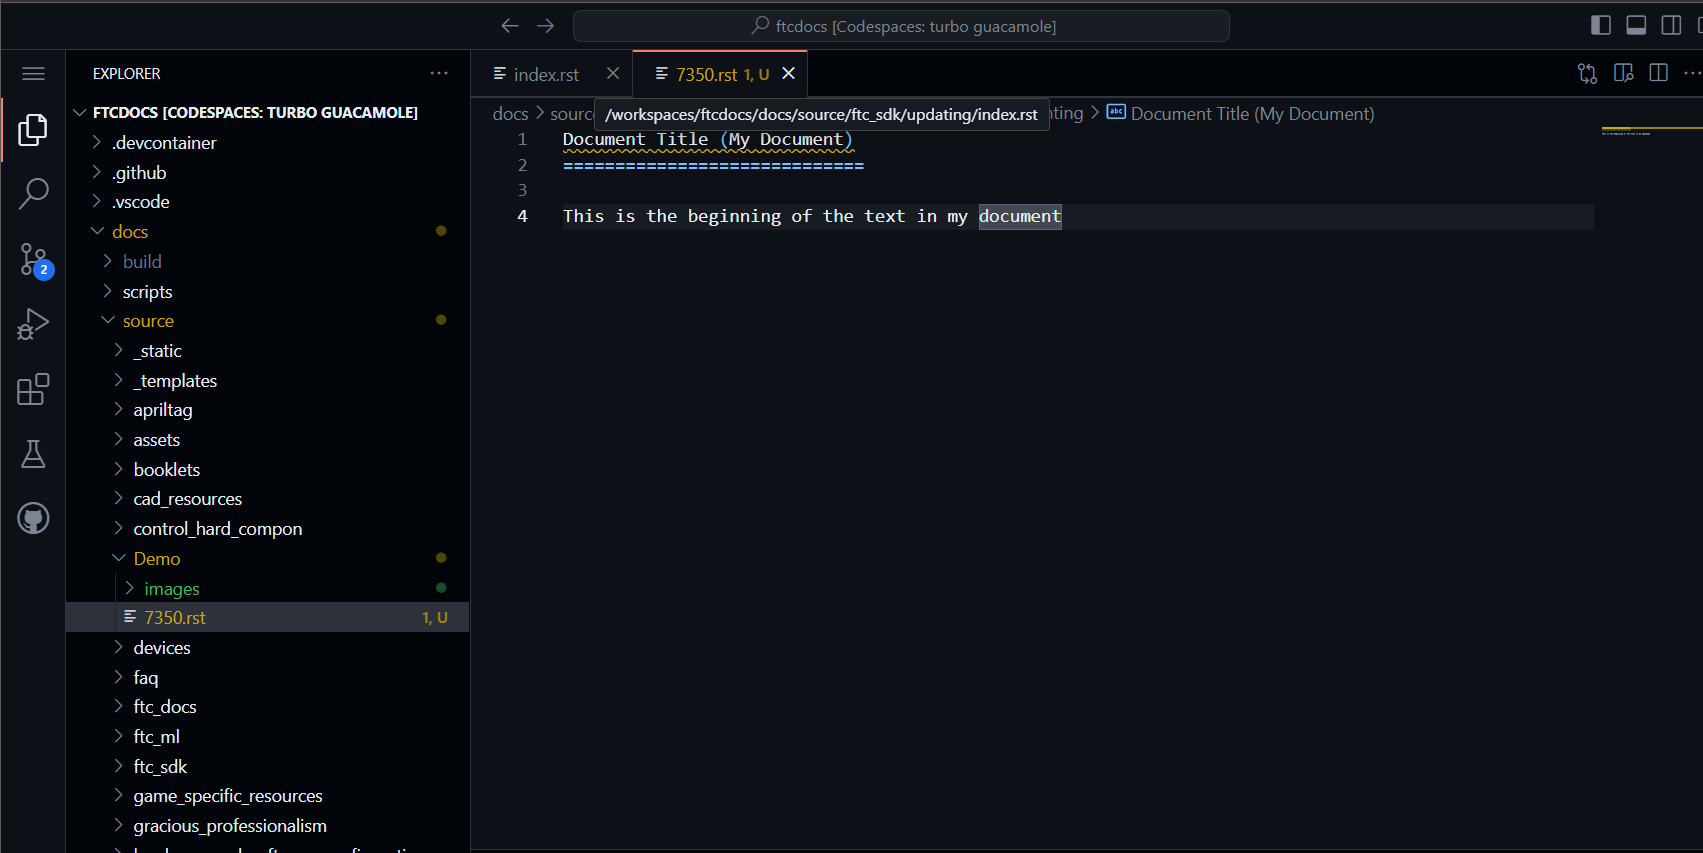
Example of Editing a Document with a Title
Great! So what will this document ACTUALLY look like on the web or in print? This is where the auto-rendering of ReStructured Text comes in. When you press ctrl-shift-b in the VS Code editor, the autobuild will render the document. You only need to press ctrl-shift-b once, and all future changes to any documents will automatically render when you save the document. To see what the document will look like, you can navigate http://127.0.0.1:7350/ in your browser for local users or click the button shown below for codespaces users.
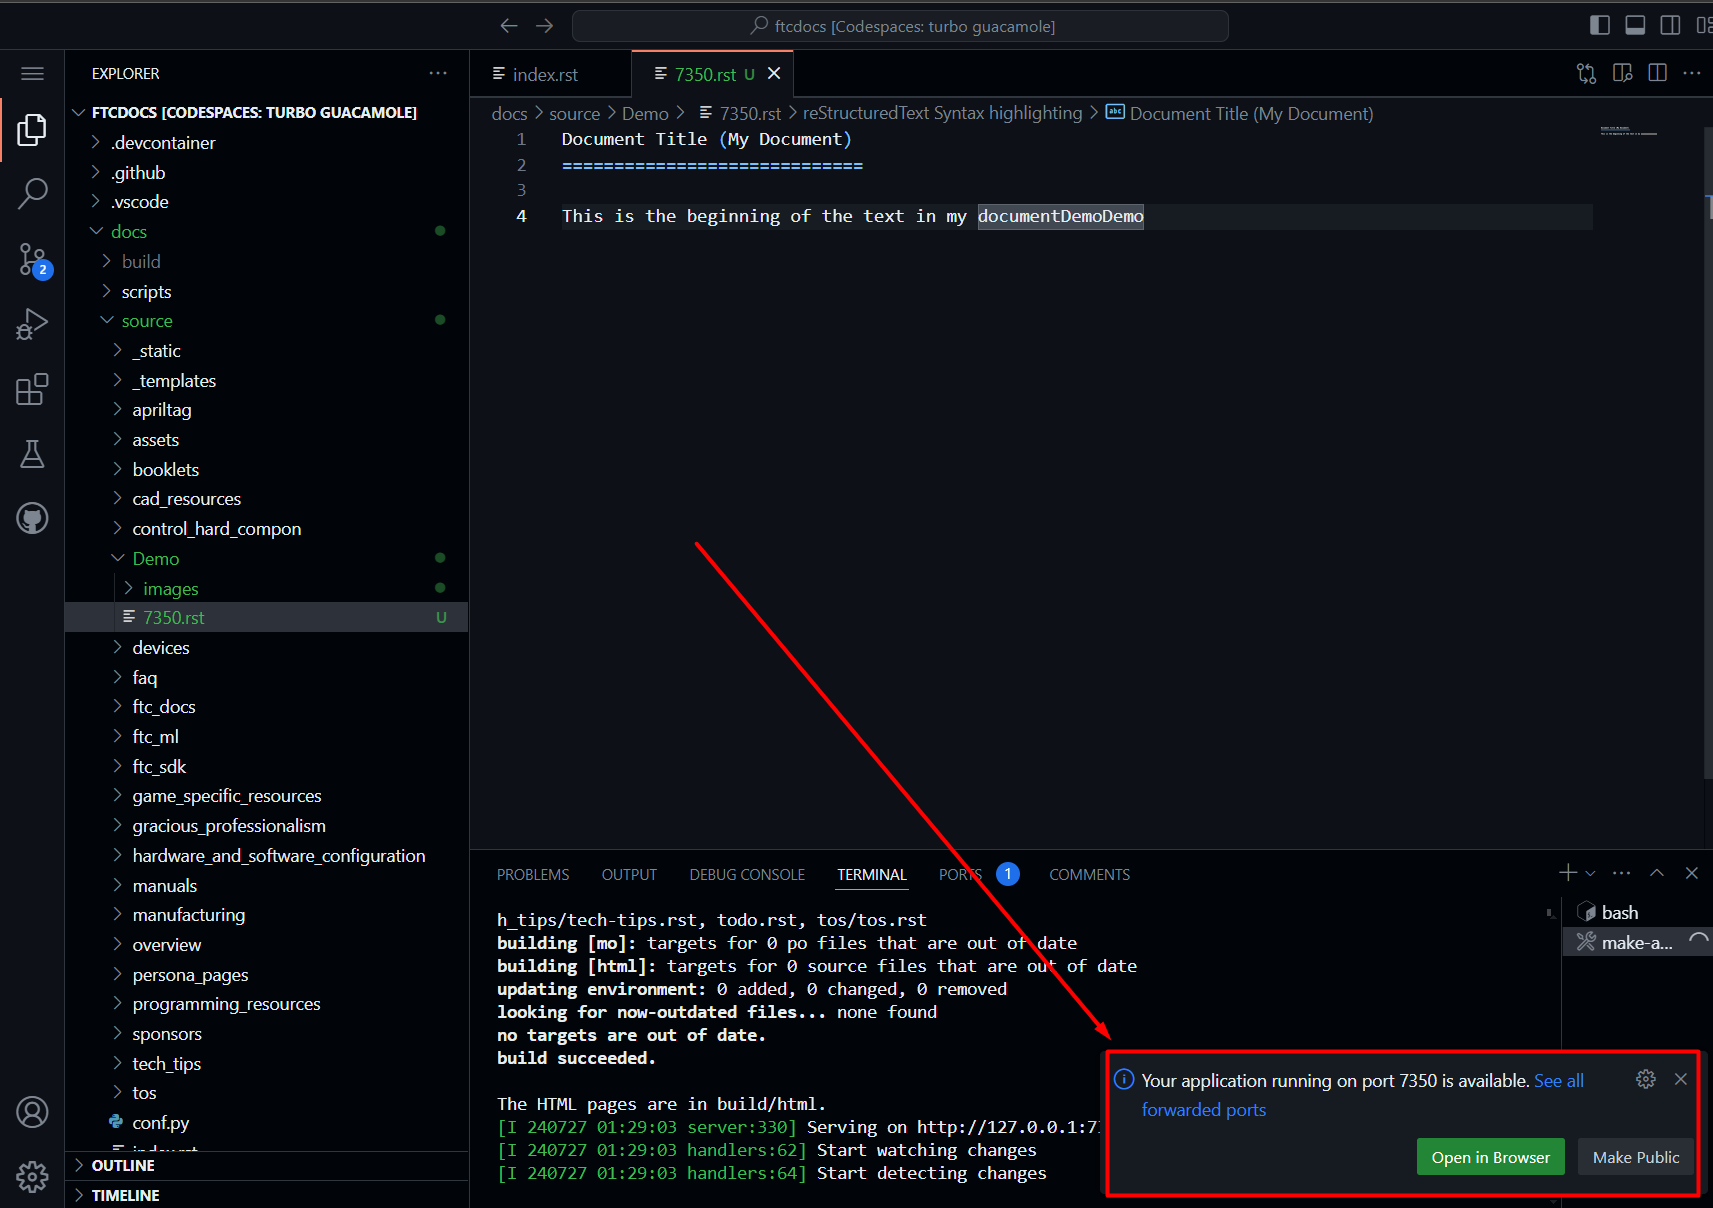
Example of Previewing a Document with a Title
Warning
Remember that inorder to see the rendered document, you must have the document added to the toctree directive in the index.rst file. If you don’t add the document to the toctree directive, the document will not be rendered in the preview.
Note
Realize that the special character you use could be almost any special character, but we generally tend to standardize on using an Equal Sign (=) for titles. Once you use a special character in a document to define a heading (like a Title, a Section, a SubSection, and so on) that character will be used to define the heading throughout the document. It’s important to be consistent, which is why we have recommended special character progressions.
11.3.5. Section Headers
Section Headers are just like titles; they’re actually both related, and are treated the exact same way. Section Headers do follow a progression - titles use the largest heading font size, sections use the next smallest heading font size, subsections use the next smallest heading font size, and so on. This progression is not changeable - as in you cannot “skip” a font size - each new heading type you use will just use the next smallest size font.
In order to create a new Section, SubSection, SubSubSection, and so on, we just use a special character that we will define for each level. The standard special characters used in Python are:
Titles
====== (Equals)

Sections
-------- (Dash)

SubSection
^^^^^^^^^^ (Carrot)

SubSubSection
""""""""""""" (Double Quotes)

SubSubSubSection
++++++++++++++++ (Plus Sign)
This is what should be used for different levels of sections. Additional special characters that can be used beyond these levels (in case they are needed) are Pound Signs (#) and Asterisks (*). Here’s what using Sections looks like:
11.3 Titles

11.3.1 Sections

11.3.1.1 SubSection

11.3.1.1.1 SubSubSection

11.3.1.1.1.1 SubSubSubSection
The great thing about sections is that each section gets an automatic anchor that can be used to reference that section within the document. Just hover over a section and you’ll see a “link” icon show up, and if you click on the “link” icon the URL in the browser will reflect the anchor you can use to direct someone specifically to this section of the document.
Warning
Titles/Sections/SubSections/etc. must all be uniquely named within the same document. In the advanced quickstarts you’ll be shown how to reference sections within documents, even within documents between projects, and these require unique headers per document (you can have the same title/header in different documents, just not within the same document).
11.3.6. Text Formatting
You can add simple text formatting - like Bold, italics, and
literals really simply in ReStructured Text using simple inline markup.
The caveat is that these Text Formatting do not stack, meaning you cannot
have “Bold Italics” or “Italiczed Literal”. You’ll find that virtually none
of the inline markup styles (Including Text Formatting, External Links, and so
on) can stack, so having things like the italicized word FIRST in link text
requires really inventive and complex procedures in order to make happen
(sometimes it’s not possible at all). Another caveat is that underlining
is not natively supported by ReStructured Text, in order to have underlining
you must mess with style sheets and pdf layout definitions in order to do
(YUCK!).
The standard Text Formatting Markup is quite simple - use:
One Asterisk: *text* for emphasis (italics) - like text
Two Asterisks: **text** for strong emphasis (boldface) - like text
Two Backquotes: ``text`` for literals - like
text
There are a few important restrictions to be aware of:
You cannot nest/stack inline markup
Content may not start or end with whitepace: For example, * text* is wrong
You must separate inline markup from surrounding text by non-word characters, like spaces. For example, *This text is italicized* will look like This text is italicized. However, * This text is not* will not render as expected because of the space between the first asterisk and the word or phrase that is expected to follow.
One way to avoid this is using a “forced whitespace character”, or “” without the quotes (you can tell rST to “force” a character by preceding the character with a backslash (\). For example, we can have Bold and Italics right next to each other without requiring spaces by “injecting” the forced whitespace character that will remain unseen - **Alien**\ *Nation* will be seen as AlienNation.
It’s REALLY nice that the standard GitHub editing window provides some in-line features to show that you’re using text formatting - for instance if you bold something, the text will appear bold and the same goes for italicize. This gives you context of what is happening as you do it.
Here are a few examples:
This is **bold** text in **this document**.

This is *italic* text in *this document*.

This is ``literal`` text in ``this document``.

This is a fun way using "\\ " to smash styles without
spaces: \*\*Bold\*\*\\ \*Italic\* will render as **Bold**\ *Italic*.
This is bold text in this document.
This is italic text in this document.
This is literal text in this document.
This is a fun way using “\ “ to smash styles without spaces: **Bold**\ *Italic* will render as BoldItalic.
11.3.7. Internal Links
It is important to note that this is for internal links within the same document. For creating document links between documents, see the :doc: and :ref: commands.
11.3.7.1. Links with Anchors
Internal Links using Anchors are ways to “jump to” various places within a single document. If you’re familiar with HTTP anchors, this follows the exact same concept. You can create an anchor anywhere in text that WILL NOT be displayed to users in the following way:
.. _anchor:
A blank line must come before the Anchor and after the Anchor.
This requires two periods at the beginning of the line.
Followed by a space
Followed by an underscore
Followed by a descriptor for the anchor
Followed by a colon
Note
This is the first time we’ve introduced what’s known as a directive, which is a block that begins with two periods and a space. Often directives help format special blocks of text in very specific ways - in this case, the underscore prior to the label identifies this as an anchor directive. Most often directives have TWO colons following the directive name, but in this case a single colon identifies this as a simple directive versus an external directive, and helps rST determine how to process the directive.
The name anchor can be replaced by any descriptor, like for example:
.. first-example:
Then, you can create an internal link anywhere in your text that directs to that anchor, in the following way:
anchor_
This is simply the anchor descriptor
Followed by an underscore
Therefore, in order to reference the .. first-example: anchor, you would
use first-example_ as the link text in your content.
11.3.7.1.1. Links with Anchors Example
In plain text, this could look like:
This is a link to an anchor_.
This reference can be anywhere before or after the anchor.

.. _anchor:

This is text following the anchor.
The anchor helps to reference this text.
And this would be rendered as:
This is a link to an anchor. This reference can be anywhere before or after the anchor.
This is text following the anchor. The anchor helps to reference this text.
11.3.7.2. Referencing Sections
This one is really simple - every title, section, subsection, subsubsection, and so on already has an anchor built-in. The name of the anchor is the name of the section. In order to use a section reference, just wrap the section name in ` (back tick) characters and then follow with an underscore.
11.3.7.2.1. Referencing Sections Example
In plain text, a section can be created and referenced like:
Section Name
------------

This is a link to `Section Name`_
As another real-life example within this document, I can jump to the top of this document really easily by using the name of the document title.
In plain text, this is what it would look like:
`Basic rST Content`_
And here’s how it would be rendered (click the link to jump to the top):
Pretty easy!
11.3.8. External Links
External Links provide a way to link to external websites. These are just another form of inline markup, with a few caveats.
11.3.8.1. Simple External Link
A simple External Link is simply the http address.
Just put the name of the URL and rST will detect it and provide an auto-link for you.
For example, simply writing:
*FIRST* Website: https://www.firstinspires.org
creates the rendered text with the link embedded:
FIRST Website: https://www.firstinspires.org
11.3.8.2. Embedded URI
An embedded URI can provide user-readable text with a link while hiding the actual URL. An embedded URI looks a lot like a Section Reference link, with an added URL component.
An embedded URI follows this example:
`Description<URL>`_
It starts with a ` (back tick) symbol
Followed by a description of the URL.
Then it defines the URL within angle brackets (< >)
Followed by another ` (back tick) symbol
Followed by an _ (underscore) character
For example:
`Microsoft <https://microsoft.com/en-us>`_
would be rendered as:
As another example:
`REV Robotics Website <https://www.revrobotics.com>`_
would be rendered as:
11.3.9. Embedding External Images
11.3.9.1. Embedding Images using the image directive
There are multiple ways to embed external images. The most common way is to
use the .. image:: directive. This directive can use a local path within
your document project, or it can use an external URI.
Two examples of using the image directive:
Including an inline image using a URI
.. image:: https://m.media-amazon.com/images/I/51-2PZby7KL.jpg

Including an inline image using a file path
.. image:: images/myimage.png
Directives can include options, which change parameters used with the directive. Options for directives are defined IMMEDIATELY AFTER the directive (on the next line), indented AT LEAST three spaces, with one option on each line. Options on these lines are defined by having a colon before and after the option, followed by the value of the option.
The options supported by the image directive are:
- alttext
Alternate text: a short description of the image, displayed by applications that cannot display images, or spoken by applications for visually impaired users
- heightlength
The desired height of the image. Used to reserve space or scale the image vertically. When the “scale” option is also specified, they are combined. For example, a height of 200px and a scale of 50 is equivalent to a height of 100px with no scale.
- scaleinteger percentage (the “%” symbol is optional)
The uniform scaling factor of the image. The default is “100 %”, i.e. no scaling.
- widthlength or percentage of the current line width
The width of the image. Used to reserve space or scale the image horizontally. As with “height” above, when the “scale” option is also specified, they are combined. It is often preferable to use width over height or scale.
- align“top”, “middle”, “bottom”, “left”, “center”, or “right”
The alignment of the image, equivalent to the HTML <img> tag’s deprecated “align” attribute or the corresponding “vertical-align” and “text-align” CSS properties. The values “top”, “middle”, and “bottom” control an image’s vertical alignment (relative to the text baseline); they are only useful for inline images (substitutions). The values “left”, “center”, and “right” control an image’s horizontal alignment, allowing the image to float and have the text flow around it. The specific behavior depends upon the browser or rendering software used.
- targettext (URI or reference name)
Makes the image into a hyperlink reference (“clickable”). The option argument may be a URI (relative or absolute), or a reference name with underscore suffix (e.g. `a name`_).
Examples of using these options:
.. image:: https://m.media-amazon.com/images/I/51-2PZby7KL.jpg
   :width: 80%
   :alt: This is alternate text for the image

.. image:: images/picture.jpeg
   :height: 100px
   :width: 200 px
   :scale: 50 %
   :alt: alternate text
   :align: right
It is important to remember that directives must have a blank line before the directive and must have a blank line after the directive (and all its options).
Warning
Images with the extension .gif and .svg are not supported in
PDF format. For documentation that will be used in PDFs, do not externally
link to files with these extensions. It is possible to use these files
when using a file path, as long as supported versions of the files exist.
For example, if you have both picture.svg and picture.png, you can
command the HTML to use one version and the PDF to use any supported
version through using a * (asterisk) in the file extension, like so:
.. image:: images/picture.*
11.3.9.2. Embedding Images using the figure directive
The .. figure:: directive is very similar to the .. image:: directive,
as a matter of fact the figure directive contains an image directive
but also allows for an optional caption (a single paragraph) and an optional
legend (with arbitrary body elements).
The figure directive supports all of the options of the image. These
options, except :align:, are passed on to the contained image. The following
options are important for the figure:
- align“left”, “center”, or “right”
The horizontal alignment of the figure, allowing the image to float and have the text flow around it. The specific behavior depends upon the browser or rendering software used.
Figures are probably the best way of showing images as they allow captions to help describe and label images. Some examples of using figures are:
.. figure:: images/picture.png
   :width: 80%
   :alt: Map to buried Treasure

   This is the caption of the figure (a simple paragraph). Note that the
   intentation for everything below the ``.. figure::`` line is the same
   and 3 or more spaces, which indicates that everything belongs to the
   figure.

.. figure:: https://m.media-amazon.com/images/I/51-2PZby7KL.jpg
   :width: 80%
   :alt: Alternate Text

   Simple Caption for Figure
You can see more about the figure directive at the Figure Directives Link.
11.3.10. Lists
There are five kinds of lists:
We’ll discuss the first three only - for Field and Option lists, click the links to go to the specifications for those types of lists.
11.3.10.1. Bulleted Lists
Bulleted lists, also known as “unordered lists”, are simple text blocks between blank lines. A text block that begins with an asterisk (*), plus (+), dash (-), or bullet (•), followed by whitespace, is a bullet list item. However, stick to a consistent character to use for list items. List item bodies must be left-aligned and indented relative to each other like paragraphs; the text immediately after the bullet determines the indentation.
For example, consider the following simple bulleted list example:
- This is the first bullet list item. It is required that
  there be a blank line above the first list item; blank
  lines between list items is optional. Note that each
  subsequent line is indented to group them together.

- This is the first paragraph in the second item in the list.

  This is a second paragraph in the second item in the list. The
  blank line above this paragraph is required. The left edge
  of this paragraph lines up with the paragraph above, both
  indented relative to the bullet.

  - This is a sub-list. The bullet lines up with the left edge
    of the text blocks above. A sublist is a new list, so it requires
    a blank line above and below.

  - This is the second item in the sub-list.

- This is the third item in themain list.

This is a new paragraph, not part of the list.
Here are examples of incorrectly formatted bullet lists:
- This first line is fine.
A blank line is required between list items and paragraphs, so this is bad.

- The following line appears to be a new sublist, but it is not:
  - This is a paragraph continuation, not a sublist (since there's
    no blank line).
   This line is also incorrectly indented.
11.3.10.2. Enumerated Lists
Enumerated lists are similar to bulleted lists, except they can use enumerators. An enumerator consists of an enumeration sequence member and formatting, followed by a whitespace.
The following enumeration sequences are recognized:
Arabic numerals: 1, 2, 3, … (and so on, no upper limit).
Uppercase alphabet characters: A, B, C, …, Z.
Lowercase alphabet characters: a, b, c, …, z.
Uppercase Roman numerals: I, II, III, IV, …, MMMMCMXCIX (4999).
Lowercase Roman numerals: i, ii, iii, iv, …, mmmmcmxcix (4999).
Hashtag (#) - this is known as an auto-enumerator, and uses arabic numerals beginning with 1.
The following formatting is recognized:
Suffixed with a period: “1.”, “A.”, “a.”, “I.”, “i.”, etc…
Surrounded by parenthesis: “(1)”, “(A)”, “(a)”, and so on.
Suffixed with a right-parenthesis: “1)”, “A)”, “a)”, and so on.
The following situations creates new lists:
An enumerator with a different format produces a new list (e.g. “1.”, “(a)” produces two separate lists).
Enumerators not in sequence produces a new list (e.g. “1.”, “3.” produces two separate lists)
Here is an example of an enumerated list:
1. This is item #1
2. This is item #2

   (a) This is item 1 in the sub-list
   (b) This is item 2 in the sub-list

3. This is item #3.
Here is the same list using an auto-enumerator:
#. This is item #1
#. This is item #2
#. Auto-enumerators are useful when adding things
   into lists without having to manually re-number
   or re-order lists.

   (a) This is item 1 in the sub-list

#. This is the fourth item in the main list.
Here is an example of a nested enumerated list:
1. This is Item 1

   a) Item 1a
   b) Item 1b

2. a) Item 2a
   b) Item 2b

3. This item won't be correct, because
this line after is not indented properly
11.3.10.3. Definition Lists
Definition lists are really useful in several ways:
As a dictionary or glossary.
To describe program variables, or other items
Each definition list item contains a term, optional classifiers, and a definition.
A term is a simple one-line word or phrase. If this term leads with a hyphen, use an escape () character before the leading hyphen to prevent recognition as an option list item.
Optional classifiers may follow the term on the same line, each after an inline “ : “ (space, colon, space). Inline markup is parsed in the term line before the classifier delimiters are recognized. A delimiter will only be recognized if it appears outside of any inline markup.
A definition is a block indented relative to the term, and may contain multiple paragraphs and other body elements. There may be no blank line between a term line and a definition block (this distinguishes definition lists from block quotes). Blank lines are required before the first and after the last definition list item, but are optional in-between.
Example:
term 1
    Definition for Term 1
term 2
    Definition for Term 2, first paragraph.
    This is a continued line for the first paragraph.

    Second paragraph for definition of term 2.
Term 3 : classifier
    Definition for term 3.
Term 4 : classifier one : classifier 2
    Definition for Term 4
\-term 5
    Without escaping, this would be an option list item.
Once rendered, this looks like:
- term 1
Definition for Term 1
- term 2
Definition for Term 2, first paragraph. This is a continued line for the first paragraph.
Second paragraph for definition of term 2.
- Term 3classifier
Definition for term 3.
- Term 4classifier oneclassifier 2
Definition for Term 4
- -term 5
Without escaping, this would be an option list item.