VisionPortal Initialization
Overview
Here we describe Step 3, creating a VisionPortal, to allow an OpMode to use AprilTag and/or TensorFlow Object Detection (TFOD). This continues from the previous page Vision Processor Initialization, which described Step 2: creating an AprilTag Processor and/or a TensorFlow Object Detection (TFOD) Processor. The two Processors evaluate camera frames independently.
Steps 1, 2 and 3 are typically performed in the OpMode’s INIT section, before
the waitForStart() method or Block.
After this Step 3, actual use of AprilTag and TFOD can begin – before or after the DS Start button is touched.
VisionPortal Initialization - Easy
The SDK provides an “easy” way to make VisionPortal, using only defaults and not mentioning a “Builder”:

The FTC Blocks VisionPortal toolbox, or palette, offers “Easy Create” Blocks for:
AprilTag or TFOD (or both)
webcam, built-in RC phone camera, or “Switchable Camera Name”
That’s 3 x 3 = 9 total choices, all “Easy”.
VisionPortal myVisionPortal;

// Create a VisionPortal, with the specified camera and AprilTag processor, and assign it to a variable.
myVisionPortal = VisionPortal.easyCreateWithDefaults(hardwareMap.get(WebcamName.class, "Webcam 1"), myAprilTagProcessor);
To also use TFOD in the same OpMode, simply add it like this example:
myVisionPortal = VisionPortal.easyCreateWithDefaults(hardwareMap.get(WebcamName.class, "Webcam 1"), myAprilTagProcessor, myTfodProcessor);
VisionPortal Initialization - Builder
The SDK also provides the “Builder” way to make VisionPortal, allowing custom settings:
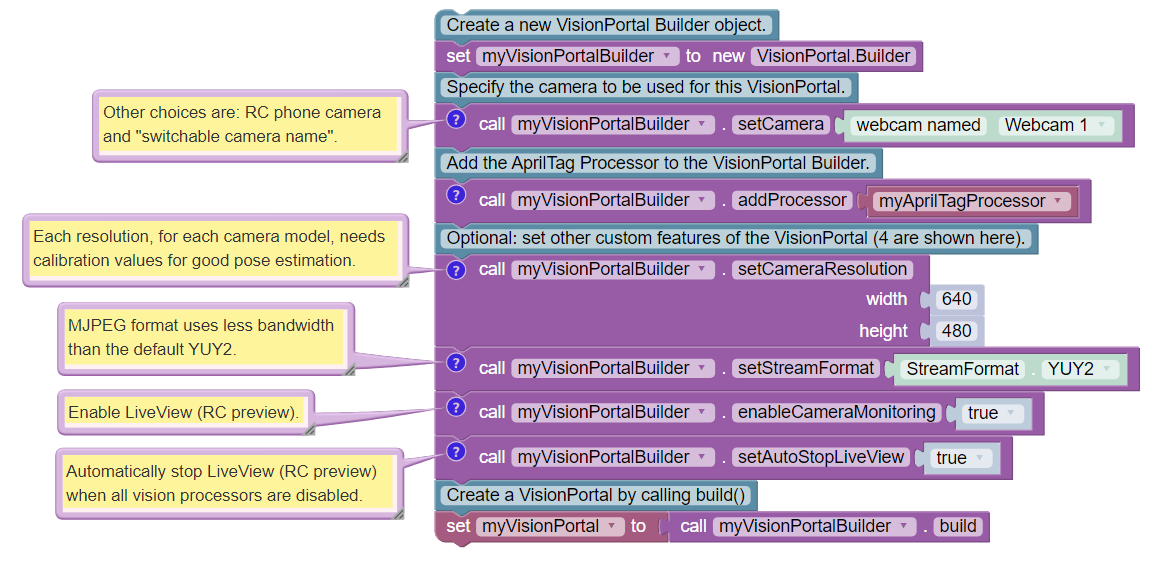
VisionPortal Initialization with a Builder
VisionPortal.Builder myVisionPortalBuilder;
VisionPortal myVisionPortal;

// Create a new VisionPortal Builder object.
myVisionPortalBuilder = new VisionPortal.Builder()

// Specify the camera to be used for this VisionPortal.
myVisionPortalBuilder.setCamera(hardwareMap.get(WebcamName.class, "Webcam 1"));      // Other choices are: RC phone camera and "switchable camera name".

// Add the AprilTag Processor to the VisionPortal Builder.
myVisionPortalBuilder.addProcessor(myAprilTagProcessor);       // An added Processor is enabled by default.

// Optional: set other custom features of the VisionPortal (4 are shown here).
myVisionPortalBuilder.setCameraResolution(new Size(640, 480));  // Each resolution, for each camera model, needs calibration values for good pose estimation.
myVisionPortalBuilder.setStreamFormat(VisionPortal.StreamFormat.YUY2);  // MJPEG format uses less bandwidth than the default YUY2.
myVisionPortalBuilder.enableCameraMonitoring(true);      // Enable LiveView (RC preview).
myVisionPortalBuilder.setAutoStopLiveView(true);     // Automatically stop LiveView (RC preview) when all vision processors are disabled.

// Create a VisionPortal by calling build()
myVisionPortal = myVisionPortalBuilder.build();
This example shows only 4 VisionPortal Builder features; others are available.
To also use TFOD in the same OpMode, simply insert its
addProcessor(myTfodProcessor) Block or Java method.
The SDK allows multiple, fully capable Portals. This is covered separately at the MultiPortal page.
Java Builder Chain
The Builder pattern can be implemented in a streamlined manner, using Java. The following code is equivalent to the above individual method calls.
Comments are omitted here, to clearly illustrate the chaining.
VisionPortal myVisionPortal;

myVisionPortal = new VisionPortal.Builder()
    .setCamera(hardwareMap.get(WebcamName.class, "Webcam 1"))
    .addProcessor(myAprilTagProcessor)
    .setCameraResolution(new Size(640, 480))
    .setStreamFormat(VisionPortal.StreamFormat.YUY2)
    .enableCameraMonitoring(true)
    .setAutoStopLiveView(true)
    .build();
Here the object myVisionPortalBuilder was not created; the build was
performed directly on myVisionPortal. The Builder pattern allows the “dot”
methods to be chained in a single Java statement ending with .build().
Enabling and Disabling Processors
This note is repeated from the previous page 2, Vision Processor Initialization
For a Processor created at Step 2, an OpMode does not need to enable that Processor at this Step 3, VisionPortal Initialization.
The setProcessorEnabled() command is not part of the Builder pattern.
Use setProcessorEnabled( , true) only to re-enable the processor,
after disabling (by setting to false). This topic is covered further
at the Managing CPU and Bandwidth page.
At this page’s Step 3, the addProcessor() command automatically enables
the specified processor. Thus OpModes do not initialize with this, after
Step 2 or 3:

VisionPortal Enabling/Disabling
// Enable or disable the AprilTag processor.
myVisionPortal.setProcessorEnabled(myAprilTagProcessor, true);
Again, use this only to re-enable the processor, after disabling (by setting to false).
Questions, comments and corrections to westsiderobotics@verizon.net