AprilTag Localization
Introduction
In FIRST Tech Challenge (FTC), localization uses sensor inputs to determine the robot’s current place on the game field.
Since 2023, an FTC OpMode can read the pose (position and orientation) of an AprilTag, relative to the camera. An OpMode can also read that AprilTag’s global pose (on the FTC game field), stored as metadata.
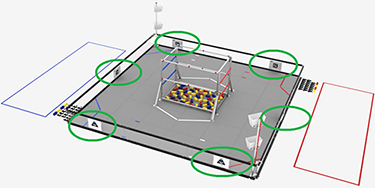
Field locations of AprilTags in INTO THE DEEP
This means it’s possible to calculate the camera’s global pose – namely its position and orientation on the game field.
Furthermore, if the camera’s pose is specified in the robot’s reference frame, then an OpMode can determine the global pose of the robot (on the game field).
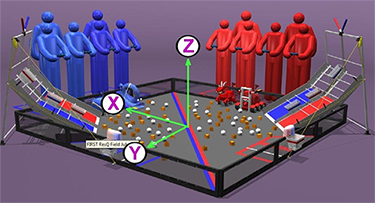
FTC Field Coordinate System
This localization is a calculation to determine the robot’s global position and rotation, based on sensing one or more fixed landmarks – AprilTags in this case.
This capability is provided in 2024 with FTC SDK version 10.0, including a Sample OpMode, thanks to Dryw Wade. This tutorial describes how to use that OpMode.
Configuration
Skip this section if …
the active robot configuration already contains “Webcam 1”, or
using the built-in camera of an Android phone as Robot Controller.
Before starting the programming, REV Control Hub users should make a robot configuration that includes the USB webcam to be used for AprilTag localization.
For now, use the default webcam name, “Webcam 1”. If a different name is preferred, edit the Sample OpMode to agree with the exact webcam name in the robot configuration.
Save and activate that configuration; its name should appear on the paired Driver Station screen.
Open the Sample OpMode
To learn about opening the Sample OpMode, select and read the Blocks or Java section below:
On a laptop or desktop computer connected via Wi-Fi to the Robot Controller, open the Chrome browser. Go to the REV Control Hub’s address http://192.168.43.1:8080 (or http://192.168.49.1:8080 for Android RC phone) and click the Blocks tab.
Click Create New OpMode, enter a new name such as
“AprilTagLocalization_Darlene_v01”, and select the Sample OpMode
ConceptAprilTagLocalization.
If using the built-in camera of an RC phone, change true to false
at the OpMode’s first Block called set USE_WEBCAM.
Save the OpMode, time to try it!
Open your choice of OnBot Java or Android Studio.
In the teamcode folder, add/create a new OpMode with a name such as
“AprilTagLocalization_Oscar_v01.java”, and select the Sample OpMode
ConceptAprilTagLocalization.java.
If using the built-in camera of an RC phone, change true to false
at about line 71 (USE_WEBCAM).
Click “Build”, time to try it!
Run the Sample OpMode
On the Driver Station, select the TeleOp OpMode that you just saved or built.
Aim the camera at an AprilTag from the current FTC game.
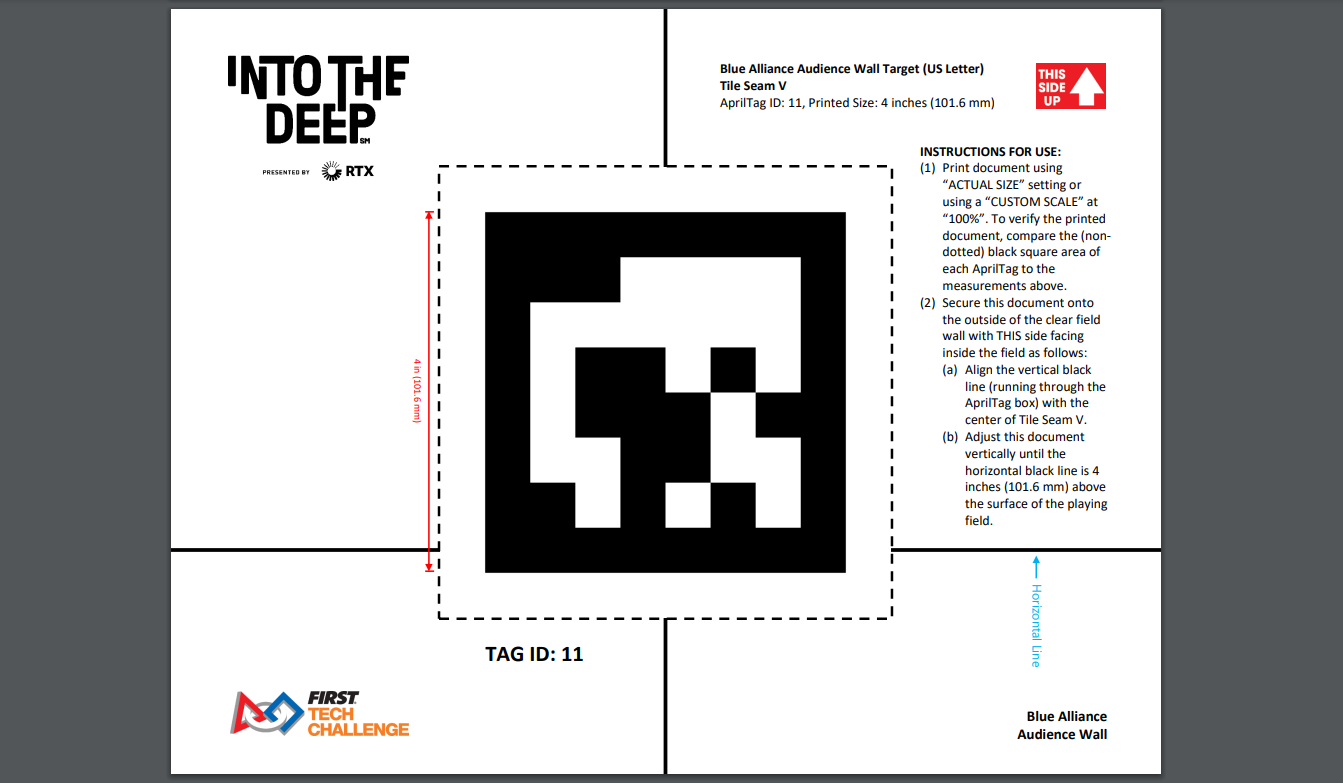
Full AprilTag Image
For real results, testing should be done on an FTC game field with one or more legal AprilTags posted in their correct positions.
For simulated/casual testing, use a loose paper AprilTag of the correct size. Or it may be on a computer screen, with the image zoomed to the correct physical size (4 x 4 inches, in this example):
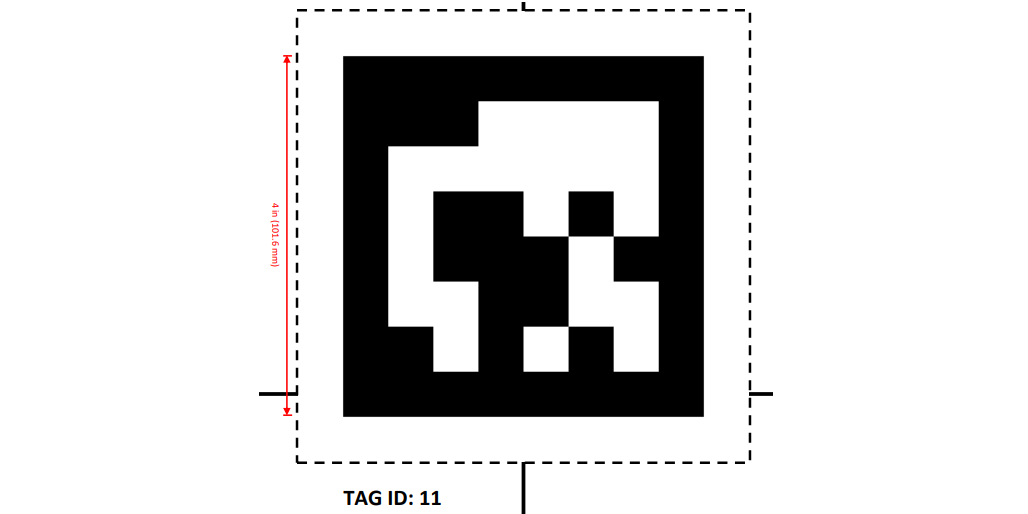
Partial AprilTag Sheet
Touch INIT only. No telemetry will appear, but at this moment the DS Camera Stream preview can be accessed. See the next section re. previews.
After using the preview to aim at the AprilTag, touch the DS Start arrow. The OpMode should give Telemetry showing the localization results:
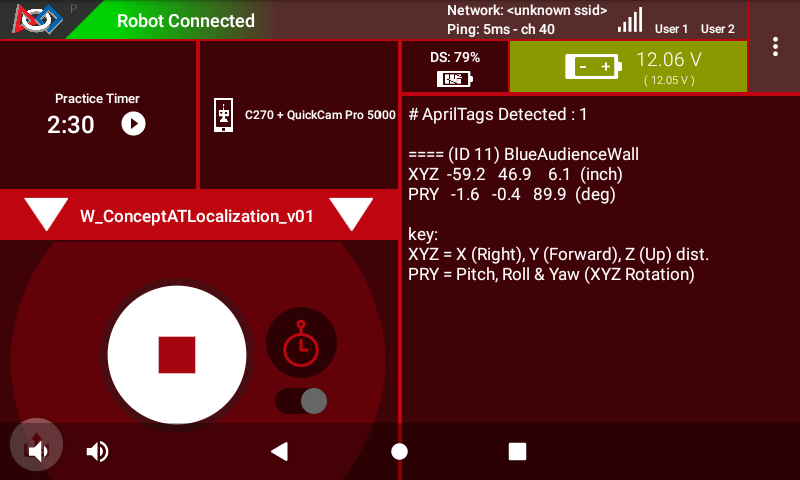
Driver Station Sample Output
These details will be covered in a later section. In this example, the camera is 12 inches directly in front of AprilTag #11 from INTO THE DEEP.
Slowly move the camera around, keeping the AprilTag fully in the camera’s view. The telemetry will update with the camera’s location on the field.
It’s working! Your OpMode can determine the global pose of the camera. A later section describes how to get the global robot pose, based on the camera’s placement on the robot.
Skip the next two sections, if you already know how to use FTC previews.
DS Preview
Before describing the telemetry data, this page offers two sections on seeing the camera’s view of the AprilTag with previews. Previewing is essential for working with robot vision.
On the Driver Station (DS), remain in INIT – don’t touch the Start button.
At the top right corner, touch the 3-dots menu, then Camera Stream. This
shows the camera’s view; tap the image to refresh it.
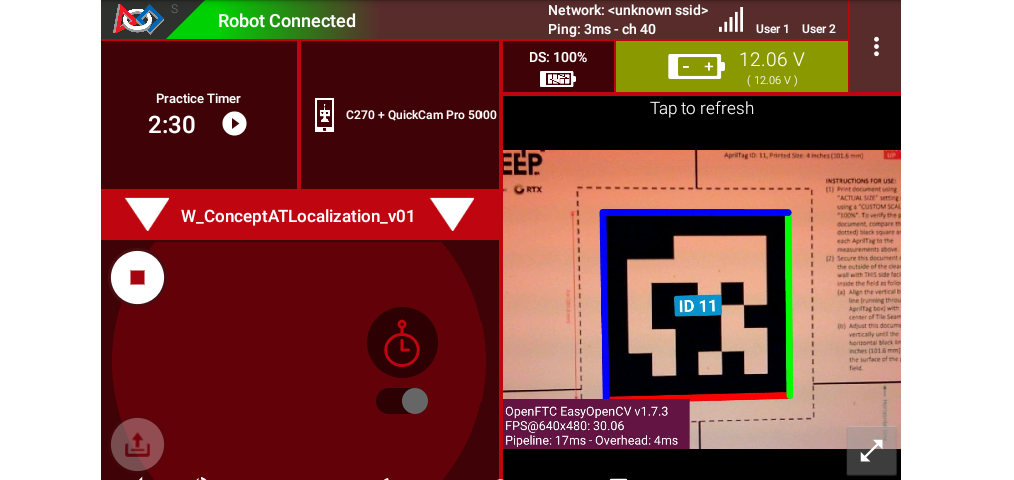
Example of DS Camera Stream
For a BIG preview, touch the arrows at the bottom right corner.
Or, select Camera Stream again, to return to the previous screen and its Telemetry.
RC Preview
The Robot Controller (RC) device also makes a preview, called LiveView.
This is full video, and is shown automatically on the screen of an RC phone.
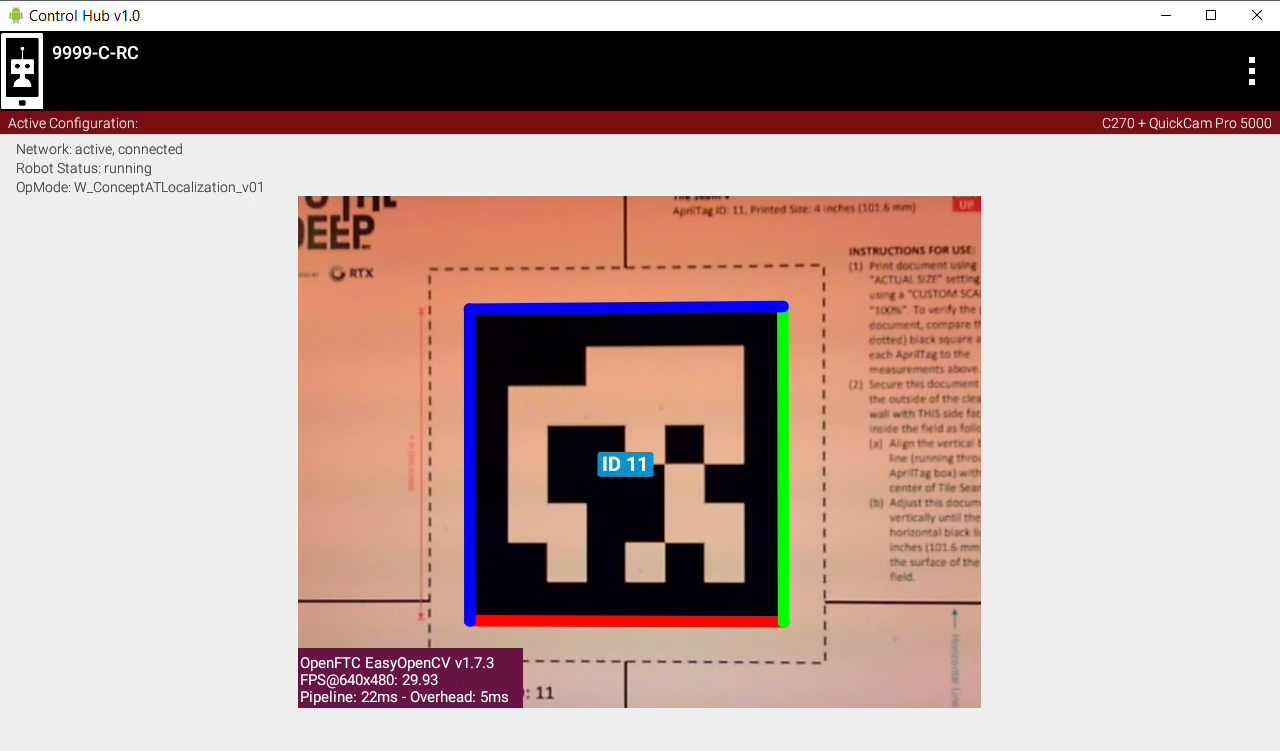
Control Hub Preview
The above preview is from a REV Control Hub.
It has no physical screen, so you must plug in an HDMI monitor or use open-source scrcpy (called “screen copy”) to see the preview on a laptop or computer that’s connected via Wi-Fi to the Control Hub.
Basic Telemetry Data
Let’s look closer at the DS telemetry:
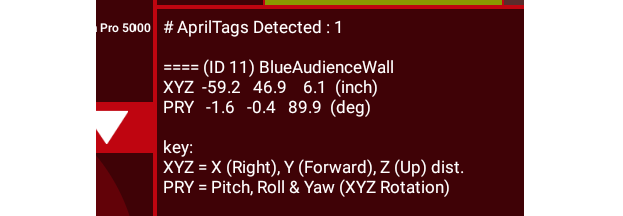
DS Telemetry Example
In this example, the camera is 12 inches directly in front of AprilTag #11 from INTO THE DEEP.
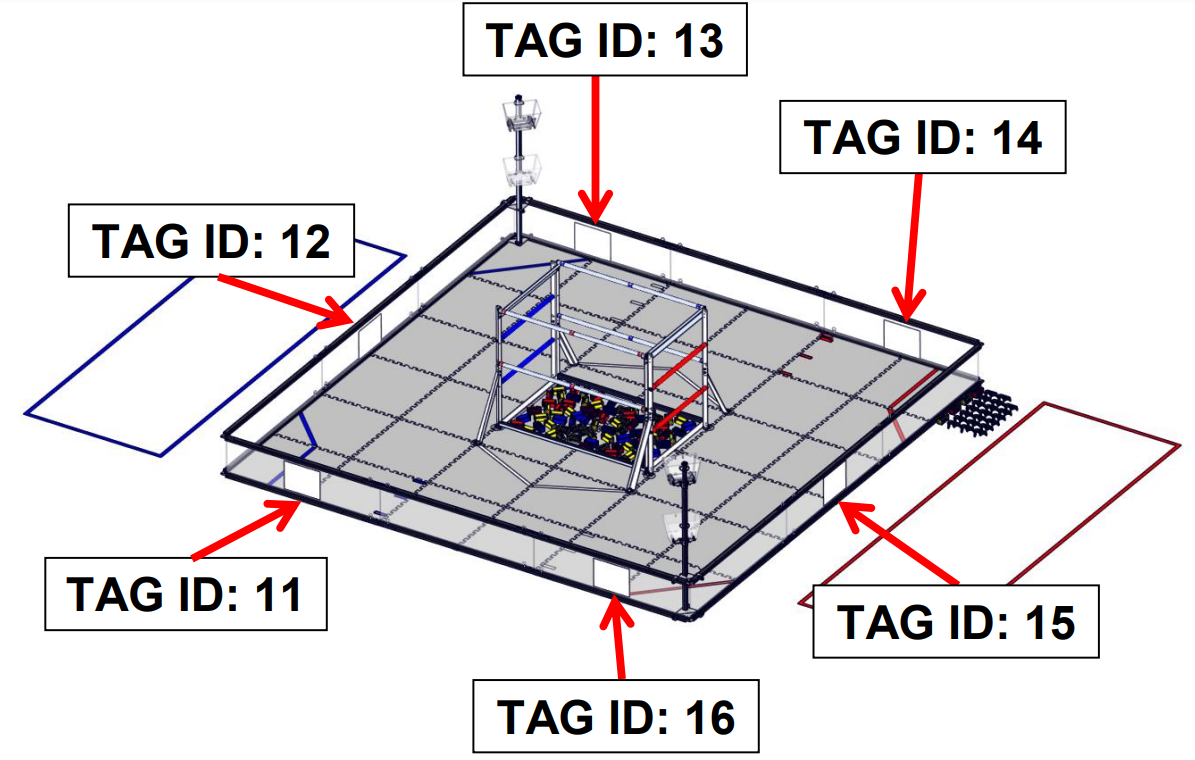
Specific Tag Locations for INTO THE DEEP
The center of AprilTag #11 is at position X = -72 inches from the center of the field. This telemetry gives the camera’s X position as (approximately) -60 inches, namely 12 inches in front of that tag.
The center of AprilTag #11 is at position Y = 48 inches from the center of the field. This telemetry gives the camera’s Y position as (approximately) 48 inches, namely directly aligned (horizontally) with that tag.
The center of AprilTag #11 is at position Z = 5.9 inches (above the mat). This telemetry gives the camera’s Z position as (approximately) 5.9 inches, namely directly aligned (vertically) with that tag.
The camera lens is parallel to the AprilTag, so the Pitch, Roll and Yaw values should be orthogonal (0 or a multiple of 90 degrees). This telemetry confirms the parallel orientation, with PRY values (approximately) 0 or 90 degrees.
Reference Frames
In the above example. the yaw angle is given as (approximately) -90 degrees. But the camera is facing in the negative X direction, thus has a heading or yaw angle of -180 degrees in the official FTC field coordinate system :
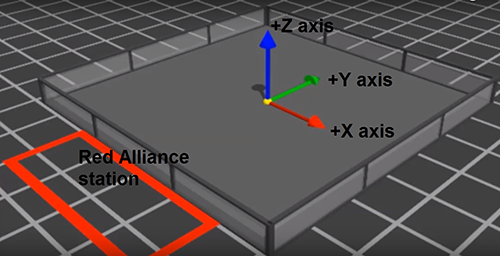
FTC Field Coordinate System
This sample OpMode uses a reference frame (coordinate system) that may be different than what you expect from other FTC navigation applications, including IMU or robot axes , odometry device axes, and the FTC field system (shown above). These differences typically result in basic and obvious changes in axis direction, axis swapping, and orthogonal angles (90-degree increments).
Learn and incorporate these differences into your OpMode, for the given scenario of your AprilTag localization. Manually adjust values as needed to accomplish your specific navigation goals.
Evaluate the accuracy and reliability of AprilTag navigation, with and without offsets, smoothing and other adjustments. Some FTC teams use multiple data sources for navigation. Base your robot strategy on capabilities demonstrated through extensive testing and refinement.
Camera Placement on Robot
The Sample OpMode provides fields to specify the location and orientation of the camera on the robot. The returned data will then represent the global robot pose rather than the camera’s pose.
Subject to the reference frame caveat noted above, do your best to follow these commented instructions, in the Blocks and Java Sample OpModes:
Setting these values requires a definition of the axes of the camera and robot:
Camera axes:
Origin location: Center of the lens
Axes orientation: +x right, +y down, +z forward (from camera’s perspective)
Robot axes: (this is typical, but you can define this however you want)
Origin location: Center of the robot at field height
Axes orientation: +x right, +y forward, +z upward
Position:
If all values are zero (no translation), that implies the camera is at the center of the robot. Suppose your camera is positioned 5 inches to the left, 7 inches forward, and 12 inches above the ground - you would need to set the position to (-5, 7, 12).
Orientation:
If all values are zero (no rotation), that implies the camera is pointing straight up. In most cases, you’ll need to set the pitch to -90 degrees (rotation about the x-axis), meaning the camera is horizontal. Use a yaw of 0 if the camera is pointing forwards, +90 degrees if it’s pointing straight left, -90 degrees for straight right, etc. You can also set the roll to +/-90 degrees if it’s vertical, or 180 degrees if it’s upside-down.
To see the commands for setting camera pose (on the robot), select and read the Blocks or Java section below:
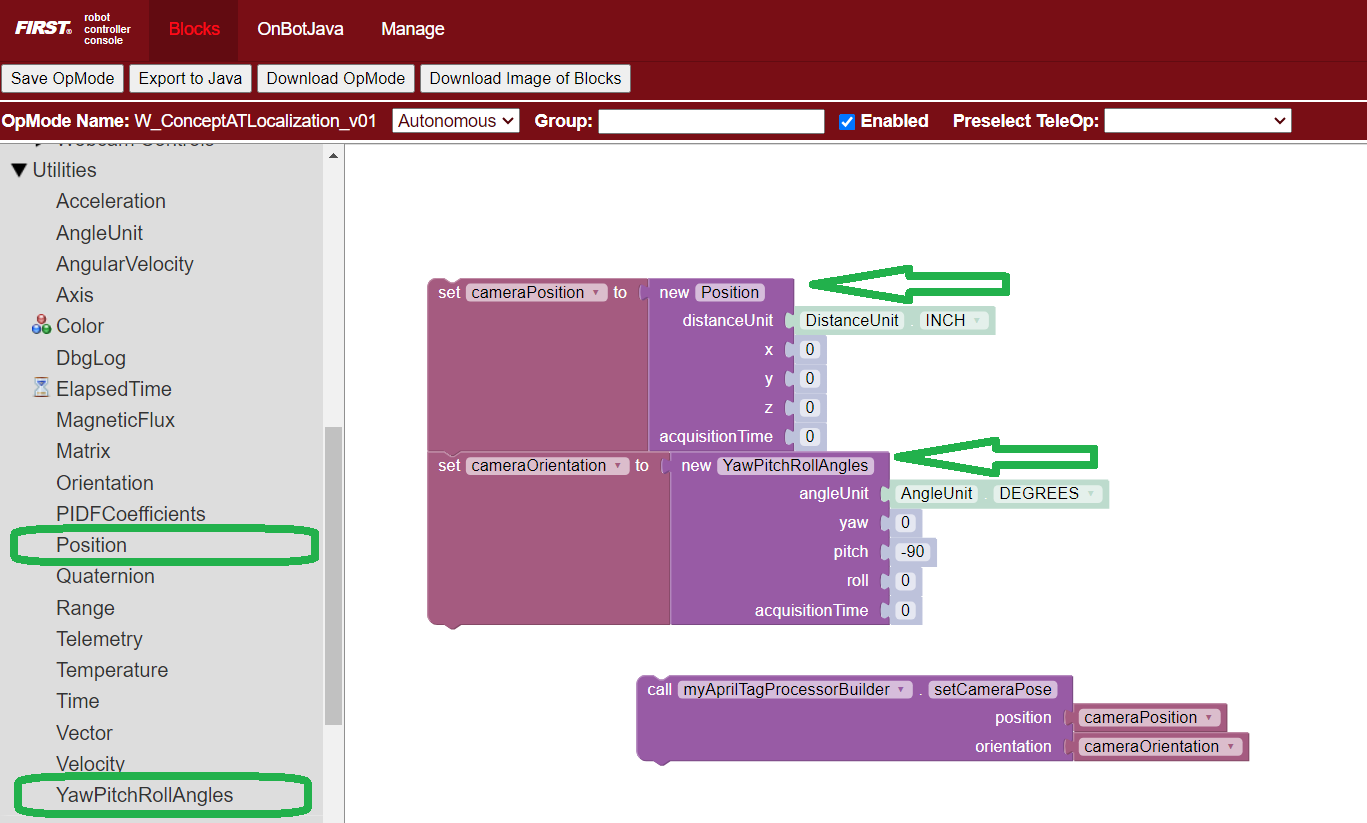
The third Block called .setCameraPose can be found in the toolbox
under Vision/AprilTag/AprilTagProcessor.Builder.
These lines show that the camera placement on the robot becomes part of the AprilTag Processor, through the Java Builder pattern.
import org.firstinspires.ftc.robotcore.external.navigation.Position;
import org.firstinspires.ftc.robotcore.external.navigation.YawPitchRollAngles;
.
Position cameraPosition = new Position(DistanceUnit.INCH, 0, 0, 0, 0);
YawPitchRollAngles cameraOrientation = new YawPitchRollAngles(AngleUnit.DEGREES, 0, -90, 0, 0);
.
AprilTagProcessor aprilTag = new AprilTagProcessor.Builder()
      .setCameraPose(cameraPosition, cameraOrientation)
      .build();
Reading Global Pose
To see the commands for reading global robot pose data, select and read the Blocks or Java section below:
These green Blocks can be assigned to position Variables, for later use.
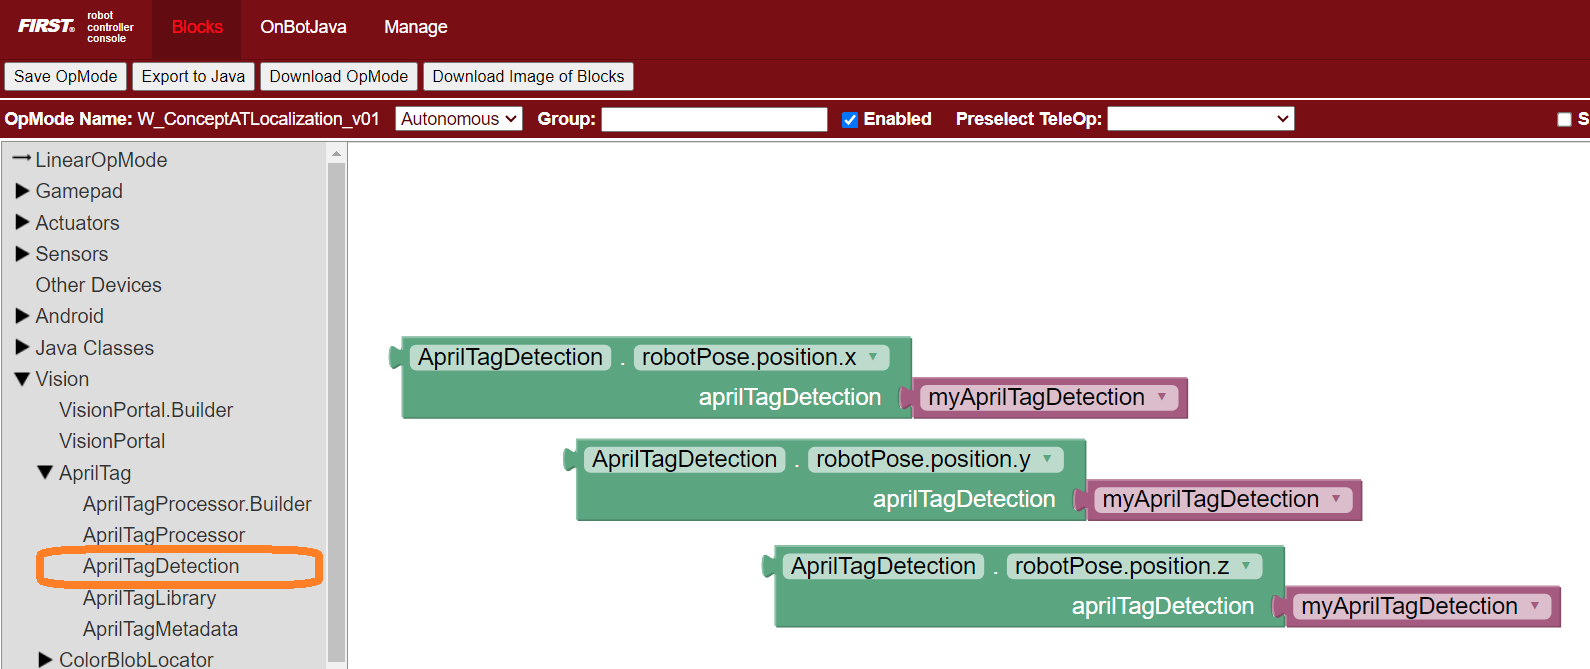
Robot Position Blocks
These green Blocks can be assigned to orientation Variables, for later use.
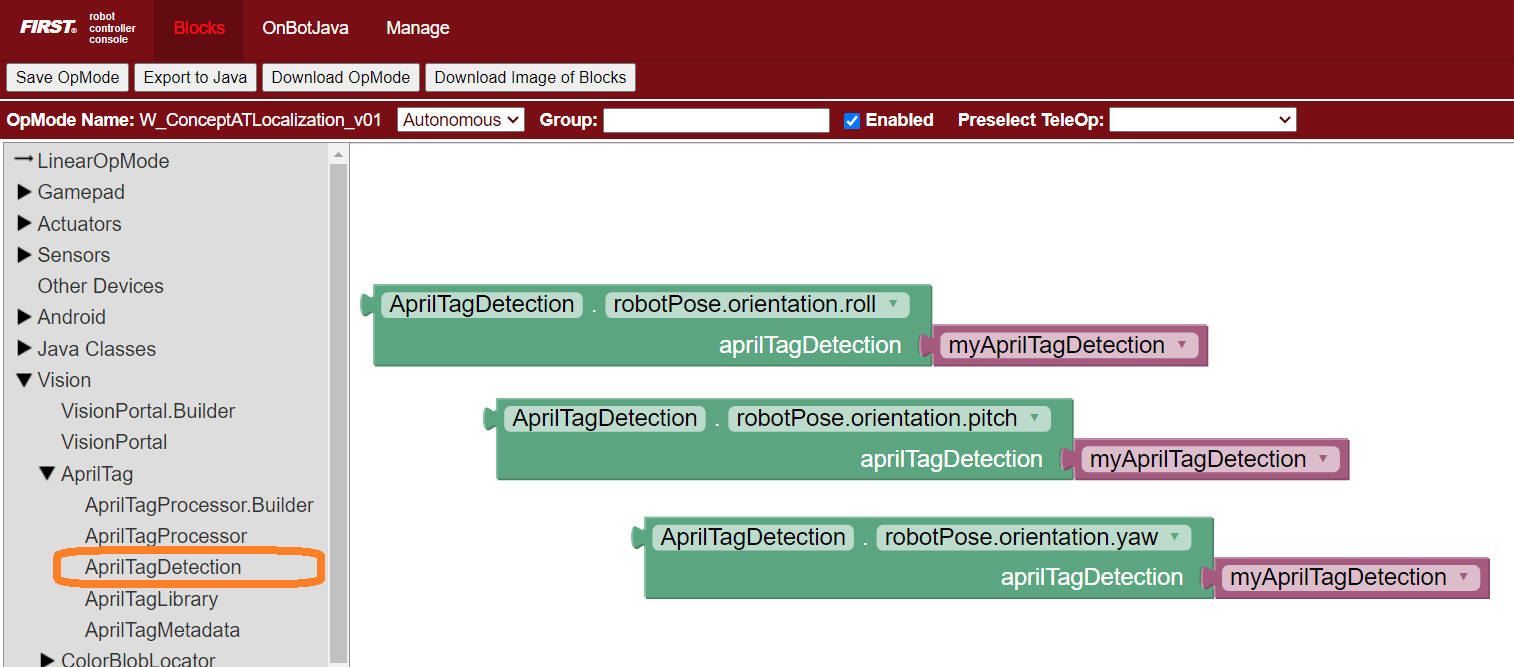
Robot Orientation Blocks
These lines demonstrate assigning position and orientation values to
variables, for later use. These are typically “instant” values inside a
for loop, as used in the Sample OpMode.
import org.firstinspires.ftc.vision.apriltag.AprilTagDetection;
.
AprilTagDetection detection;
.
double myX = detection.robotPose.getPosition().x;
double myY = detection.robotPose.getPosition().y;
double myZ = detection.robotPose.getPosition().z;
.
double myPitch = detection.robotPose.getOrientation().getPitch(AngleUnit.DEGREES);
double myRoll = detection.robotPose.getOrientation().getRoll(AngleUnit.DEGREES);
double myYaw = detection.robotPose.getOrientation().getYaw(AngleUnit.DEGREES);
Summary
The 2024 FTC software allows robot localization using a camera and fixed AprilTags on the field. This is done by combining three elements:
basic AprilTag pose data,
the tag’s built-in metadata, and
the camera’s pose on the robot.
AprilTag localization uses a reference frame (coordinate system) that may differ from others, such as IMU or robot axes, odometry device axes, and the FTC field system. Adjust as needed.
Evaluate this navigation tool against other choices, and plan a robot strategy based on demonstrated capability.
Best of luck as you develop FTC robot navigation to reach your goals!