Vision Processor Initialization
Processor Initialization - Overview
Your OpMode must first prepare for using AprilTag and/or Color Processing commands, or methods.
In the INIT portion of your Java or Blocks code, before waitForStart(), use
these steps:
Step 1. Optional:
Supplement the default AprilTag Library with additional tags. This task is not shown in the Sample OpModes, and is covered at the Library page (not here).
Step 2. Required:
Create the AprilTag Processor (or the Color Locator or Color Sensor Processor), to analyze frames streaming in from the camera. “Under the hood”, the Apriltag Processor is attached to an EOCV pipeline, which performs various steps, in order, to each stream frame. The stream is the input to the pipeline. A similar process happens for Color Processing.
Step 3. Required:
Create the FTC VisionPortal, to manage the overall pipeline. Here you specify that the Portal includes the AprilTag and/or TFOD Processor(s) from Step 2. The two Processors evaluate camera frames independently.
This page describes Step 2 in more detail, for both Processors. The VisionPortal Init page covers Step 3, VisionPortal Initialization.
AprilTag Initialization - Easy
Step 2 is creating the AprilTag Processor, software that evaluates frames streaming in from the camera.
The SDK provides an “easy” way to create the processor, using only defaults and not mentioning a “Builder”:
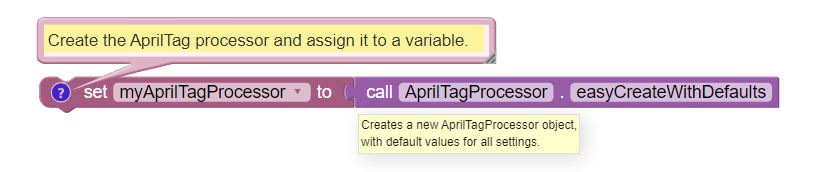
Easy AprilTag Processor Initialization without a Builder
Example of Easy AprilTag Processor Initialization without a Builder
AprilTagProcessor myAprilTagProcessor;
// Create the AprilTag processor and assign it to a variable.
myAprilTagProcessor = AprilTagProcessor.easyCreateWithDefaults();
AprilTag Initialization - Builder
The SDK also provides the “Builder” way to create the processor, allowing custom settings.
Builder is a Java pattern or structure for adding features or parameters,
finalized with the .build() command. Such features are not modified
later during an OpMode.
Inside the SDK, even the “easy” process uses the Builder pattern to set the default parameters.
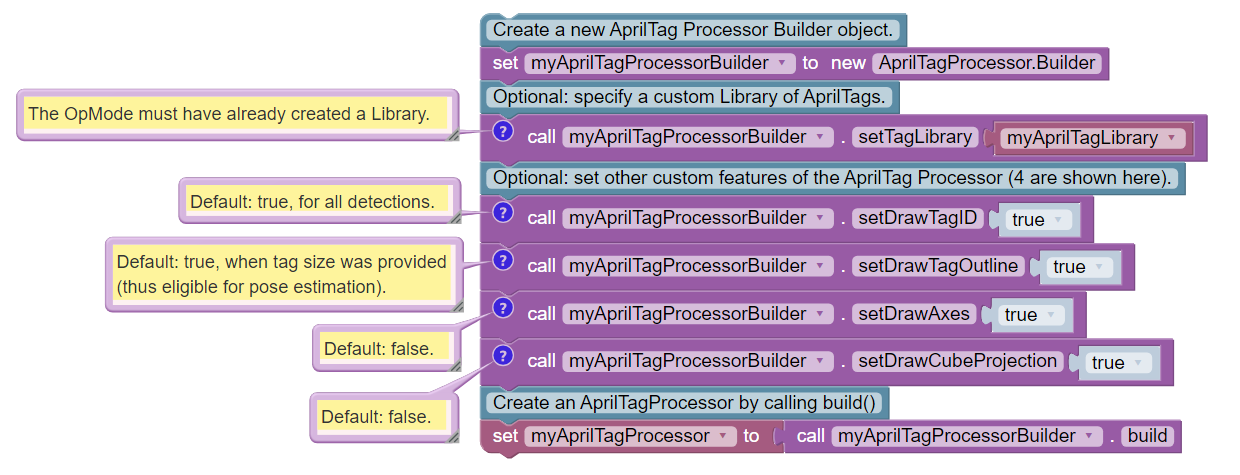
AprilTag Processor Initialization with a Builder
AprilTagProcessor.Builder myAprilTagProcessorBuilder;
AprilTagProcessor myAprilTagProcessor;

// Create a new AprilTag Processor Builder object.
myAprilTagProcessorBuilder = new AprilTagProcessor.Builder();

// Optional: specify a custom Library of AprilTags.
myAprilTagProcessorBuilder.setTagLibrary(myAprilTagLibrary);   // The OpMode must have already created a Library.

// Optional: set other custom features of the AprilTag Processor (4 are shown here).
myAprilTagProcessorBuilder.setDrawTagID(true);       // Default: true, for all detections.
myAprilTagProcessorBuilder.setDrawTagOutline(true);  // Default: true, when tag size was provided (thus eligible for pose estimation).
myAprilTagProcessorBuilder.setDrawAxes(true);        // Default: false.
myAprilTagProcessorBuilder.setDrawCubeProjection(true);        // Default: false.

// Create an AprilTagProcessor by calling build()
myAprilTagProcessor = myAprilTagProcessorBuilder.build();
This example shows only 4 AprilTag Processor Builder features; others are available.
As seen above, Step 2 must specify any custom (non-default) Library from the optional Step 1 - otherwise the Processor will include only the default Library.
AprilTag Java Builder Chain
The Builder pattern can be implemented in a streamlined manner, using Java. The following code is equivalent to the above individual method calls.
Comments are omitted here, to clearly illustrate the chaining.
AprilTagProcessor myAprilTagProcessor;

myAprilTagProcessor = new AprilTagProcessor.Builder()
    .setTagLibrary(myAprilTagLibrary)
    .setDrawTagID(true)
    .setDrawTagOutline(true)
    .setDrawAxes(true)
    .setDrawCubeProjection(true)
    .build();
Here the object myAprilTagProcessorBuilder was not created; the build was
performed directly on myAprilTagProcessor. The Builder pattern allows the
“dot” methods to be chained in a single Java statement ending with .build().
Color Processing Initialization
Step 2 is similar for creating the Color Sensor/Locator Processor, software that evaluates frames streaming in from the camera.
The Builder is going to look a little different depending on if you are using the Color Sensor or the Color Locator. For more information, see the Color Processing Documentation.
Enabling and Disabling Processors
For a Processor created here at Step 2, an OpMode does not need to enable that Processor at the following Step 3, VisionPortal Initialization.
The setProcessorEnabled() command is not part of the Builder pattern.
Use setProcessorEnabled( , true) only to re-enable the processor,
after disabling (by setting to false). This topic is covered further
at the Managing CPU and Bandwidth page.
At the following page’s Step 3, the addProcessor() command automatically
enables the specified processor. Thus OpModes do not initialize with
this, after Step 2:

Enable or Disable AprilTag Processor
Again, use this only to re-enable the processor, after disabling (by setting to false).
// Enable or disable the AprilTag processor.
myVisionPortal.setProcessorEnabled(myAprilTagProcessor, true);
Again, use this only to re-enable the processor, after disabling (by setting to false).
Questions, comments and corrections to westsiderobotics@verizon.net