Java Custom Model Sample OpMode for TFOD
Introduction
This tutorial describes the regular, or Builder, version of the FTC Java Sample OpMode for TensorFlow Object Detection (TFOD).
This Sample, called “ConceptTensorFlowObjectDetection.java”, can recognize official or custom FTC game elements and provide their visible size and position. It uses the Java Builder pattern to customize standard/default TFOD settings.
This is not the same as the “Easy” version, which uses only default settings and official/built-in TFOD model(s), described here:
For the 2023-2024 game CENTERSTAGE, the official game element is a hexagonal white Pixel. The FTC SDK software contains a TFOD model of this object, ready for recognition.
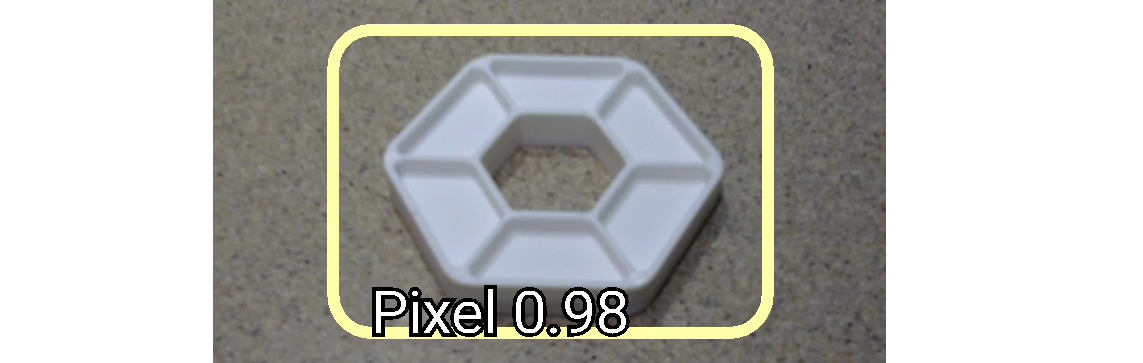
Example Pixel Recognition using TFOD
For extra points, FTC teams may instead use their own custom TFOD models of game elements, called Team Props in CENTERSTAGE.
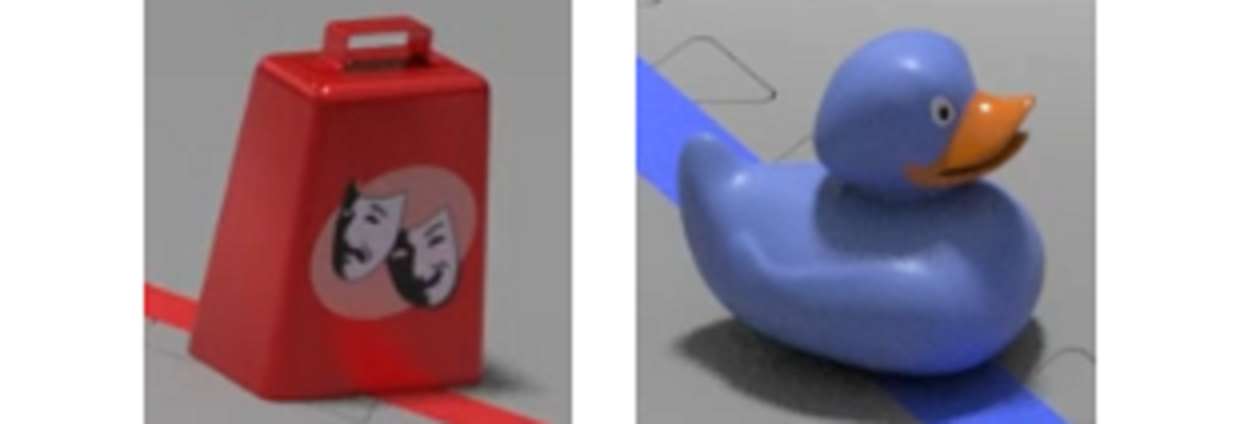
Example Team Props
This tutorial shows OnBot Java screens. Users of Android Studio can follow along with a few noted exceptions, since the Sample OpMode is exactly the same.
Creating the OpMode
At the FTC OnBot Java browser interface, click on the large black plus-sign icon “Add File”, to open the New File dialog box.
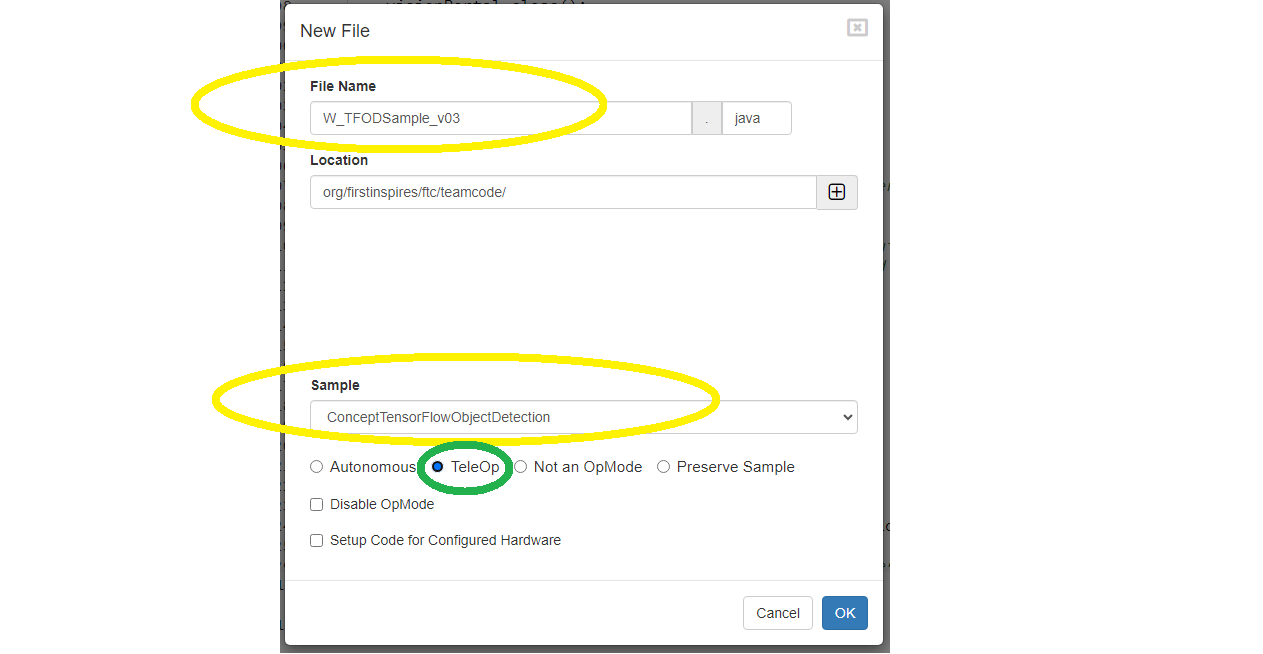
Example New File Dialog
Specify a name for your new OpMode. Select “ConceptTensorFlowObjectDetection” as the Sample OpMode to be the template for your new OpMode.
This Sample has optional gamepad inputs, so it could be designated as a TeleOp OpMode (see green oval above).
Click “OK” to create your new OpMode.
Android Studio users should follow the commented instructions to
copy this class from the Samples folder to the Teamcode folder, with a
new name. Also remove the @Disabled annotation, to make the OpMode
visible in the Driver Station list.
The new OpMode should appear in the editing window of OnBot Java.
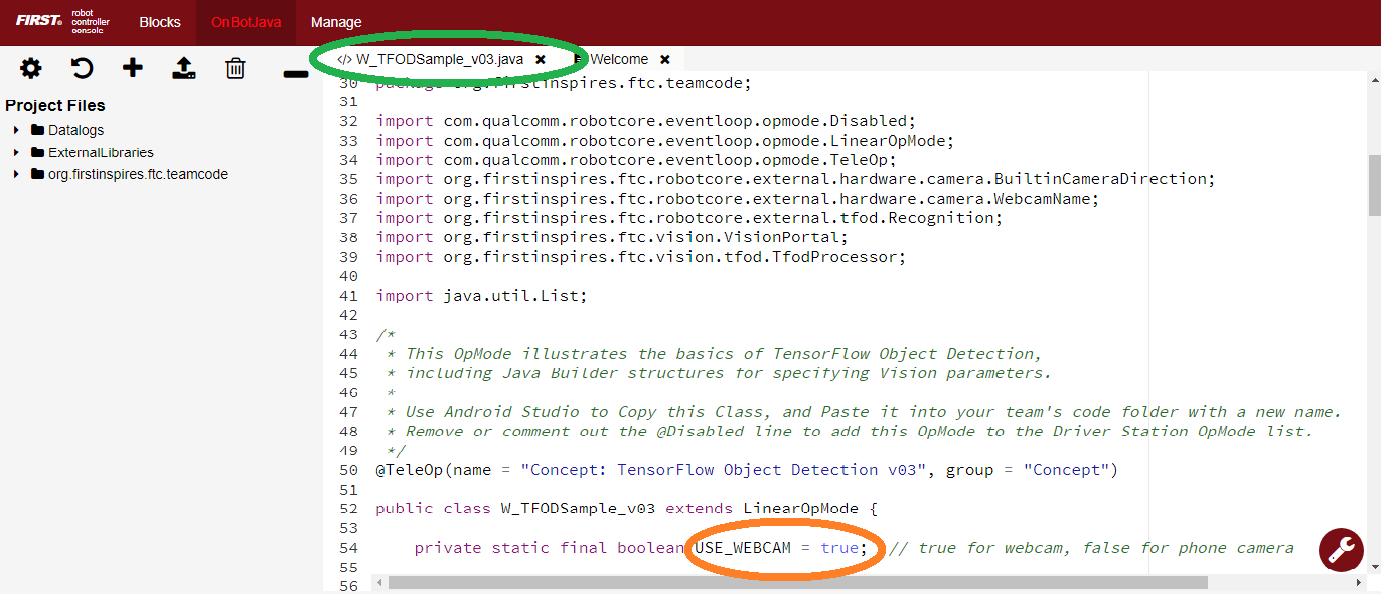
Sample Open Dialog
By default, the Sample OpMode assumes you are using a webcam, configured
as “Webcam 1”. If instead you are using the built-in camera on your
Android RC phone, change the USE_WEBCAM Boolean from true to
false (orange oval above).
Preliminary Testing
This Sample OpMode is ready to use, for detecting the default/built-in model (white Pixel for CENTERSTAGE).
If Android Studio users get a DS error message “Loading model from asset failed”, skip to the next section “Downloading the Model”.
Click the “Build Everything” button (wrench icon at lower right), and wait for confirmation “BUILD SUCCESSFUL”.
If Build is prevented by some other OpMode having errors/issues, they must be fixed before your new OpMode can run. For a quick fix, you could right-click on that filename and choose “Disable/Comment”. This “comments out” all lines of code, effectively removing that file from the Build. That file can be re-activated later with “Enable/Uncomment”.
In Android Studio (or OnBot Java), you can open a problem class/OpMode and type CTRL-A and CTRL-/ to select and “comment out” all lines of code. This is reversible with CTRL-A and CTRL-/ again.
Now run your new OpMode from the Driver Station (in the TeleOp list, if so designated). The OpMode should recognize any CENTERSTAGE white Pixel within the camera’s view, based on the trained TFOD model.
For a preview during the INIT phase, touch the Driver Station’s 3-dot menu and select Camera Stream.

Sample DS Camera Stream
Camera Stream is not live video; tap to refresh the image. Use the small white arrows at bottom right to expand or revert the preview size. To close the preview, choose 3-dots and Camera Stream again.
After the DS START button is touched, the OpMode displays Telemetry for any recognized Pixel(s):
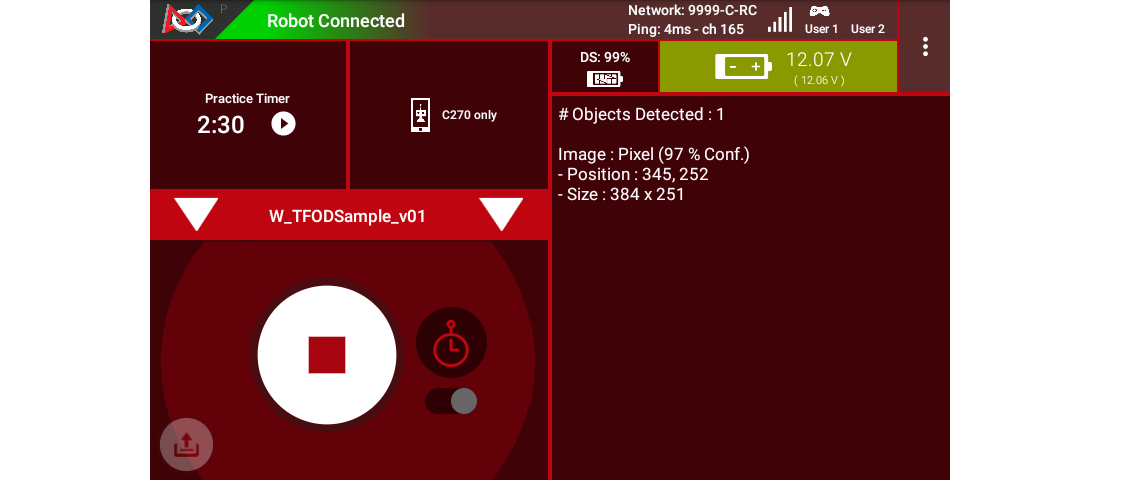
Sample DS Telemetry
The above Telemetry shows the Label name, and TFOD recognition confidence level. It also gives the center location and size (in pixels) of the Bounding Box, which is the colored rectangle surrounding the recognized object.
The pixel origin (0, 0) is at the top left corner of the image.
Before and after DS START is touched, the Robot Controller provides a video preview called LiveView.
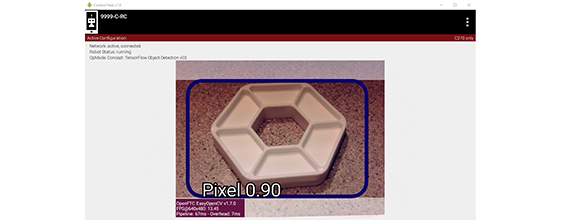
Sample RC LiveView
For Control Hub (with no built-in screen), plug in an HDMI monitor or
learn about scrcpy (https://github.com/Genymobile/scrcpy). The
above image is a LiveView screenshot via scrcpy.
If you don’t have a physical Pixel on hand, try pointing the camera at this image:
Sample Pixel
Congratulations! At this point the Sample OpMode and your camera are working properly. Ready for a custom model?
Downloading the Model
Now we describe how to load a trained inference model in the form of a
TensorFlow Lite (.tflite) file.
Instead of an actual custom model, here we use the standard FTC model of the white Pixel from CENTERSTAGE (2023-2024). Later, your team will follow this same process with your custom TFOD model, specifying its filename and labels (objects to recognize).
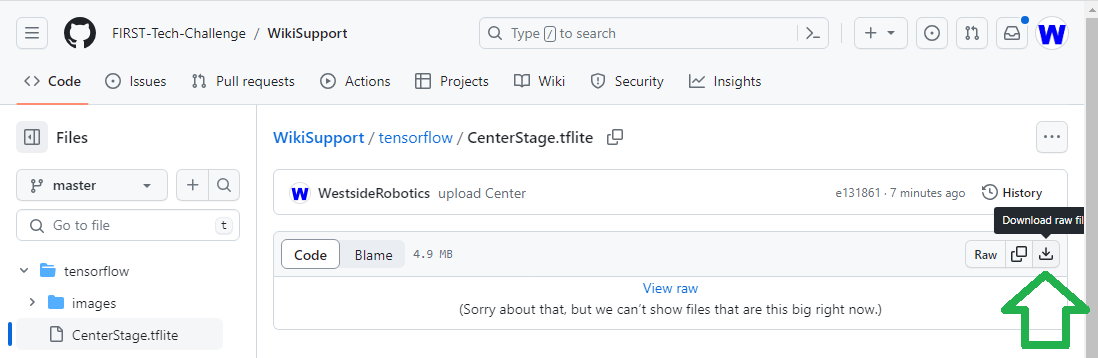
The standard .tflite file (white Pixel) is available on GitHub at
the following link:
CENTERSTAGE TFLite File (https://github.com/FIRST-Tech-Challenge/WikiSupport/blob/master/tensorflow/CenterStage.tflite)
Note
Very advanced teams could use Google’s TensorFlow Object Detection API (https://github.com/tensorflow/models/tree/master/research/object_detection) to create their own custom inference model.
Click the “Download Raw File” button to download the
CenterStage.tflite file from GitHub to your local device
(e.g. laptop). See the green arrow.
Public Repo
Uploading to the Robot Controller
Next, OnBot Java users will upload the TFOD model to the Robot Controller. Connect your laptop to your Robot Controller’s wireless network, open the Chrome browser, and navigate to the FTC “Manage” page:
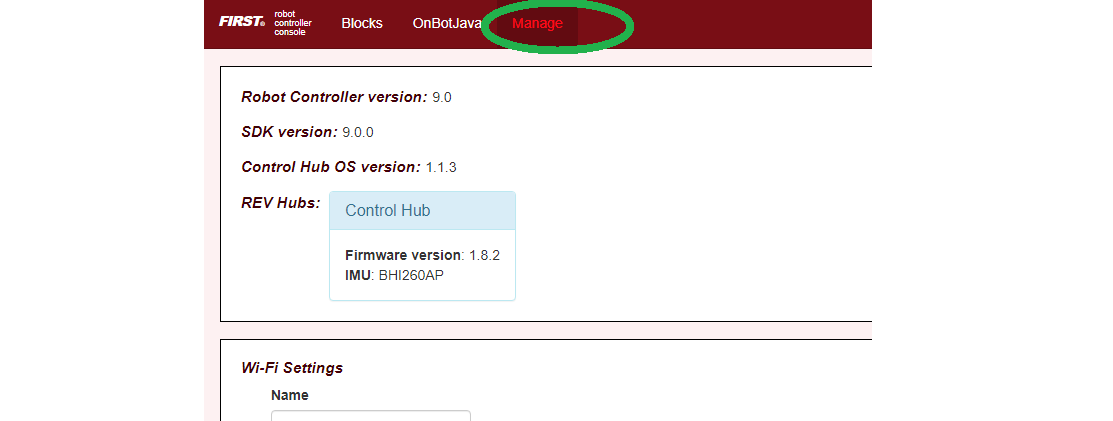
Robot Controller Manage Page
Android Studio users should instead skip to the instructions at the bottom of this section.
Scroll down and click on “Manage TensorFlow Lite Models”.
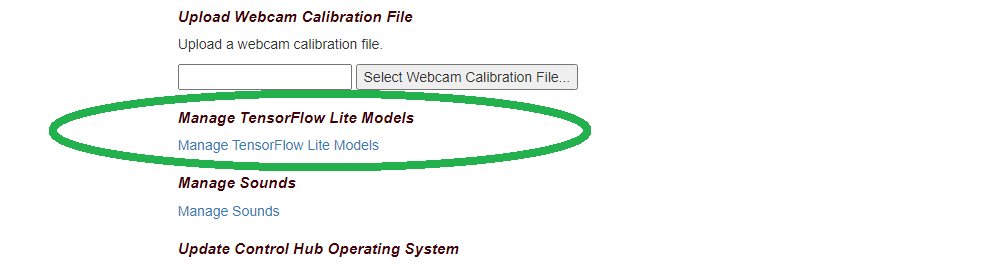
TensorFlow Lite Model Management
Now click the “Upload Models” button.
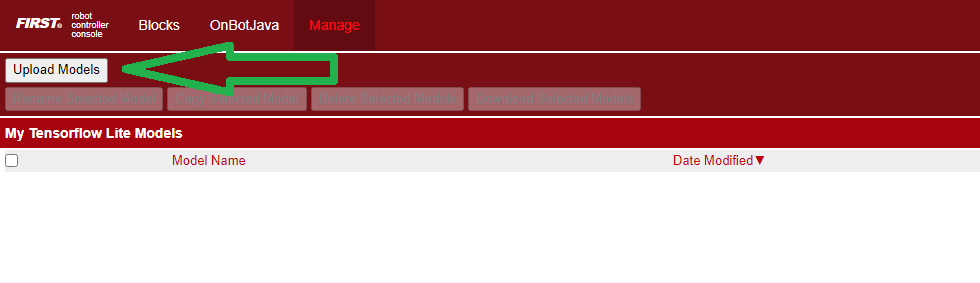
Upload Models
Click “Choose Files”, and use the dialog box to find and select the
downloaded CenterStage.tflite file.

Choose Files
Now the file will upload to the Robot Controller. The file will appear in the list of TensorFlow models available for use in OpModes.
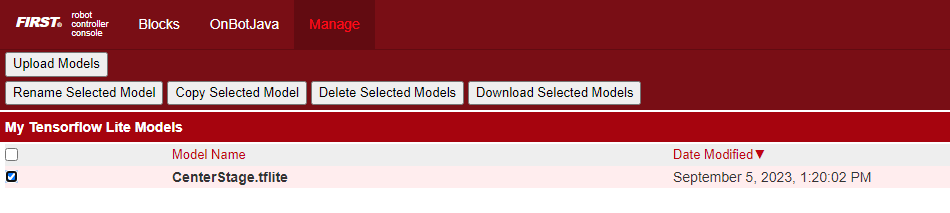
CENTERSTAGE TFLITE File Uploaded
Android Studio users should instead store the TFOD model in the
project assets folder. At the left side, look under
FtcRobotController for the folder assets. If it’s missing,
right-click FtcRobotController, choose New, Directory and
src\main\assets. Right-click assets, choose Open In and
Explorer, then copy/paste your .tflite file into that assets
folder.
Basic OpMode Settings
This Sample OpMode can now be modified, to detect the uploaded TFOD model.
Again, this tutorial uploaded the standard TFOD model (white Pixel for CENTERSTAGE), just to demonstrate the process. Use the same steps for your custom TFOD model.
First, change the filename here:
private static final String TFOD_MODEL_FILE = "/sdcard/FIRST/tflitemodels/myCustomModel.tflite";
to this:
private static final String TFOD_MODEL_FILE = "/sdcard/FIRST/tflitemodels/CenterStage.tflite";
Later, you can change this filename back to the actual name of your custom TFOD model. Here we are using the default (white Pixel) model just downloaded.
Android Studio users should instead verify or store the TFOD model in the project assets folder as noted above, and use:
private static final String TFOD_MODEL_ASSET = "CenterStage.tflite";
OR (for a custom model)
private static final String TFOD_MODEL_ASSET = "MyModelStoredAsAsset.tflite";
For this example, the following line does not need to be changed:
// Define the labels recognized in the model for TFOD (must be in training order!)
private static final String[] LABELS = {
   "Pixel",
};
… because “Pixel” is the correct and only TFOD Label in the standard model file.
Later, you might have custom Labels like “myRedProp” and “myBlueProp” (for CENTERSTAGE). The list should be in alphabetical order and contain the labels in the dataset(s) used to make the TFOD model.
Next, scroll down to the Java method initTfod().
Here is the Java Builder pattern, used to specify various settings for the TFOD Processor.
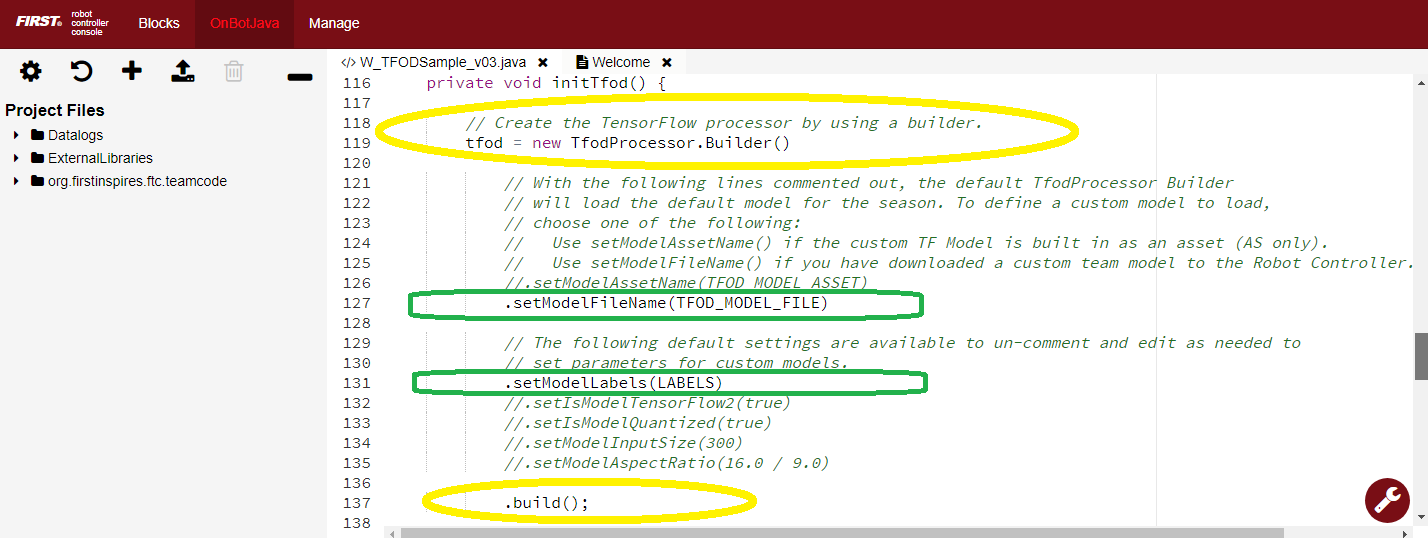
Builder Pattern Settings
The yellow ovals indicate its distinctive features: create the
Processor object with new Builder(), and close/finalize with the
.build() method.
This is the streamlined version of the Builder pattern. Notice all the
.set methods are “chained” to form a single Java expression, ending
with a semicolon after .build().
Uncomment two Builder lines, circled above in green:
.setModelFileName(TFOD_MODEL_FILE)
.setModelLabels(LABELS)
Android Studio users should instead uncomment the lines
.setModelAssetName(TFOD_MODEL_ASSET) and
.setModelLabels(LABELS).
These Builder settings tell the TFOD Processor which model and labels to use for evaluating camera frames.
That’s it! You are ready to test this Sample OpMode again, this time using a “custom” (uploaded) TFOD model.
Testing with Custom Model
In OnBot Java, click the “Build Everything” button (wrench icon at lower right), and wait for confirmation “BUILD SUCCESSFUL”.
Now run your updated OpMode from the Driver Station. The OpMode should recognize objects within the camera’s view, based on the trained TFOD model.
Test the Camera Stream preview during the INIT phase.
Sample DS Camera Stream
Tap to refresh the image. Expand or revert the preview size as needed. Close the preview, with 3-dots and Camera Stream again.
After the DS START button is touched, the OpMode displays Telemetry for any recognized object(s):
Sample DS Telemetry
The above Telemetry shows the Label name, and TFOD recognition confidence level. It also gives the center location and size (in pixels) of the Bounding Box, which is the colored rectangle surrounding the recognized object.
Also test the RC’s video LiveView, using HDMI or
scrcpy (https://github.com/Genymobile/scrcpy):
Sample RC LiveView
For a large view of this standard model, right-click the image to open in a new browser tab:
Sample Pixel
When your team creates, uploads and specifies a custom model containing red and blue Team Props, the OpMode will recognize and process those – instead of the standard model shown here.
Program Logic and Initialization
How does this simple OpMode work?
During the INIT stage (before DS START is touched), this OpMode calls a method to initialize the TFOD Processor and the FTC VisionPortal.
After DS START is touched, the OpMode runs a continuous loop, calling a method to display telemetry about any TFOD recognitions.
The OpMode also contains optional features to remind teams about CPU resource management, useful in vision processing.
You’ve already seen the first part of the method initTfod() which
uses a streamlined, or “chained”, sequence of Builder commands to create
the TFOD Processor.
The second part of that method uses regular, non-chained, Builder commands to create the VisionPortal.
// Create the vision portal by using a builder.
VisionPortal.Builder builder = new VisionPortal.Builder();

// Set the camera (webcam vs. built-in RC phone camera).
if (USE_WEBCAM) {
   builder.setCamera(hardwareMap.get(WebcamName.class, "Webcam 1"));
} else {
   builder.setCamera(BuiltinCameraDirection.BACK);
}

// Choose a camera resolution. Not all cameras support all resolutions.
builder.setCameraResolution(new Size(640, 480));

// Enable the RC preview (LiveView).  Set "false" to omit camera monitoring.
builder.enableLiveView(true);

// Set the stream format; MJPEG uses less bandwidth than default YUY2.
builder.setStreamFormat(VisionPortal.StreamFormat.YUY2);

// Choose whether or not LiveView stops if no processors are enabled.
// If set "true", monitor shows solid orange screen if no processors enabled.
// If set "false", monitor shows camera view without annotations.
builder.setAutoStopLiveView(false);

// Set and enable the processor.
builder.addProcessor(tfod);

// Build the Vision Portal, using the above settings.
visionPortal = builder.build();
All settings have been uncommented here, to see them more easily.
Here the new Builder() creates a separate VisionPortal.Builder
object called builder, allowing traditional/individual Java method
calls for each setting. For the streamlined “chained” TFOD process, the
new Builder() operated directly on the TFOD Processor called
tfod, without creating a TfodProcessor.Builder object. Both
approaches are valid.
Notice the process again closes with a call to the .build()
method.
Telemetry Method
After DS START is touched, the OpMode continuously calls this method to display telemetry about any TFOD recognitions:
/**
  * Add telemetry about TensorFlow Object Detection (TFOD) recognitions.
  */
private void telemetryTfod() {

    List<Recognition> currentRecognitions = tfod.getRecognitions();
    telemetry.addData("# Objects Detected", currentRecognitions.size());

    // Step through the list of recognitions and display info for each one.
    for (Recognition recognition : currentRecognitions) {
        double x = (recognition.getLeft() + recognition.getRight()) / 2 ;
        double y = (recognition.getTop()  + recognition.getBottom()) / 2 ;

        telemetry.addData(""," ");
        telemetry.addData("Image", "%s (%.0f %% Conf.)", recognition.getLabel(), recognition.getConfidence() * 100);
        telemetry.addData("- Position", "%.0f / %.0f", x, y);
        telemetry.addData("- Size", "%.0f x %.0f", recognition.getWidth(), recognition.getHeight());
    }   // end for() loop

}   // end method telemetryTfod()
In the first line of code, all TFOD recognitions are collected and stored in a List variable. The camera might “see” more than one game element in its field of view, even if not intended (i.e. for CENTERSTAGE with 1 game element).
The for() loop then iterates through that List, handling each item,
one at a time. Here the “handling” is simply processing certain TFOD
fields for DS Telemetry.
The for() loop calculates the pixel coordinates of the center of
each Bounding Box (the preview’s colored rectangle around a recognized
object).
Telemetry is created for the Driver Station, with the object’s name (Label), recognition confidence level (percentage), and the Bounding Box’s location and size (in pixels).
For competition, you want to do more than display Telemetry, and you want to exit the main OpMode loop at some point. These code modifications are discussed in another section below.
Resource Management
Vision processing is “expensive”, using much CPU capacity and USB bandwidth to process millions of pixels streaming in from the camera.
This Sample OpMode contains three optional features to remind teams about resource management. Overall, the SDK provides over 10 tools to manage these resources, allowing your OpMode to run effectively.
As the first example, streaming images from the camera can be paused and resumed. This is a very fast transition, freeing CPU resources (and potentially USB bandwidth).
// Save CPU resources; can resume streaming when needed.
if (gamepad1.dpad_down) {
   visionPortal.stopStreaming();
} else if (gamepad1.dpad_up) {
   visionPortal.resumeStreaming();
}
Pressing the Dpad buttons, you can observe the off-and-on actions in the RC preview (LiveView), described above. In your competition OpMode, these streaming actions would be programmed, not manually controlled.
The second example, commented out, similarly allows a vision processor (TFOD and/or AprilTag) to be disabled and re-enabled:
//Disable or re-enable the TFOD processor at any time.
visionPortal.setProcessorEnabled(tfod, true);
Simply set the Boolean to false (to disable), or true (to
re-enable).
The third example: after exiting the main loop, the VisionPortal is closed.
// Save more CPU resources when camera is no longer needed.
visionPortal.close();
Teams may consider this at any point when the VisionPortal is no longer needed by the OpMode, freeing valuable CPU resources for other tasks.
Adjusting the Zoom Factor
If the object to be recognized will be more than roughly 2 feet (61 cm) from the camera, you might want to set the digital Zoom factor to a value greater than 1. This tells TensorFlow to use an artificially magnified portion of the image, which may offer more accurate recognitions at greater distances.
// Indicate that only the zoomed center area of each
// image will be passed to the TensorFlow object
// detector. For no zooming, set magnification to 1.0.
tfod.setZoom(2.0);
This setZoom() method can be placed in the INIT section of your
OpMode,
immediately after the call to the
initTfod()method, oras the very last command inside the
initTfod()method.
This method is not part of the TFOD Processor Builder pattern, so the Zoom factor can be set to other values during the OpMode, if desired.
The “zoomed” region can be observed in the DS preview (Camera Stream) and the RC preview (LiveView), surrounded by a greyed-out area that is not evaluated by the TFOD Processor.
Other Adjustments
This Sample OpMode contains another adjustment, commented out:
// Set confidence threshold for TFOD recognitions, at any time.
tfod.setMinResultConfidence(0.75f);
The SDK uses a default minimum confidence level of 75%. This means the TensorFlow Processor needs a confidence level of 75% or higher, to consider an object as “recognized” in its field of view.
You can see the object name and actual confidence (as a decimal, e.g. 0.96) near the Bounding Box, in the Driver Station preview (Camera Stream) and Robot Controller preview (Liveview).
Adjust this parameter to a higher value if you want the processor to be more selective in identifying an object.
Another option is to define, or clip, a custom area for TFOD
evaluation, unlike setZoom which is always centered.
// Set the number of pixels to obscure on the left, top,
// right, and bottom edges of each image passed to the
// TensorFlow object detector. The size of the images are not
// changed, but the pixels in the margins are colored black.
tfod.setClippingMargins(0, 200, 0, 0);
Adjust the four margins as desired, in units of pixels.
These method calls can be placed in the INIT section of your OpMode,
immediately after the call to the
initTfod()method, oras the very last commands inside the
initTfod()method.
As with setProcessorEnabled() and setZoom(), these methods are
not part of the Processor or VisionPortal Builder patterns, so they
can be set to other values during the OpMode, if desired.
Modifying the Sample
In this Sample OpMode, the main loop ends only when the DS STOP button is touched. For CENTERSTAGE competition, teams should modify this code in at least two ways:
for a significant recognition, take action or store key information – inside the
for() loopend the main loop based on your criteria, to continue the OpMode
As an example, you might set a Boolean variable isPixelDetected (or
isPropDetected) to true, if a significant recognition has
occurred.
You might also evaluate and store which randomized Spike Mark (red or blue tape stripe) holds the white Pixel or Team Prop.
Regarding the main loop, it could end after the camera views all three Spike Marks, or after your code provides a high-confidence result. If the camera’s view includes more than one Spike Mark position, perhaps the Pixel/Prop’s Bounding Box size and location could be useful. Teams should consider how long to seek an acceptable recognition, and what to do otherwise.
In any case, the OpMode should exit the main loop and continue running, using any stored information.
Best of luck this season!
Questions, comments and corrections to westsiderobotics@verizon.net