Blocks Sample OpMode for TFOD
Introduction
This tutorial describes the FTC Blocks Sample OpMode for TensorFlow Object Detection (TFOD). This Sample, called “ConceptTensorFlowObjectDetection”, can recognize one or more official game elements and provide their visible size and position.
For the 2023-2024 game CENTERSTAGE, the game element is a hexagonal white Pixel. The FTC SDK software contains a TFOD model of this object, ready for recognition.
For extra points, teams may instead use their own custom TFOD models of Team Props. That option is described here:
Creating the OpMode
At the FTC Blocks browser interface, click on the “Create New OpMode” button to display the Create New OpMode dialog box.
Specify a name for your new OpMode. Select “ConceptTensorFlowObjectDetection” as the Sample OpMode that will be the template for your new OpMode.
If no webcam is configured for your REV Control Hub, the dialog box will display a warning message (shown here). You can ignore this warning message if you will use the built-in camera of an Android RC phone. Click “OK” to create your new OpMode.
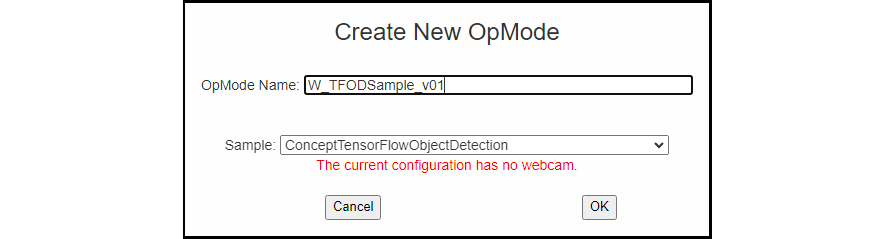
Creating a New OpMode
The new OpMode should appear in edit mode in your browser.
Sample OpMode
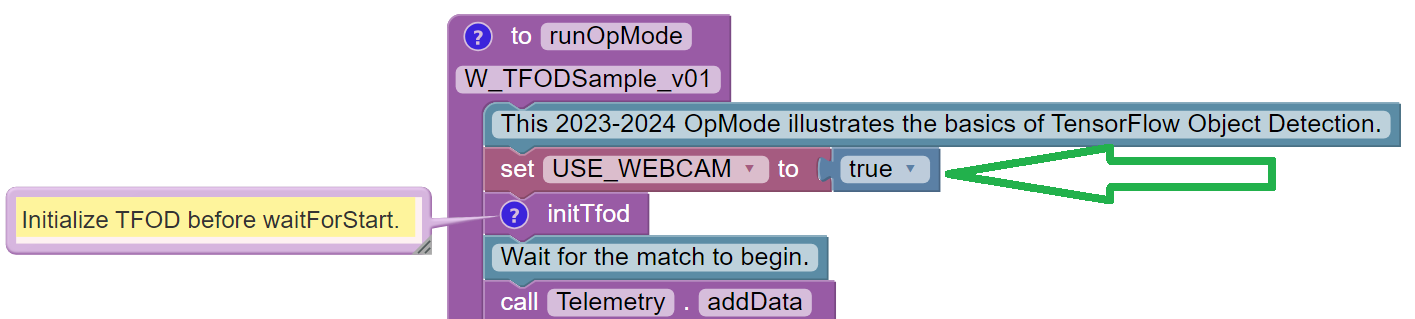
By default, the Sample OpMode assumes you are using a webcam, configured
as “Webcam 1”. If you are using the built-in camera on your Android RC
phone, change the USE_WEBCAM Boolean from true to false (green
arrow above).
Adjusting the Zoom Factor
If the object to be recognized will be more than roughly 2 feet (61 cm) from the camera, you might want to set the digital zoom factor to a value greater than 1. This tells TensorFlow to use an artificially magnified portion of the image, which may offer more accurate recognitions at greater distances.

Setting the Zoom Factor
Pull out the ``setZoom`` Block, found in the toolbox or palette called “Vision”, under “TensorFlow” and “TfodProcessor” (see green oval above). Change the magnification value as desired (green arrow).
On REV Control Hub, the “Vision” menu appears only when the active robot configuration contains a webcam, even if not plugged in.
This setZoom Block can be placed in the INIT section of your OpMode,
immediately after the call to the
initTfodFunction, oras the very last Block inside the
initTfodFunction.
This Block is not part of the Processor Builder pattern, so the Zoom factor can be set to other values during the OpMode, if desired.
The “zoomed” region can be observed in the DS preview (Camera Stream) and the RC preview (LiveView), surrounded by a greyed-out area that is not evaluated by the TFOD Processor.
Other Adjustments
The Sample OpMode uses a default minimum confidence level of 75%. The TensorFlow Processor needs to have a confidence level of 75% or higher, to consider an object as “recognized” in its field of view.
You can see the object name and actual confidence (as a decimal, e.g. 0.75) near the Bounding Box, in the Driver Station preview (Camera Stream) and Robot Controller preview (Liveview).

Setting the Minimum Confidence
Pull out the ``setMinResultConfidence`` Block, found in the toolbox or palette called “Vision”, under “TensorFlow” and “TfodProcessor”. Adjust this parameter to a higher value if you would like the processor to be more selective in identifying an object.
Another option is to define, or clip, a custom area for TFOD
evaluation, unlike setZoom which is always centered.
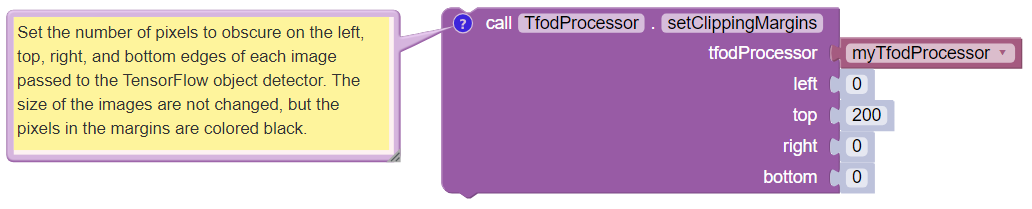
Setting Clipping Margins
From the same Blocks palette, pull out the ``setClippingMargins`` Block. Adjust the four margins as desired, in units of pixels.
These Blocks can be placed in the INIT section of your OpMode,
immediately after the call to the
initTfodFunction, oras the very last Blocks inside the
initTfodFunction.
As with setZoom, these Blocks are not part of the Processor
Builder pattern, so they can be set to other values during the OpMode,
if desired.
Command Flow in this Sample
After the waitForStart Block, this OpMode contains the main program
loop:
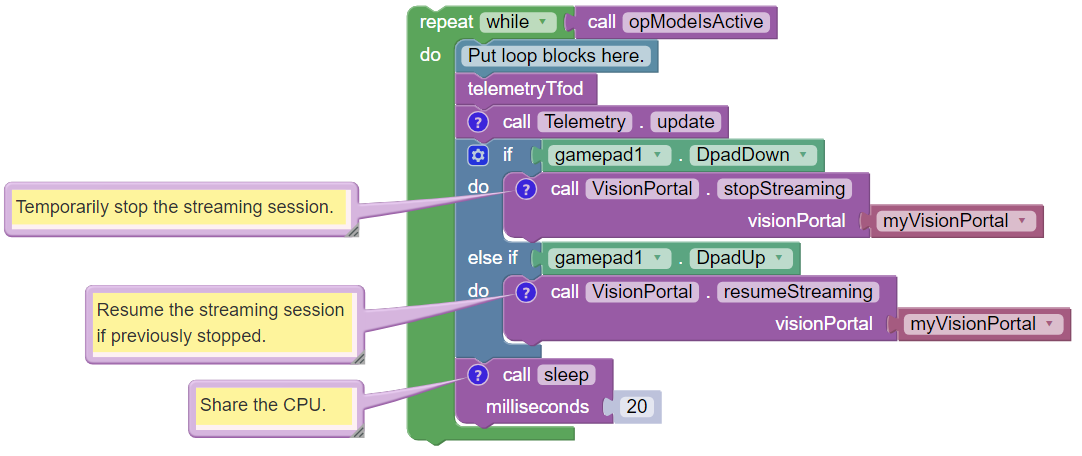
OpMode Main Loop
This loop repeatedly calls a Blocks Function called ``telemetryTfod``. That Function is the heart of the OpMode, seeking and evaluating recognized TFOD objects, and displaying DS Telemetry about those objects. It will be discussed below, in the next section.
The main loop also allows the user to press the Dpad Down button on
the gamepad, to temporarily stop the streaming session. This
.stopStreaming Block pauses the flow and processing of camera
frames, thus conserving CPU resources.
Pressing the Dpad Up button (.resumeStreaming) allows the
processing to continue. The on-and-off actions can be observed in the RC
preview (LiveView), described further below.
These two commands appear here in this Sample OpMode, to spread awareness of one tool for managing CPU and bandwidth resources. The FTC VisionPortal offers over 10 such controls, described here.
Processing TFOD Recognitions
The Function called ``telemetryTfod`` is the heart of the OpMode, seeking and evaluating recognized TFOD objects, and displaying DS Telemetry about those objects.
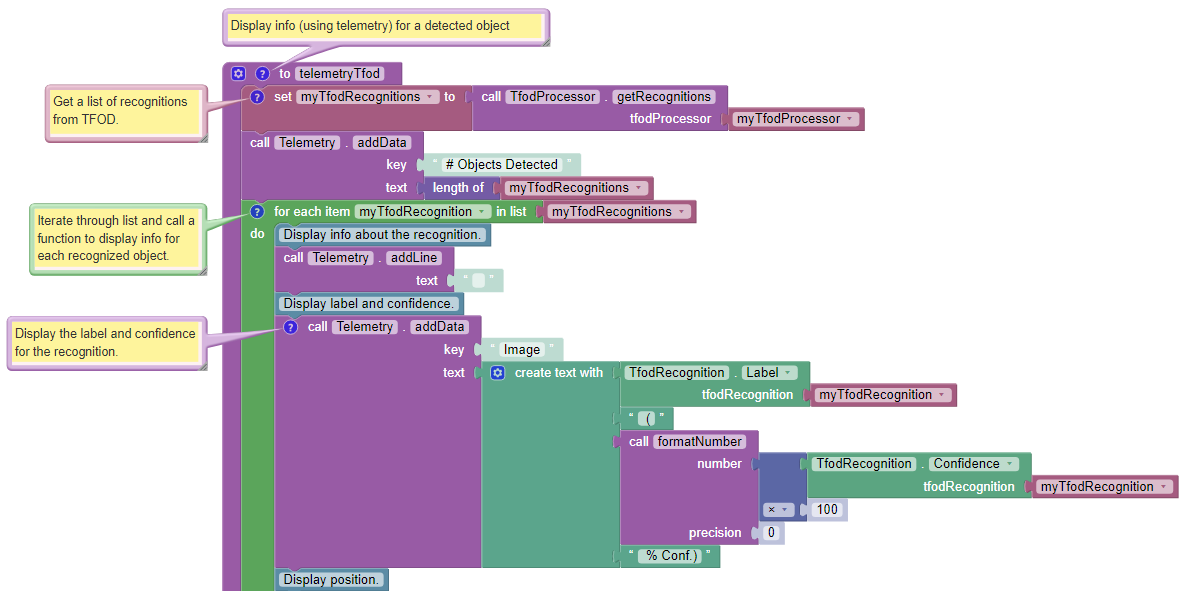
Telemetry TFOD
The first Block uses the TFOD Processor to gather and store all
recognitions in a List, called myTfodRecognitions.
The green “FOR Loop” iterates through that List, handling each item, one at a time. Here the “handling” is simply displaying certain TFOD fields to DS Telemetry.
For competition, you want to do more than display Telemetry, and you want to exit the main loop at some point. These code modifications are discussed in another section below.
Testing the OpMode
Click the “Save OpMode” button, then run the OpMode from the Driver Station. The Robot Controller should use the CENTERSTAGE TFOD model to recognize and track the white Pixel.
For a preview during the INIT phase, touch the Driver Station’s 3-dot menu and select Camera Stream.
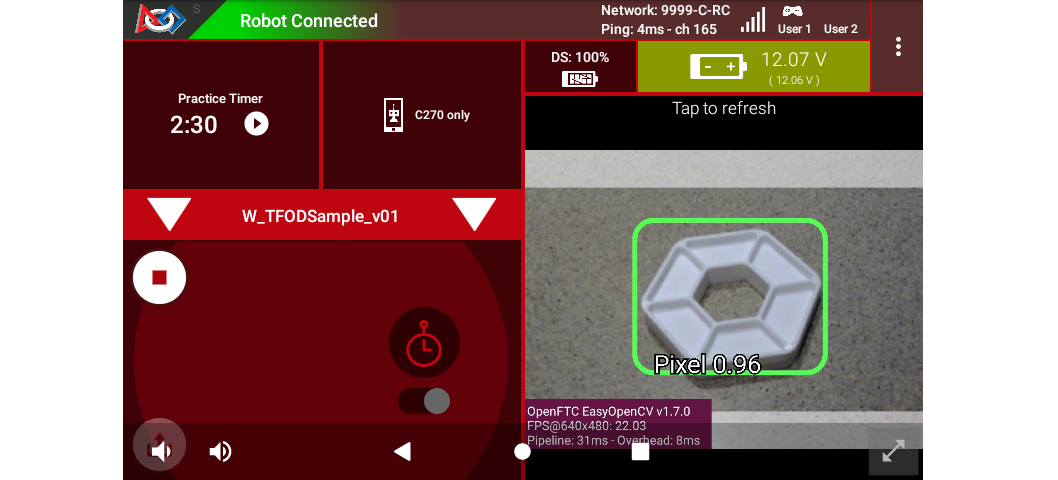
Sample DS Camera Stream
Camera Stream is not live video; tap to refresh the image. Use the small white arrows at lower right to expand or revert the preview size. To close the preview, choose 3-dots and Camera Stream again.
After touching the DS START button, the OpMode displays Telemetry for any recognized Pixel(s):
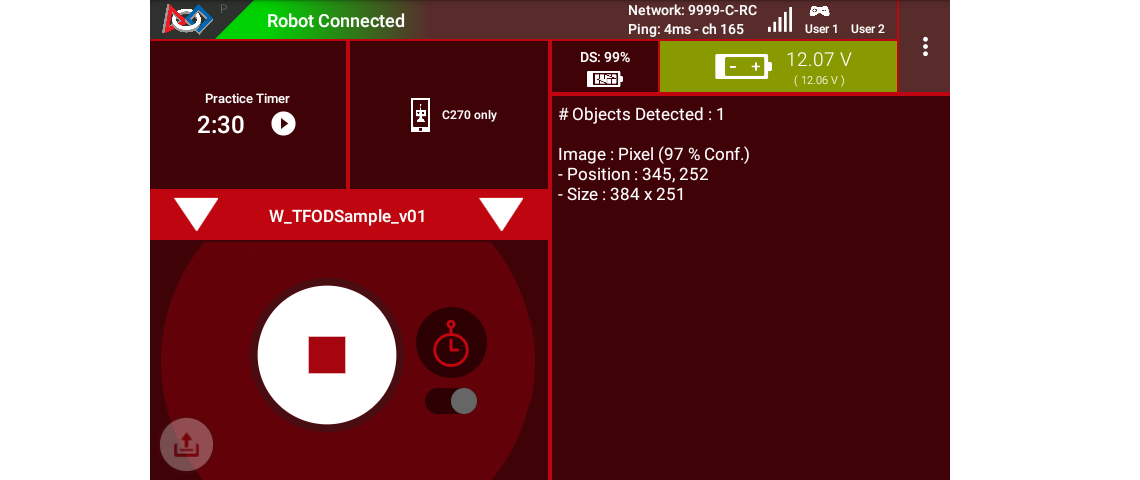
Sample DS Telemetry
The above Telemetry shows the label name, and TFOD confidence level. It also gives the center location and size (in pixels) of the Bounding Box, which is the colored rectangle surrounding the recognized object.
The pixel origin (0, 0) is at the top left corner of the image.
Before and after touching DS START, the Robot Controller provides a video preview called LiveView.
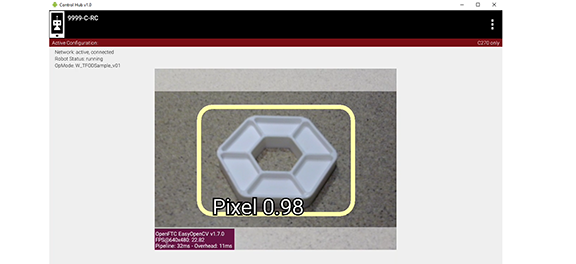
Sample RC LiveView
For Control Hub (with no built-in screen), plug in an HDMI monitor or
learn about scrcpy (https://github.com/Genymobile/scrcpy). The
above image is a LiveView screenshot via scrcpy.
If you don’t have a physical Pixel on hand, try pointing the camera at this image:
Sample Pixel
Modifying the Sample
In this Sample OpMode, the main loop ends only upon touching the DS Stop button. For competition, teams should modify this code in at least two ways:
for a significant recognition, take action or store key information – inside the FOR loop
end the main loop based on your criteria, to continue the OpMode
As an example, you might set a Boolean variable isPixelDetected to
true, if a significant recognition has occurred.
You might also evaluate and store which randomized Spike Mark (red or blue tape stripe) holds the white Pixel.
Regarding the main loop, it could end after the camera views all three Spike Marks, or after your code provides a high-confidence result. If the camera’s view includes more than one Spike Mark position, perhaps the white Pixel’s Bounding Box size and location could be useful. Teams should consider how long to seek an acceptable recognition, and what to do otherwise.
In any case, the OpMode should exit the main loop and continue running, using any stored information.
Best of luck this season!
Questions, comments and corrections to westsiderobotics@verizon.net