Blocks Custom Model Sample OpMode for TFOD
Introduction
This tutorial uses an FTC Blocks Sample OpMode to load and recognize a custom TensorFlow inference model.
In this example, the “custom model” is actually the standard trained model of the 2023-2024 CENTERSTAGE game element called a Pixel. This does not affect the process described for a custom model.
Downloading the Model
The Robot Controller allows you to load a trained inference model in the
form of a TensorFlow Lite (.tflite) file.
Here we use the standard FTC .tflite file from CENTERSTAGE
(2023-2024), available on GitHub at the following link:
Note
Very advanced teams could use Google’s TensorFlow Object Detection API (https://github.com/tensorflow/models/tree/master/research/object_detection) to create their own custom inference model.
Click the “Download Raw File” button to download the
CenterStage.tflite file from GitHub to your local device
(e.g. laptop). See the green arrow.
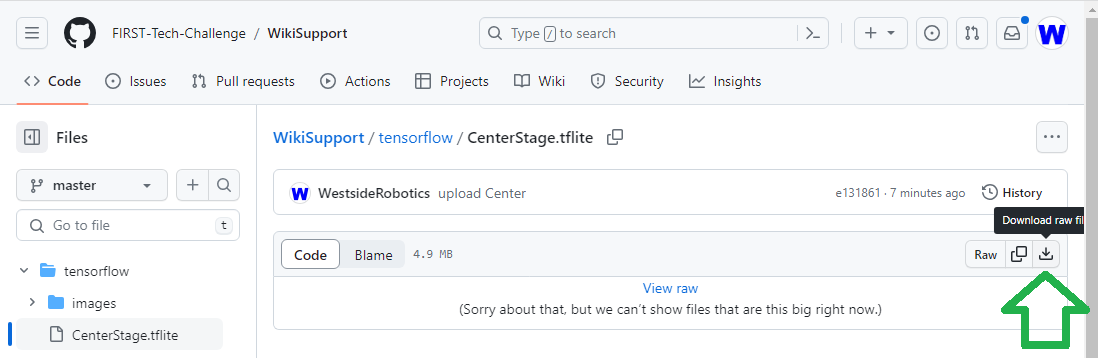
Public repo for CenterStage tflite file
Uploading to the Robot Controller
After downloading the file to your laptop, you need to upload it to the Robot Controller. Connect your laptop to your Robot Controller’s wireless network and navigate to the FTC “Manage” page:
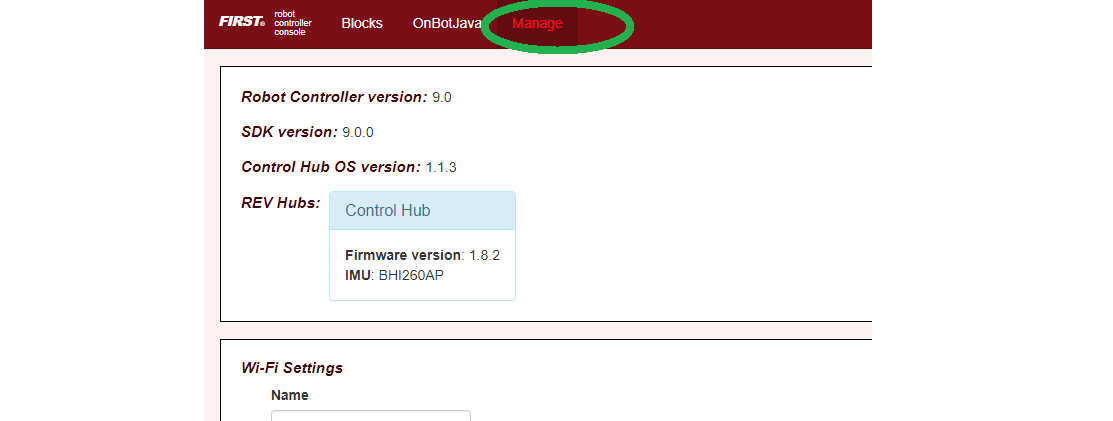
Example of the Manage Page
Scroll down and click on “Manage TensorFlow Lite Models”.
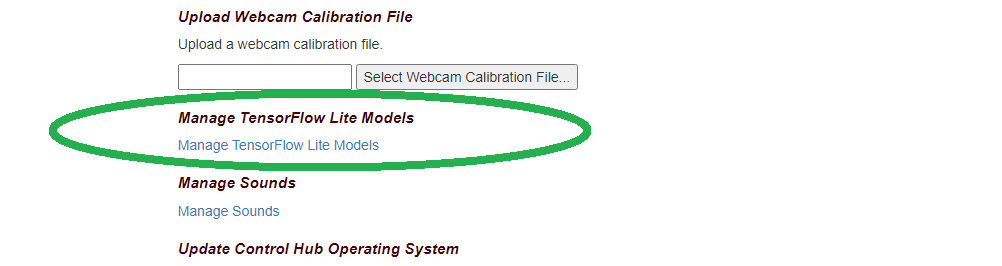
Manage TFLITE Models Link
Now click the “Upload Models” button.
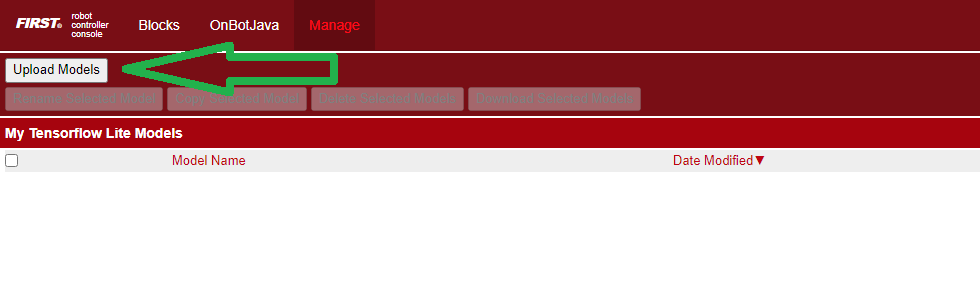
Upload TFLITE Models Button
Click “Choose Files”, and use the dialog box to find and select the
downloaded CenterStage.tflite file.

Upload TFLITE Models Button
Now the file will upload to the Robot Controller. The file will appear in the list of TensorFlow models available for use in OpModes.

TFLITE Model Listed
Creating the OpMode
Click on the “Blocks” tab at the top of the screen to navigate to the Blocks Programming page. Click on the “Create New OpMode” button to display the Create New OpMode dialog box.
Specify a name for your new OpMode. Select “ConceptTensorFlowObjectDetectionCustomModel” as the Sample OpMode that will be the template for your new OpMode.
If no webcam is configured for your REV Control Hub, the dialog box will display a warning message (shown here). You can ignore this warning message if you will use the built-in camera of an Android RC phone. Click “OK” to create your new OpMode.
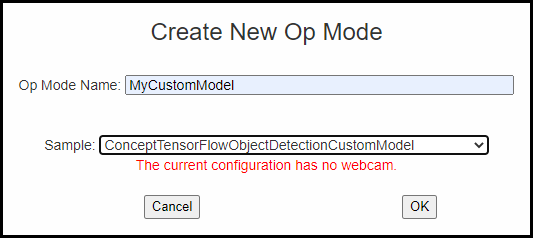
Create New OpMode
The new OpMode should appear in edit mode in your browser.
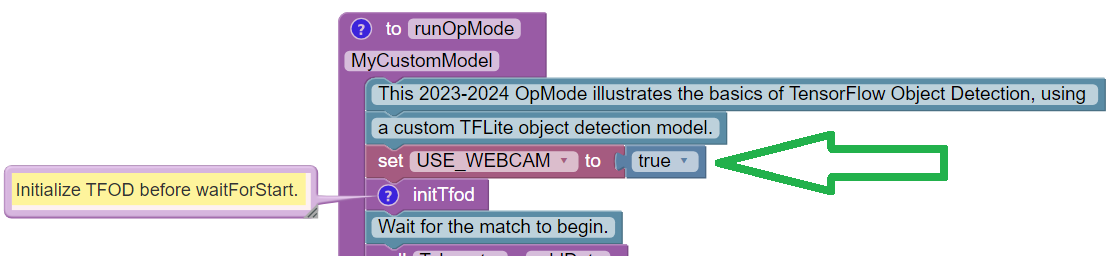
Sample OpMode
By default, the Sample OpMode assumes you are using a webcam, configured
as “Webcam 1”. If you are using the built-in camera on your Android RC
phone, change the USE_WEBCAM Boolean from true to false (green
arrow above).
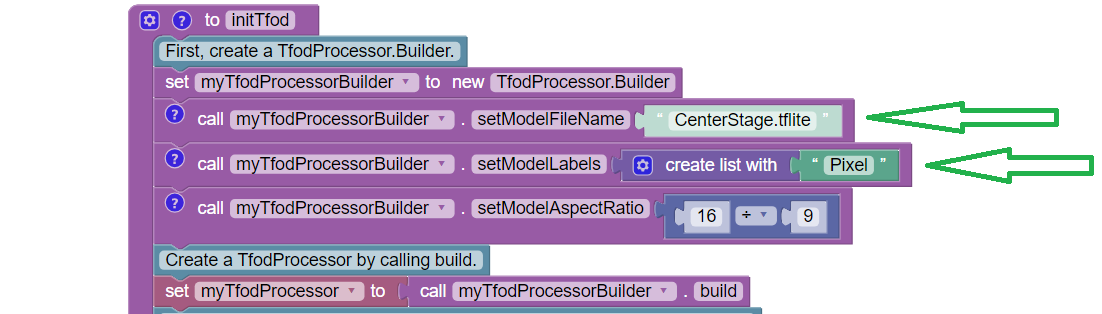
Loading the Custom Model
Scroll down in the OpMode, to the Blocks Function called “initTfod”.
In the Block with “.setModelFileName”, change the filename from
“MyCustomModel.tflite” to CenterStage.tflite – or other filename
that you uploaded to the Robot Controller. The filename must be an exact
match. See green oval below.
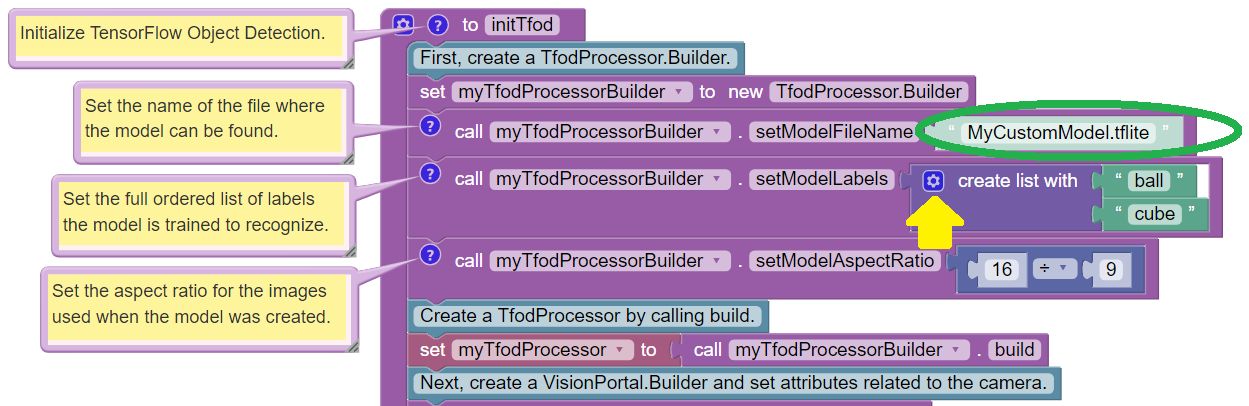
Init TFOD Function
When loading an inference model, you must specify a list of labels that describe the known objects in the model. This is done in the next Block, with “.setModelLabels”.
This Sample OpMode assumes a default model with two known objects, labeled “ball” and “cube”. The CENTERSTAGE model contains only one object, labeled “Pixel”.
For competition, the Team Prop label names might be
myTeamProp_Red and/or myTeamProp_Blue.
The number of labels can be changed by clicking the small blue gear icon for the “create list with” Block (see yellow arrow).
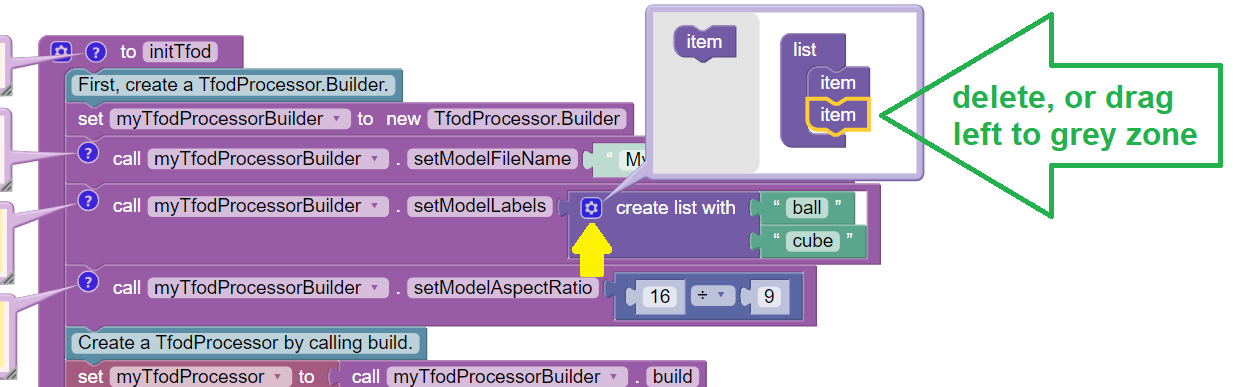
Blue Gear Delete
In the pop-up layout balloon, click on one of the list items to select it (green arrow above). Then remove it, by pressing Delete (on keyboard), or by dragging it to the balloon’s left-side grey zone.
After editing that purple “list” structure, click the blue gear icon again to close the layout balloon. Edit the remaining label to “Pixel”.
When complete, the edited Blocks should look like this:
Adding Pixel Label
Adjusting the Zoom Factor
If the object to be recognized will be more than roughly 2 feet (61 cm) from the camera, you might want to set the digital zoom factor to a value greater than 1. This tells TensorFlow to use an artificially magnified portion of the image, which may offer more accurate recognitions at greater distances.

Set Zoom
Pull out the “setZoom” Block, found in the toolbox or palette called “Vision”, under “TensorFlow” and “TfodProcessor” (see green oval above). Change the magnification value as desired (green arrow).
On REV Control Hub, the “Vision” menu appears only when the active robot configuration contains a webcam, even if not plugged in.
Place this Block immediately after the Block
set myTfodProcessor to call myTfodProcessorBuilder.build. This Block
is not part of the Processor Builder pattern, so the Zoom factor can
be set to other values during the OpMode, if desired.
The “zoomed” region can be observed in the DS preview (Camera Stream) and the RC preview (LiveView), surrounded by a greyed-out area that is not evaluated by the TFOD Processor.
Testing the OpMode
Click the “Save OpMode” button, then run the OpMode from the Driver Station. The Robot Controller should use the new CENTERSTAGE inference model to recognize and track the Pixel game element.
For a preview during the INIT phase, touch the Driver Station’s 3-dot menu and select Camera Stream.
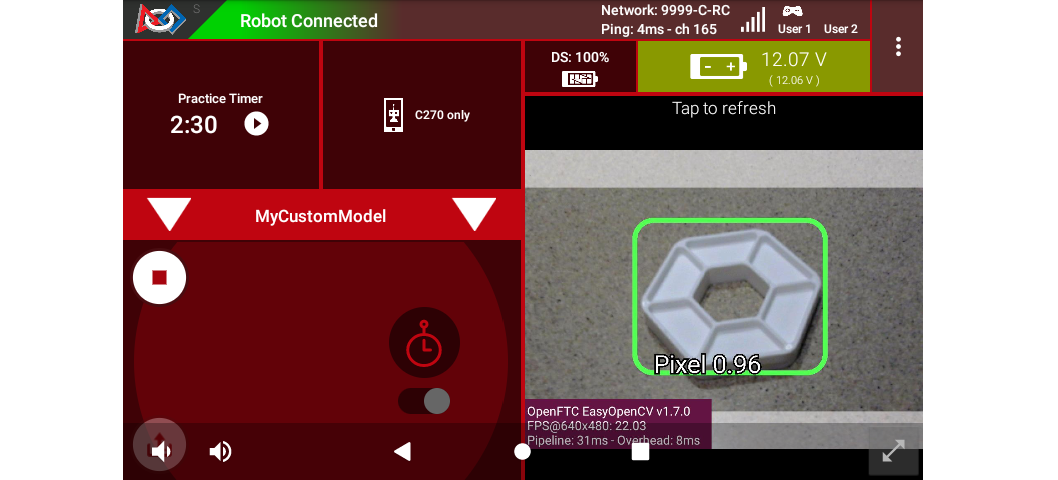
DS Camera Stream
Camera Stream is not live video; tap to refresh the image. Use the small white arrows at lower right to expand or revert the preview size. To close the preview, choose 3-dots and Camera Stream again.
After touching the DS START button, the OpMode displays Telemetry for any recognized Pixel(s):
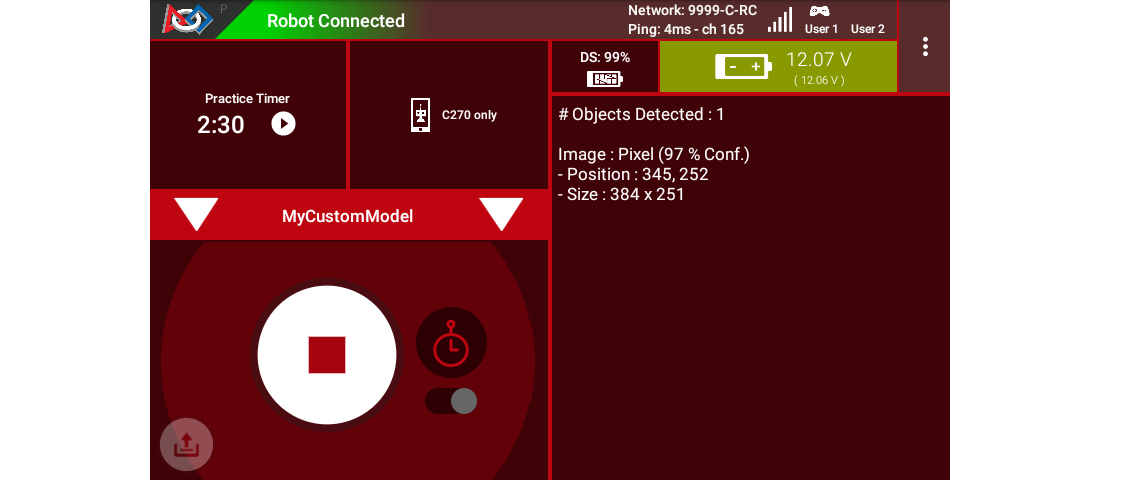
DS Telemetry
The above Telemetry shows the label name, and TFOD confidence level. It also gives the center location and size (in pixels) of the Bounding Box, which is the colored rectangle surrounding the recognized object.
The pixel origin (0, 0) is at the top left corner of the image.
Before and after touching DS START, the Robot Controller provides a video preview called LiveView.
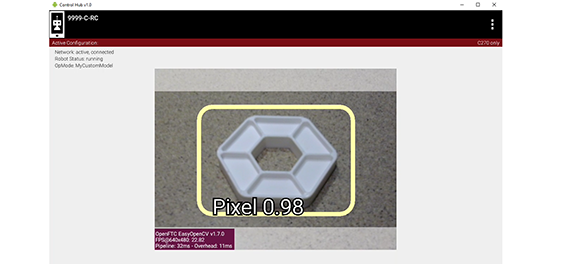
RC LiveView
For Control Hub (with no built-in screen), plug in an HDMI monitor or
learn about scrcpy (https://github.com/Genymobile/scrcpy). The
above image is a LiveView screenshot via scrcpy.
If you don’t have a physical Pixel on hand, try pointing the camera at this image:
Sample Pixel
Modifying the Sample
In this Sample OpMode, the main loop ends only upon touching the DS Stop button. For competition, teams should modify this code in at least two ways:
for a significant recognition, take action or store key information – inside the FOR loop
end the main loop based on your criteria, to continue the OpMode
As an example, you might set a Boolean variable isTeamPropDetected
to true, if a significant recognition has occurred.
You might also evaluate and store which randomized Spike Mark (red or blue tape stripe) holds the Team Prop.
Regarding the main loop, it could end after the camera views all three Spike Marks, or after your code provides a high-confidence result. If the camera’s view includes more than one Spike Mark position, perhaps the Team Prop’s Bounding Box size and location could be useful. Teams should consider how long to seek an acceptable recognition, and what to do otherwise.
In any case, the OpMode should exit the main loop and continue running, using any stored information.
Best of luck this season!
Questions, comments and corrections to westsiderobotics@verizon.net