External Libraries in OnBot Java and Blocks
Introduction
Blocks and OnBot Java programmers can use external libraries, starting with SDK 7.0 released for the Freight Frenzy season. This capability previously existed for programmers using Android Studio.
An external library is a collection of specialized software ready for public use, and typically available from a website or repository, called a ‘repo’. You don’t need to know its inner workings, just what it does and how to use it.
This beginner-level tutorial shows how to incorporate a library’s features into your Op Modes, and provides simple examples. It does not teach Java.
Many thanks to Liz Looney who developed this capability, along with myBlocks and many other useful features of the software.
Note: This new capability exists for a Robot Controller (RC) running Android 7 & and higher. Moto G 2nd Gen and Moto G 3rd Gen RC phones cannot use this feature.
Overview
It’s a simple process with three basic steps.
Step 1, find a library with features you want to use, and get its .jar or .aar file.
Step 2, upload that file in OnBot Java.
Step 3 has three variations, depending on your planned use of the library.
Step 3A assumes you want to use a library function, or method, in OnBot Java only. Namely you are not planning to make that method available for Blocks users.
Step 3B assumes that you do want to provide the library method to a Blocks user, by creating a special Block called a myBlock. MyBlocks are not new with 7.0, but now you can use library code in that myBlock. You can create your myBlock to have the exactly same inputs and outputs as the library method, or slightly different inputs and outputs.
Step 3C is a different scenario, where the library method is made available directly to the Blocks user, without creating a myBlock. This can be done, if the library is specially annotated by its author.
Step 1 - Select library, get archive file
There are hundreds of code libraries available on the internet. In Step 1, you find a library with specialized functions (methods) that you want to use. Start with a web search, or get suggestions from other teams.
It’s best to choose a repo with a well documented interface. Review its documentation or API, learn what the methods can do, and learn about inputs required and output provided.
If that’s something you want to use, then try to find the .jar or .aar
file. The .jar suffix means Java Archive and .aar means a
similar format called Android Archive. This is a compressed file
containing the entire collection of code that you want, in a single
file. It’s similar to a zip file that you may have used for general
web downloads.
If you’re having trouble locating that .jar file, or if you’re not sure how to use that library, you are encouraged to contact the repo owner or developer. They often enjoy hearing how programmers plan to use their code, and would be happy to help you get started. Don’t be intimidated, they are often willing to help.
Then just download that .jar or .aar file to local storage such as your laptop or to a team Google drive.
Step 2 - Upload archive file
Copy the .jar or .aar file to your programming laptop, if the file is not stored there already.
Connect your laptop via Wi-Fi to a Robot Controller device that’s
running the RC app, version 7.0 or higher (see instructions at
Program and Manage, on the RC phone or its paired Driver Station
device). In the Chrome browser, open OnBot Java.
In OnBot Java (OBJ) click the upload icon, normally used to upload a
regular Java file to the teamcode folder.

Upload icon in OnBot Java
Instead of a Java file, select the .jar or .aar library file to upload from the laptop.
OnBot Java will recognize that it’s an archive file, and will
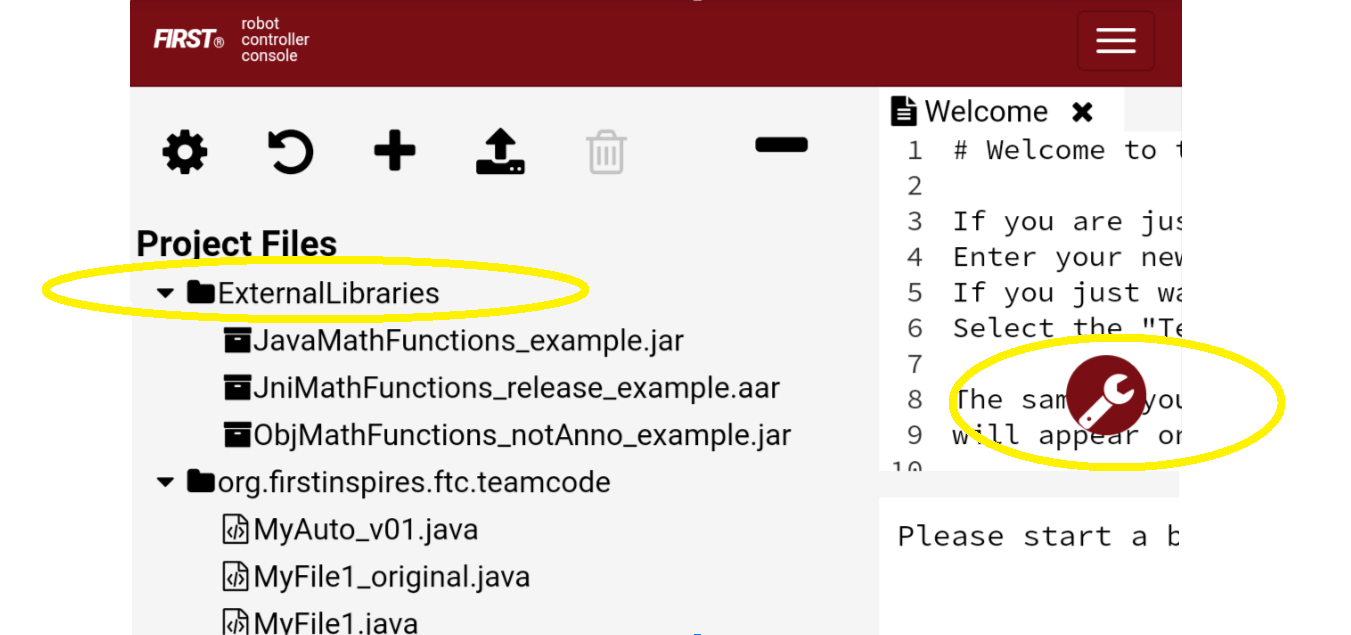
automatically create a folder called ExternalLibraries. This folder
will appear above the teamcode folder.

ExternalLibraries folder and Build Everything icon
Step 3 - Programming
The programming step has several variations depending on how you’re planning to use the External Library code.
Step 3A assumes you want to use the library method only in your Java program or OpMode, and not provide it to Blocks users. Or perhaps your team doesn’t work with Blocks at all.
So, you can just start programming!
First import the class. You know the class name because you read about it in the library documentation. And you know the method names and how they work, including the inputs and outputs (and their Java types). This tutorial does not offer Java programming instruction.
Remember, when all your programming is finished, click the
Build Everything icon (see image above).
In Step 3B you create a myBlock, which can modify the library method, or not. It depends on the functionality you want to provide to your Blocks programmer.
Unmodified means that your myBlock simply calls the library method, using exactly the same inputs and outputs. This might be called a wrapper method.
Or, you can use the library method as a utility function, performing a specific task in or for your larger myBlock method. In other words, your myBlock supplements what the library method can do.
Alternatively, the library method might have more parameters than your Blocks user needs, so you want a simpler interface. Your OBJ code can satisfy extra parameters without exposing them to the user of your myBlock.
As a reminder, creating a myBlock requires only these two items:
Extend your existing OpMode class with
BlocksOpModeCompanion.Place the annotation
@ExportToBlocksimmediately before each myBlock method.
For more info, see the separate myBlock tutorial here.
Step 3C assumes the library methods should be provided directly to the Blocks user, without even creating a myBlock. This scenario doesn’t need to be enabled with your Java code at all.
Instead you must ask the library developer to add two annotations, then provide you a fresh .jar or .aar file. The changes are:
Place the annotation
@org.firstinspires.ftc.robotcore.external.ExportClassToBlocksdirectly before the library class declaration.Place the annotation
@org.firstinspires.ftc.robotcore.external.ExportToBlocksdirectly before each library method to be exposed (shared or passed through to Blocks).
When you have that archive file with its annotations, upload it in OnBot
Java, and click Build Everything. That’s it!
It doesn’t matter which Java file (if any) is currently open in OBJ; no such file is needed for this feature. Those library-annotated “pass-through” methods will automatically appear in the Blocks toolbox (menu), with the method’s actual inputs and outputs.
See further below for examples of these 3 scenarios.
User Training & Documentation
For Step 3B or Step 3C, your Blocks users must be taught how to use the new myBlocks or the new pass-through Blocks. That’s your job, as the Java developer who implemented this feature.
Start with good documentation. For myBlocks, use the existing tools to make helpful labels (for input parameters), clear tooltips and detailed comments. The comments appear in a text box that expands after clicking the blue question-mark icon on that Block. Tell your users it’s there.

myBlock documented using comment, tooltip and input labels
Meet with your team’s Blocks programmer(s) to explain the new features. Consider writing a short description, for their future reference. Encourage users to give you feedback, to improve your code. Congratulations, you are now a Java developer!
Benefits
Obviously this External Libraries feature provides advanced functions previously available only to Android Studio teams.
Secondly, more of your team members can continue programming the robot in Blocks. Meanwhile other students (like you), if they want to, can advance their Java skills and still contribute to the team’s actual robot programming.
Often, teams have one student who has moved far ahead with their Java skills, and becomes the team programmer – the only programmer. Then nobody else has the chance to learn and contribute basic programming.
This feature can allow a new arrangement: “nobody is left out, and nobody is held back”.
As a third benefit, judges love to hear about Outreach. For example your team could develop useful Blocks for beginner teams. Or, you share ideas and tips with other advanced teams who are doing the same kind of development. And, you are encouraged to communicate with library developers. This is a good opportunity for real-world interaction with specialists: sharing your needs, and receiving expert guidance. Scientists, engineers, doctors, entrepreneurs – nobody needs to reinvent the wheel. Professional life is built on these interactions.
Example 1 - non-annotated library
The first example uses a very basic “homemade” library called Geometry
For OBJ. To get your own copy, click here.
As with any current real-world library, this one is not annotated for use. You can use it in OnBot Java only (Step 3A), or you can create a myBlock (Step 3B) to share its capabilities with Blocks programmers. Lacking annotations, this library does not provide direct “pass-through” methods (Step 3C) to Blocks.
This library contains a class called
com.example.google.ftc.Geometry, with three methods: -
circleCircumference() accepts radius, returns circumference -
circleArea() accepts radius, returns area - hypot() accepts 2
lengths, returns hypotenuse of right triangle
Under Step 3A, you would use, for example, the hypot() method
for your own OnBot Java programming, not providing it to Blocks.
Add this to your list of import statements:
import com.example.google.ftc.Geometry;
Then simply use the method in your Java code:
double A = 3.0;
double B = 4.0;
double myHypotenuse = Geometry.hypot(A, B);
Under Step 3B, let’s create your own custom Block called “myHypotenuse”. This is just an exercise; regular Blocks could easily calculate this value.
You will still need the import statement, same as above in Step 3A.
Then, extend the main class:
public class librariesExample extends BlocksOpModeCompanion {
The myBlock method might read:
@ExportToBlocks (
    comment = "This myBlock returns the hypotenuse (longest side) of the right triangle" +
              " with legs whose lengths are specified by the two given numbers.",
    tooltip = "calculate hypotenuse of 2 sides",
    parameterLabels = {"side a", "side b"}
)
public static double myHypotenuse(double a, double b) {
    return Geometry.hypot(a, b);
}
This myBlock contains only the library method and uses the same inputs and output, an example of a ‘wrapper method’.
Note that myHypotenuse() is a static method, required for all
myBlock methods. Also note that parameter labels are allowed to be
different than the actual method parameters. Learn more about myBlocks
here.
Here is the myBlock that will appear in the Blocks toolbox (menu):

myBlock using library method Geometry.hypot()
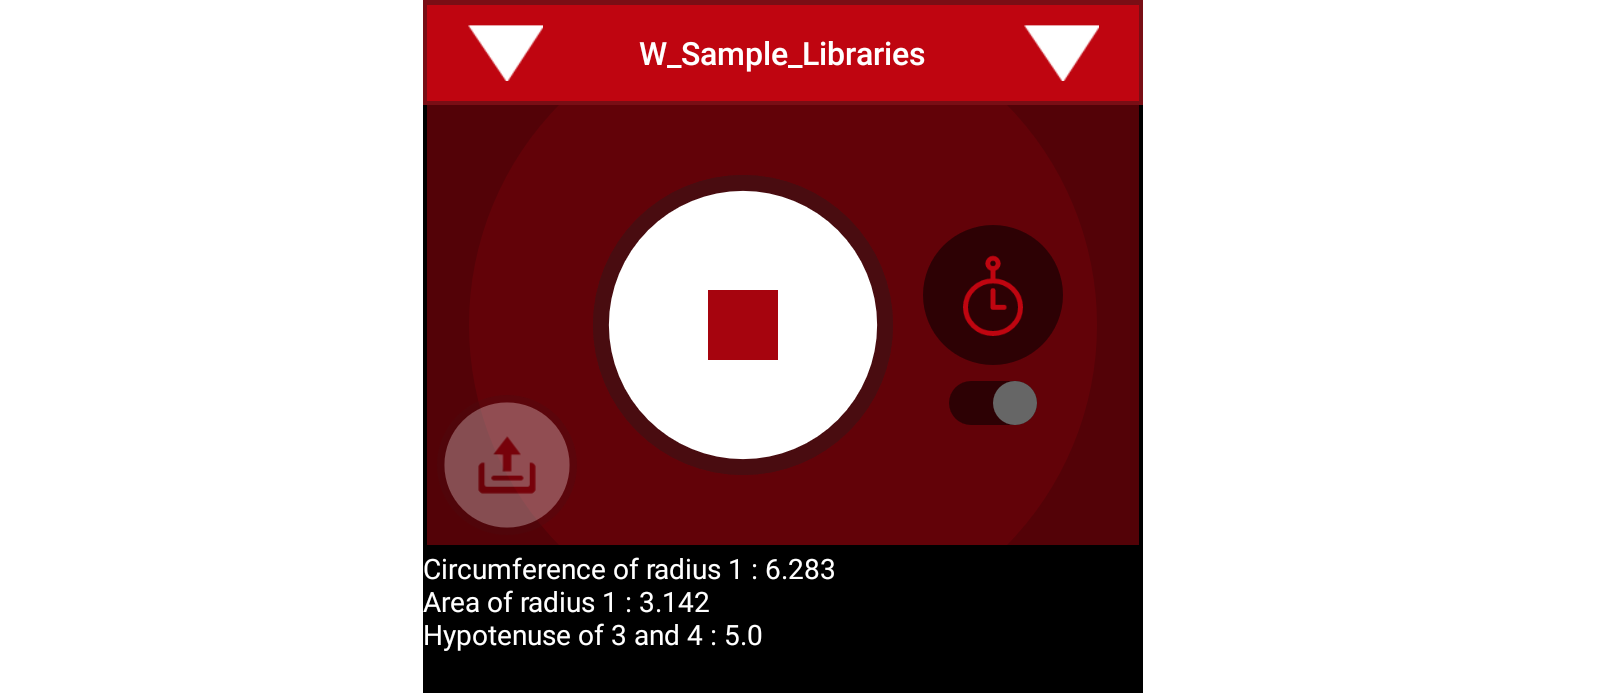
On your own, you can try this with the two remaining methods. Use myBlocks to show telemetry output of various input values.

Telemetry of myBlocks using Geometry library
Example 2 - FIRST Tech Challenge-annotated library
Now let’s try another “homemade” library that does already contain
the annotations. This one is called Arithmetic For Blocks; click
here.
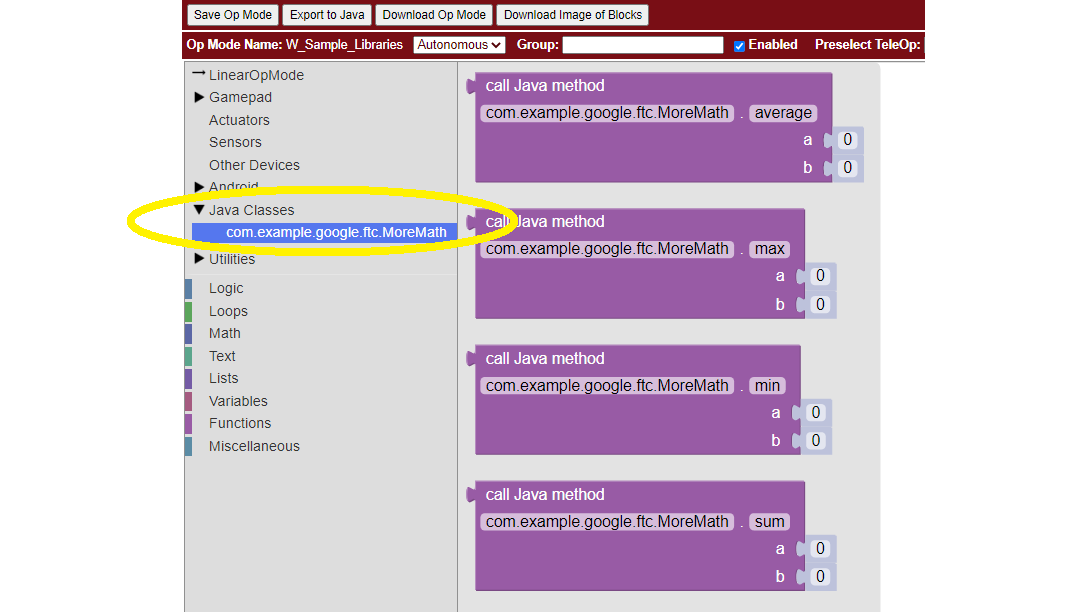
This library contains a class name com.example.google.ftc.MoreMath,
with public methods sum, min, max and average. Each
accepts two numbers and provides a numeric result.
This library is annotated specifically for team use, as described
above. After you upload the .aar file and Build Everything, its 4
“pass-through” methods will automatically appear as Blocks:

Pass-through methods from class MoreMath in annotated library Arithmetic For Blocks
You could also use these methods in OnBot Java, including to create a myBlock. For example, perhaps you want to also provide a custom version of a pass-through method. But you don’t need an OnBot Java file to support this library or its methods; that’s done automatically by OnBot Java when it processes the library at upload.
What if you have an annotated library, and don’t want any of its
methods to appear as a Blocks pass-through? Just Build Everything,
then delete the .jar or .aar file.
Here are two other “homemade” libraries, both annotated. Feel free to experiment with these.
JniExample.aarcontains a class namedcom.example.google.ftc.IntegerMath, with methods for simple arithmetic operations, implemented in native C++ code. Its public methods areadd,subtract,multiply, anddivide. Each accepts two integers and provides an integer result.RevPotentiometer.aarcontains a class namedcom.example.google.ftc.RevPotentiometer, which is a hardware device class for the REV Potentiometer. It usesAnalogSensorTypeandDevicePropertiesannotations to make this sensor appear in the “Configure Robot” menu of the RC app or paired DS app. After the .aar file has been uploaded (andBuild Everything), configure your robot’s Analog Input Devices and chooseREV Potentiometer. It has a public methodgetRotationwith parameter of type AngleUnit.
Real-world libraries
External Libraries have unique content and structure. Each may pose special challenges as you try to use it in robot code. Communication with the library developer will be very helpful, perhaps essential.
Ideally, the library’s .jar or .aar file encompasses all the classes you’ll need, without external dependencies. A good example is EasyOpenCV, designed and ready for use. See the simple instructions here.
General external libraries might involve a longer journey. For example, Apache Commons is a vast public repo, basically a library of libraries, focused on the Java programming language. Complications can arise even when choosing a simple math-only library.
Apache libraries are organized into Modules, typically each with one or more .jar files. It may not be sufficient to upload only the .jar file that seems to contain the class and methods you want to use.
If the library code refers to a class not contained in that .jar file, OnBot Java’s auto-complete feature may eventually throw a ‘class not found’ exception, causing your RC app to crash. The exception triggered by this ‘hidden dependency’ may occur within minutes or hours, whenever OBJ encounters the ‘missing’ class – even if your OpMode does not directly or indirectly use that class. After that point, your RC app will not operate. It can operate again only by manually deleting the .jar file and its associated folder, directly on the RC device.
Starting over, you can find and upload the .jar file containing the ‘missing’ class. But that may expose further dependencies, requiring more .jar files.
Also, be aware that the SDK already contains some common Apache classes. OnBot Java may detect this duplication, preventing upload of your .jar file. On the bright side, your desired methods should already be available!
So, be prepared for these and other challenges that may arise. Again, it’s helpful to communicate with the library developer where possible.
Advanced
Here are some technical details that might apply to very advanced use of the External Libraries feature. These are not covered in this basic tutorial.
.aar files with assets are not supported
External libraries can include .so files for native code
External libraries can add new hardware devices with these annotations:
com.qualcomm.robotcore.hardware.configuration.annotations.AnalogSensorType
com.qualcomm.robotcore.hardware.configuration.annotations.DeviceProperties
com.qualcomm.robotcore.hardware.configuration.annotations.DigitalIoDeviceType
com.qualcomm.robotcore.hardware.configuration.annotations.I2cDeviceType
com.qualcomm.robotcore.hardware.configuration.annotations.MotorType
com.qualcomm.robotcore.hardware.configuration.annotations.ServoType
External libraries can add new functionality to the Robot Controller with these annotations:
org.firstinspires.ftc.ftccommon.external.OnCreate
org.firstinspires.ftc.ftccommon.external.OnCreateEventLoop
org.firstinspires.ftc.ftccommon.external.OnCreateMenu
org.firstinspires.ftc.ftccommon.external.OnDestroy
org.firstinspires.ftc.ftccommon.external.WebHandlerRegistrar
Summary
Blocks and OnBot Java programmers can benefit and learn from this new capability with external libraries.
You are encouraged to submit other examples and suggestions that worked for you.
Questions, comments and corrections to westsiderobotics@verizon.net