Color Processing Color Sensor
Overview
A simple way to use FTC’s new OpenCV vision tools is to operate a “Color Sensor”. Namely, it can determine the color seen by the robot’s camera, in a specified zone.
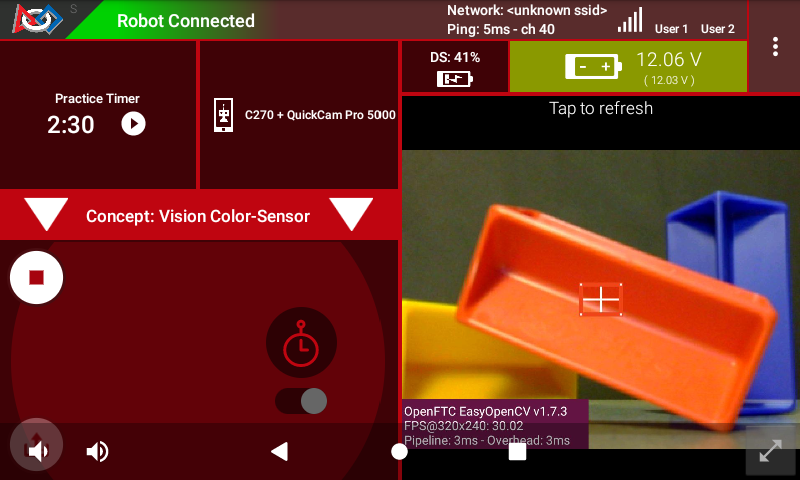
Below, the small central rectangle is the region being evaluated:

Color sensor detection zone
A key benefit is that the camera can be much further away from the object than, for example, a REV Color Sensor or others like it.
It’s still important to accurately point the camera and carefully select the image zone to inspect.
For the above example, OpenCV can provide results like this:

RED Detection using Color Sensor
The following sections describe how to do this, with a Sample OpMode.
Configuration
Skip this section if …
the active robot configuration already contains “Webcam 1”, or
using the built-in camera of an Android phone as Robot Controller.
Before starting the programming, REV Control Hub users should make a robot configuration that includes the USB webcam to be used as a color sensor.
For now, use the default webcam name, “Webcam 1”. If a different name is preferred, edit the Sample OpMode to agree with the exact webcam name in the robot configuration.
Save and activate that configuration; its name should appear on the paired Driver Station screen.
Sample OpMode
Opening the Sample OpMode
To learn about opening the Sample OpMode, click the tab for Blocks or Java:
On a laptop or desktop computer connected via Wi-Fi to the Robot Controller, open the Chrome browser. Go to the REV Control Hub’s address
http://192.168.43.1:8080(orhttp://192.168.49.1:8080for Android RC phone) and click the Blocks tab.Click
Create New OpMode, enter a new name such as “ColorSensor_Maria_v01”, and select the Sample OpModeConceptVisionColorSensor.At the top of the Blocks screen, you can change the type from “TeleOp” to “Autonomous”, since this Sample OpMode does not use gamepads.
If using the built-in camera of an RC phone, drag out the relevant Block from the left-side
VisionPortal.Buildertoolbox.Save the OpMode, time to try it!
Open your choice of OnBot Java or Android Studio.
In the
teamcodefolder, add/create a new OpMode with a name such as “ColorSensor_Bobby_v01.java”, and select the Sample OpModeConceptVisionColorSensor.java.At about Line 58, you can change
@TeleOpto@Autonomous, since this Sample OpMode does not use gamepads.If using the built-in camera of an RC phone, follow the OpMode comments to specify that camera.
Click “Build”, time to try it!
Running the Sample OpMode
On the Driver Station:
Select the Autonomous OpMode that you just saved or built.
Turn off the automatic 30-second match timer (green slider).
Touch INIT only.
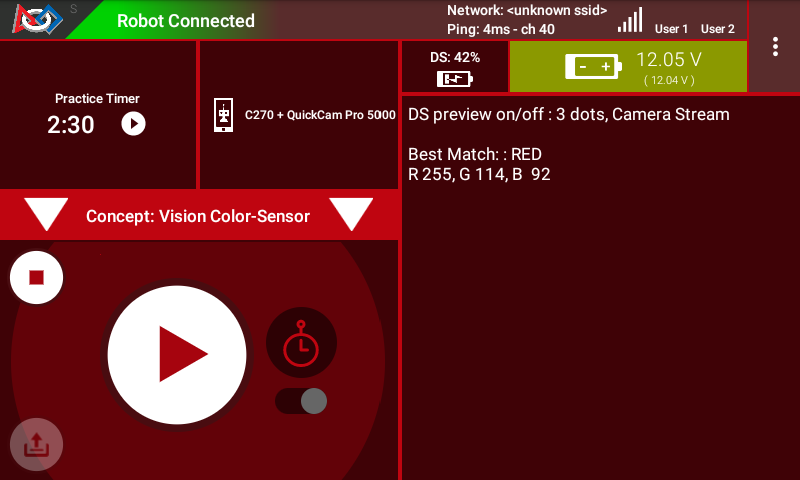
The OpMode should give Telemetry, stating the main “matched” color inside the Region of Interest.

Driver Station Telemetry
Move the camera around, and watch the Telemetry area on the Driver Station screen. It should state “BLUE” when pointing at a blue object, and likewise should identify other common colors.
It’s working! You have a color sensor in your robot camera. Think about how to use this in the FTC Robot Game.
Skip the next two sections if you already know how to use FTC previews.
DS Preview
Before describing how to modify the OpMode, this page offers two sections showing how to view the OpenCV results with previews. Previewing is essential for working with vision code.
Opening the DS Preview
On the Driver Station (DS), remain in INIT – don’t touch the Start button.
At the top right corner, touch the 3-dots menu, then
Camera Stream. This shows the camera’s view; tap the image to refresh it.

Camera Stream Preview
Drawn on the image is the rectangle being evaluated, called the Region of Interest (ROI). The ROI border color is the rectangle’s predominant color, reported to DS Telemetry.
If that border “disappears” against a solid-color background, the thin white cross-hairs and 4 small white dots can still identify the ROI.
For a BIG preview, touch the arrows at the bottom right corner.
Or, select Camera Stream again, to return to the previous screen and its Telemetry.
RC Preview
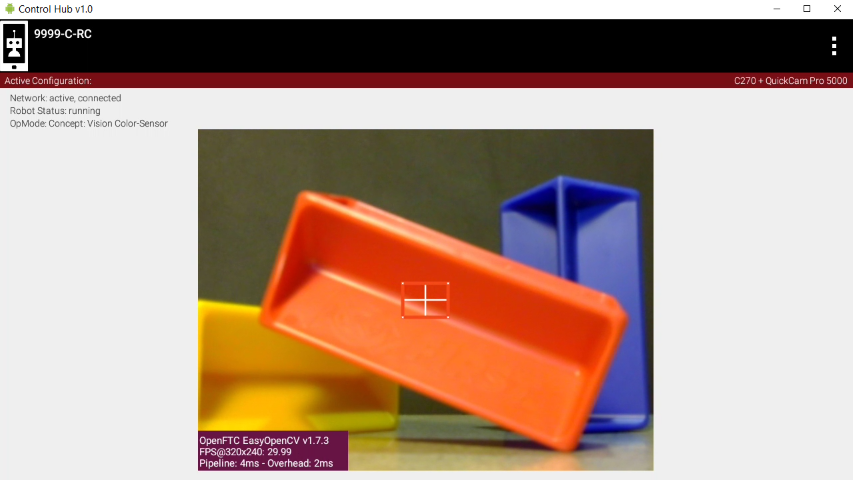
The Robot Controller (RC) device also makes a preview, called LiveView.
This is full video, and is shown automatically on the screen of an RC phone.

Control Hub LiveView
The above preview is from a REV Control Hub.
It has no physical screen, so you must plug in an HDMI monitor or use open-source scrcpy (called “screen copy”) to see the preview on a laptop or computer that’s connected via Wi-Fi to the Control Hub.
Modify the Sample
This Sample OpMode is designed for the user to select/edit two inputs:
define the Region of Interest (ROI)
list the colors that might be found
For the first input, there are 3 ways to define the ROI:
entire frame
sub-region, defined with standard image coordinates
sub-region, defined with a normalized +/- 1.0 coordinate system
For the second input, you must list the candidate colors from which a result will be selected as a “Match”.
Simply choose from the 10 “Swatches”: RED, ORANGE, YELLOW, GREEN, CYAN, BLUE, PURPLE, MAGENTA, BLACK, WHITE. For efficiency, add only those Swatches for which you reasonably expect to get a match.
The Blocks and Java OpModes contain detailed comments to guide you through these edits. They are not repeated in this tutorial.
Building the VisionPortal
The Sample OpMode first creates a “Predominant Color” Processor using the Builder pattern. This is the same Builder pattern used to create an AprilTag Processor, and previously a TensorFlow Processor.
The Sample OpMode then creates a VisionPortal, again using a Builder pattern. This includes adding the “Predominant Color” Processor to the VisionPortal.
How does OpenCV determine the “predominant color” of the ROI? An algorithm called “k-means” determines clusters of similar colors. The color of the cluster with the most pixels is called “predominant” here. (This will NOT be on the final.)
Testing the Result
After trying and learning how the commands work, you can incorporate this Color Sensor into your Autonomous and/or TeleOp OpModes.
As seen in the OpMode’s Telemetry section, the result is called
closestSwatch and appears as a word (RED, BLUE, etc.). But this is not
plain text!
Testing, or comparing, for a particular color-match must be done as follows. Select and read the Blocks or Java section below:
At the left side, pull out the following multi-Block from Vision/PredominantColor/Processor:

Closest Swatch Comparison
You must use this special Block to determine if the result is (for example) RED.
Why? The result, called closestSwatch is not text (yes it seems
like text!). It’s a type called Swatch and can be compared only to
another Swatch.
In the sample OpMode, here’s the Telemetry that gives the result:
telemetry.addData("Best Match:", result.closestSwatch);
This displays as text, but this is not Java type String!
Here’s how to determine if the result is (for example) RED:
if (result.closestSwatch == Swatch.RED) { }
Why? The result, called closestSwatch is of type Swatch and can
be compared only to another Swatch.
OpMode Programming
The Color Sensor part of your team’s Autonomous OpMode might include these goals:
Seek a color, using the code from this Sample OpMode
Take a robot action, based on finding that color
If so, select and read the Blocks or Java section below:
Beginners often try this first:

Wrong way to act upon match result
The problem is, after the robot does the action for RED, the OpMode is still inside the vision loop. Very messy and unpredictable.
A better approach is to save the result (as text!), exit the loop, then retrieve the stored result to take the desired RED action.

Right way to act upon match result
How to exit the vision loop? It could be based on time , or finding a particular color, or finding a particular color 10 times in a row, or finding only a particular color for 1 full second, or any other desired criteria.
The color result is generated inside a vision loop. Save the result (as text!), exit the loop, then retrieve the stored result to take the desired RED action.
String savedColorMatch = "NULL";
.
.
if (result.closestSwatch == Swatch.RED)     {
     savedColorMatch = "RED";
     // your code here: optional to exit the vision loop based on your criteria
     }
.
.
// After exiting the vision loop...
if (savedColorMatch == "RED")     {
     // your code here: robot actions if the ROI was RED
     }
How to exit the vision loop? It could be based on time, or finding a particular color, or finding a particular color 10 times in a row, or finding only a particular color for 1 full second, or any other desired criteria.
Advanced Use
Some teams may prefer to read and evaluate the actual RGB color values, rather than rely on a generic Swatch result.
RGB is a Color Space that uses three numerical components of Red, Green and Blue. Values range from 0 to 255. For more info, see this tutorial’s Color Spaces page.
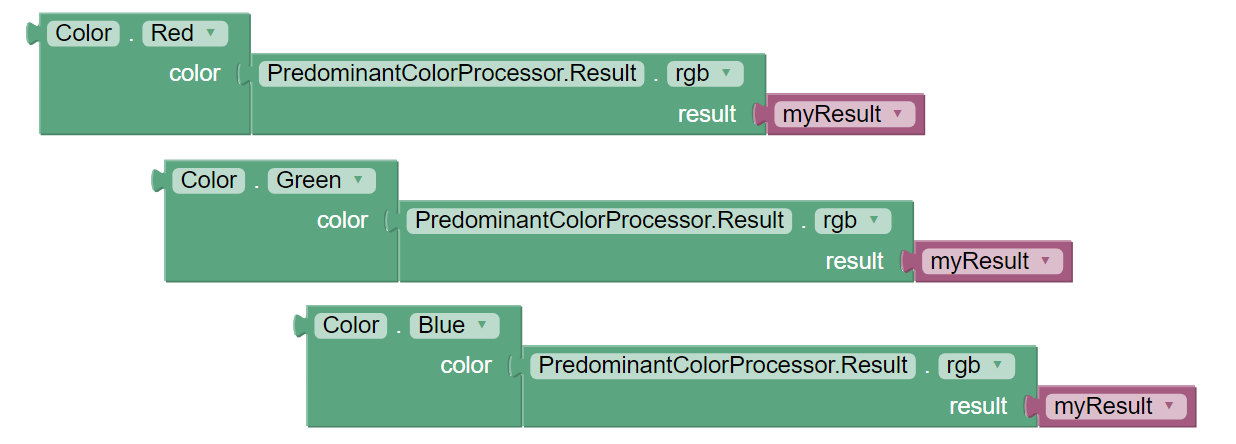
Extracting the RGB components can be seen in the Telemetry portion of the Sample OpMode. Click the Blocks or Java tab:
Here are the RGB components of the ROI’s predominant color:

Note: the Color Block has a drop-down list that includes Hue,
Saturation and Value. Those settings will not work here, to produce
components in the HSV Color Space, because the source Block provides only
RGB color (its method name is .rgb).
Here are the RGB components of the ROI’s predominant color:
Color.red(result.rgb)Color.green(result.rgb)Color.blue(result.rgb)
For Blocks or Java, those component values can be assigned to numeric
variables, with names like ROIRedValue, ROIGreenValue, and
ROIBlueValue.
Now your code can process those RGB variables as desired.
Next Sections
Soon you can move ahead to try the Color Locator processor.
But first, learn a few basic concepts at this tutorial’s Color Blob Concepts page.
Questions, comments and corrections to westsiderobotics@verizon.net