Adding labels to frames in a video
The Video Labeling tool is the primary method for providing input to the Machine Learning process. Also known as Supervised Learning, a user selects regions of each video frame that contains objects that a model will be trained to recognize and provides categorization data in the form of a label. If done completely manually, this process can be time consuming and error prone – fortunately there are tools to help us do this. Because the input package is a video, each frame is more than likely sequential to one another. As the objects move around in the frame (such as a ball rolling by), or the camera pans around the objects (to get multiple pose angles at varying distances from the object) the objects are going to move between frames at relatively predictable increments. Tracking algorithms, such as the OpenCV Object Tracking API, can help track the movement of labeled objects from one frame to another with the help (from time to time) from a human supervising the process.
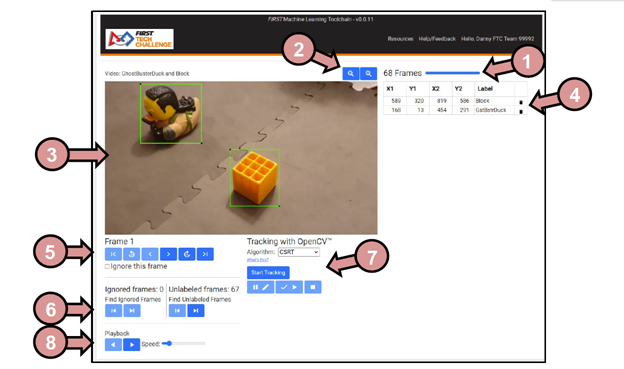
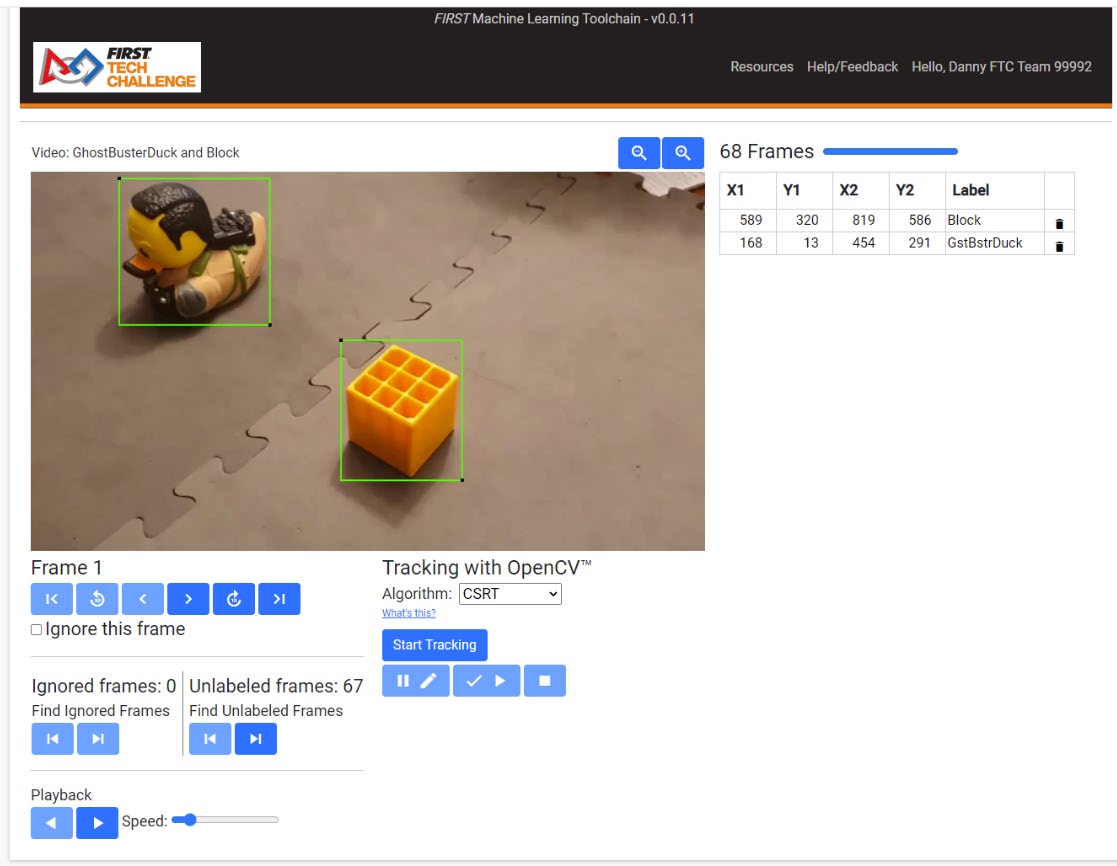
Figure 6: Video Labeling Tool main window.
Figure 6 shows a sample of the Video Labeling Tool main window. The tool is composed of multiple segments, labeled as follows:
Loading Progress Bar - In the upper-right-hand area of the window, a frame loading progress bar will show the frame load progress; for large videos this might take a while. While the image frames are loading, loaded frames may begin to be examined and labeled in the main image window.
Zoom Tools - If necessary or desired, these zoom buttons may be used to increase and decrease the size of elements in the Video Labeling tool window.
Main Image Window – The main image window is for viewing the current frame of the video, and where the labeling for the video happens. To create a bounding box left-click on the location for one corner of the box, drag the mouse to the opposite diagonal corner for the box, and then release the mouse button. Once a bounding box is shown, a label can be added to the Region Labels area or the bounding box can be deleted using the Trash Can icon in the Region Labels area.
Region Labels – When dragging a bounding box within the Main Image Window, the coordinates of the bounding box are stored here. Each bounding box needs a label. Labels must be exact – just like in a password, capitalization matters! Keep labels short and to the point.
Frame Navigation Buttons – To navigate deliberately between frames, and show which frame is currently being viewed, the frame navigation area can help out. The current Frame number is shown above the navigation toolbar. To ignore the current frame (completely eliminate the frame from being used in training) the “Ignore this frame” checkbox below the frame navigation toolbar must be checked for each frame to be ignored.
Special Frame Navigation – This area is used to view/verify ignored frames and to find unlabeled frames in the video. All instances of objects in frames should be labeled, but unlabeled frames (also known as “negative frames”) can be useful if your objects are typically hiding something that you would like for your model to ignore if the objects are not present.
OpenCV Object Tracking tools – Use this to begin, pause, or stop object tracking using the selected object tracking algorithm. Click the “Start Tracking” button once the first frame is fully labeled, and monitor each frame to ensure the bounding boxes are correct
Playback Menu - The Playback menu can play the video (with or without labels) at varying speeds. The Left and Right buttons indicate direction, and the Speed slider controls the speed of the playback. Click a direction once to begin playing the video in that direction. This is useful when reviewing bounding box selections between frames.
When a video is first loaded into the Video Labeling tool, it may take several seconds for the image data to be loaded into the tool. Bounding Boxes should be drawn around objects in the Main Image Window and each bounding box needs to be labeled. If the bounding box needs to be modified, click and drag the corners with a black “dot” in them to adjust the bounding box. It’s okay if bounding boxes overlap slightly in training data. If multiple “blocks” are in the image, then each should get the same “block” label. If you want the model to classify an object within a bounding box as a “duck”, then add the “duck” label, and so on. You should not have more than 10 objects within a single frame (so keep that in mind when creating videos); this is because the ftc-ml tool is limited to 10 labels per frame, and there should NEVER be unlabeled trackable objects in a frame (See here for more information about the background detector).
Once the first frame has been fully labeled, click the “Start Tracking” button on the OpenCV Object Tracking tools. It may take several seconds for the tracking process to begin. Once started, OpenCV will progress frame-by-frame, attempting to track the bounded labeled object as it moves for you. If you need to pause the OpenCV tracking and correct a bounding box that becomes too large, too small, or loses the object, do so. You may resume tracking at any time.
To review the bounding boxes throughout the video, use the Playback Menu to show each frame in sequence in the desired direction.
Once the labeling process has completed, click on the FIRST Tech Challenge logo to return back to the ftc-ml main workflow page. Note that there is no “save” button, actions are saved each time a browser action occurs, and there is no way to “undo” or “redo” actions.