HuskyLens Intro for FIRST Tech Challenge
Introduction
This is a simple tutorial to introduce the use of HuskyLens in FIRST Tech Challenge (FTC), for teams that already decided to explore its potential.
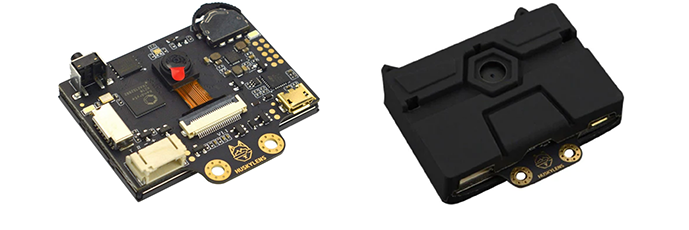
DFRobot HuskyLens
Basic support for this vision sensor was added to the FTC SDK version 9.0 in September 2023 with the CENTERSTAGE robot game kickoff.
HuskyLens uses on-board programming to perform AI-assisted learning, vision processing and recognition. It plugs into an I2C sensor port of a REV Control Hub or REV Expansion Hub.
HuskyLens is not a USB webcam, and does not use the FTC VisionPortal software or the FTC Machine Learning software.
Electrical Connection
You will need a custom adapter cable to connect the HuskyLens to an I2C port on a REV Control Hub or Expansion Hub. The 4 wires/pins of the HuskyLens connector are not in the same order/position as the 4 pins on the REV Hub.
Three of the wires have the same color as wires in the REV sensor cable. Your custom cable should connect red to red, black to black, and blue to blue. This leaves only the HuskyLens green wire; connect it to the REV white wire. Simple!
This tutorial does not cover the (many) ways to:
modify an existing cable (change pin order in one connector), OR
fabricate a custom cable, with:
soldering
crimped connectors
lever nuts (example below)
FTC Game Manual 1 allows this work, but teams must ensure high quality for robot competition all season.
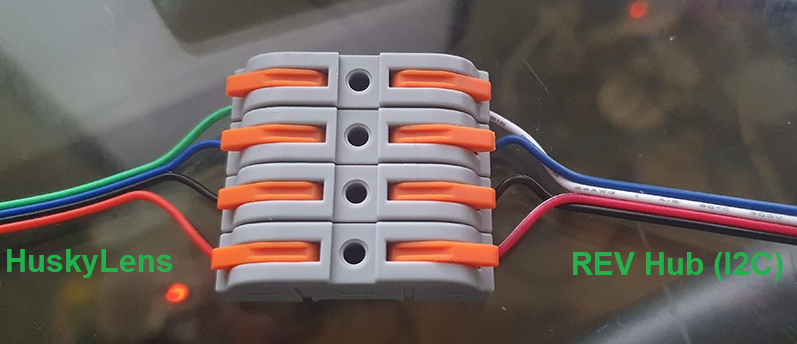
image credit: @texasdiaz
To confirm these wiring instructions are correct, you could study the HuskyLens documentation and the REV Hub documentation. You will see the following “pinout” info:
HuskyLens green wire 1 (“T”) SDA or data == REV Hub white wire 3 “SDA” or data
HuskyLens blue wire 2 (“R”) SCL or clock == REV Hub blue wire 4 “SCL” or clock
HuskyLens black wire 3 (“-”) GND or ground == REV Hub black wire 1 “GND” or ground
HuskyLens red wire 4 (“+”) VCC or +3.3-5VDC == REV Hub red wire 2 “3.3V” or Vcc
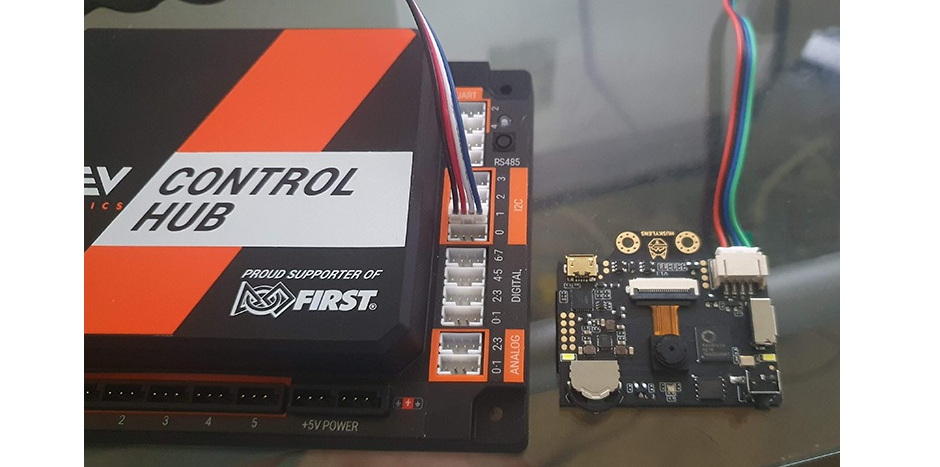
image credit: @texasdiaz
Configuration
Plug the HuskyLens into a REV Hub I2C port, using your new adapter cable. The I2C connections labeled Bus 1, 2 or 3 are suggested, to avoid (unlikely) overload of data traffic.
The label 0 (zero) is I2C Bus 0, which likely has a built-in IMU on its Port 0. An I2C Bus can contain multiple I2C Ports, sharing traffic.
On the Driver Station, touch the three-dots menu, and
Configure Robot.
Edit an existing (correct) configuration, or touch New. Touch
Scan, then navigate (through the Portal level) to the specific
Expansion Hub or Control Hub with the HuskyLens plugged in.
Select I2C Bus 3 or whichever Bus number has the HuskyLens plugged
in.
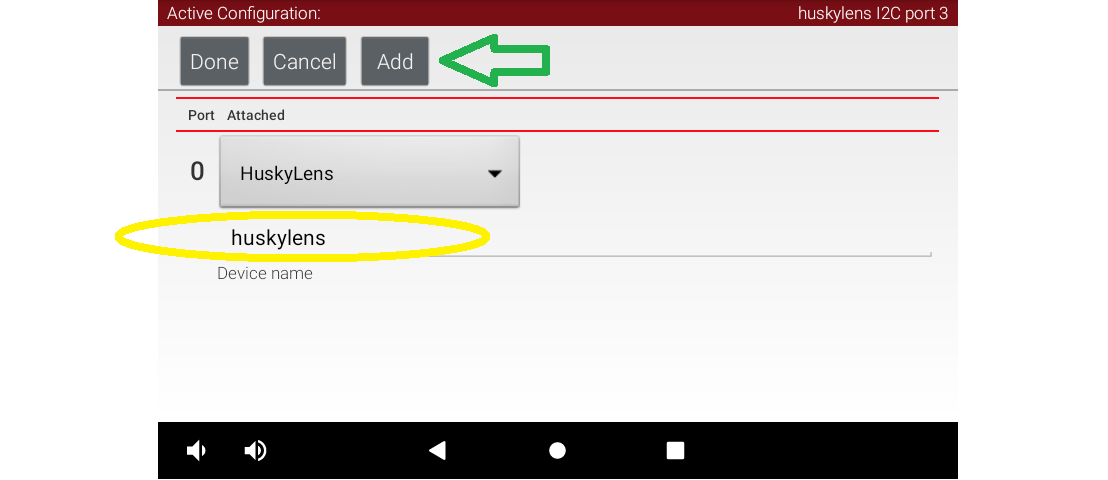
Driver Station Config
Touch Add, and select device “HuskyLens” from the drop-down list for
Port 0 (or first available port). Type the device name “huskylens”, as
expected by the Sample OpMode.
Touch Done several times, then Save, to save and name/rename
this updated robot configuration. Touch the DS “Back” arrow, returning
to the DS app’s home screen.
Confirm that your new configuration is shown on-screen as the active configuration.
Sample OpMode
Connect your programming computer to the Robot Controller, and open the programming software. This tutorial uses FTC Blocks.
Note
OnBot Java and Android Studio users can easily follow along, since the Java Sample OpMode uses the same programming logic and is well commented.
In FTC Blocks, create a new OpMode using the sample called “SensorHuskyLens”:
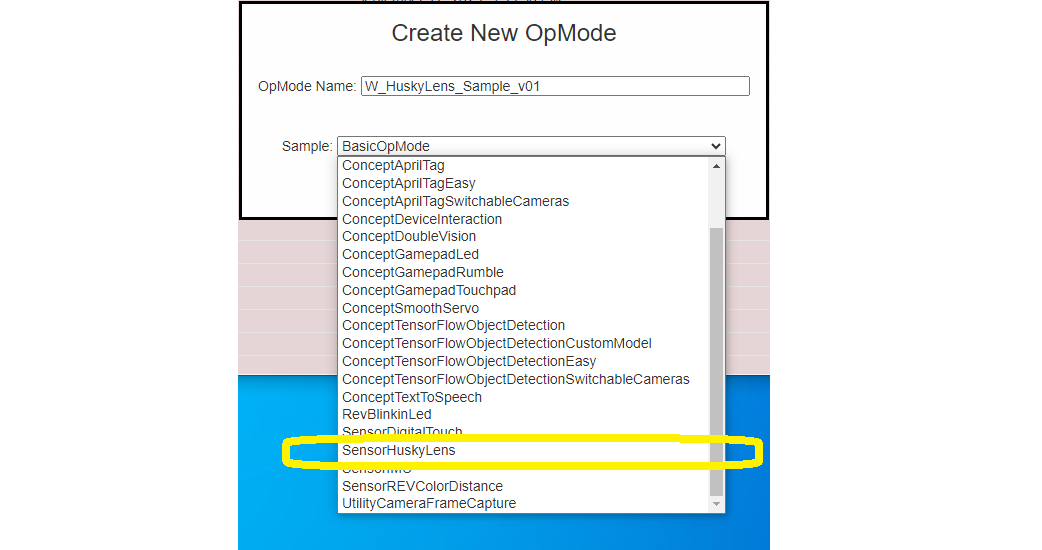
HuskyLens Blocks Sample
Change the OpMode type from TeleOp to Autonomous, since this
sample does not use the gamepads.
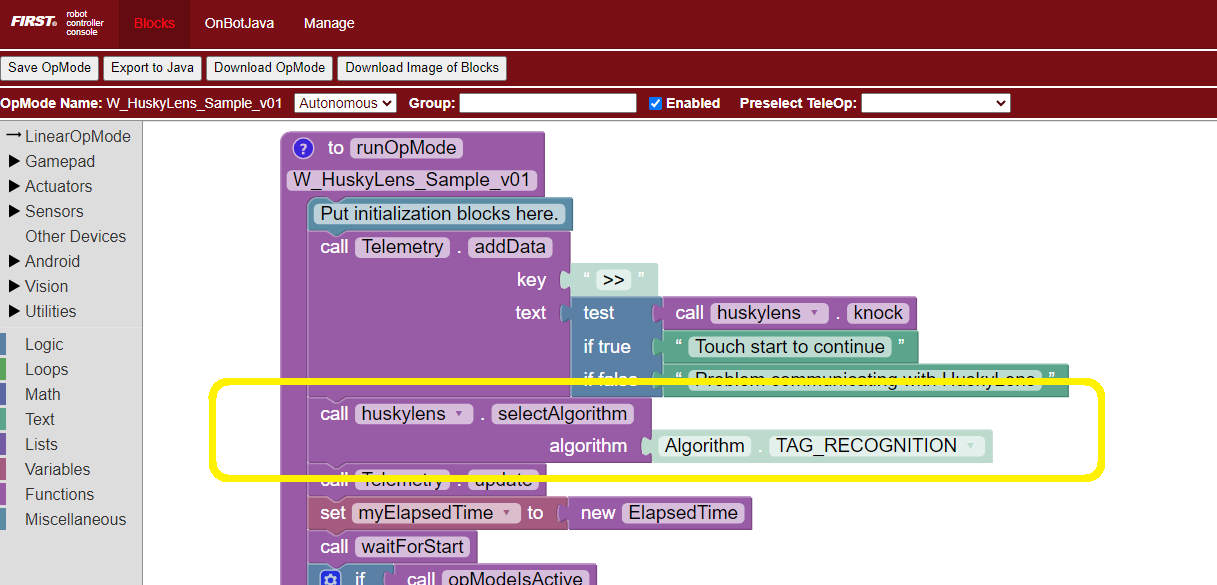
HuskyLens Blocks Algorithm
Notice the default algorithm here is TAG_RECOGNITION, which simply
detects any (common) AprilTags in the sensor’s field of view. This
recognition is unrelated to the FTC game CENTERSTAGE and its 10
AprilTags with metadata. Instead, this is a simple built-in, generic
function of HuskyLens, used here only to validate the sensor’s
operation.
For AprilTag recognition and navigation, FTC teams may find much more value from a UVC webcam and the FTC VisionPortal software. An FTC robot may use HuskyLens and USB webcams.
Click Save OpMode, then select and run this OpMode from the Driver
Station. After touching the Start arrow, point the HuskyLens at any
AprilTag from the common 36h11 family:
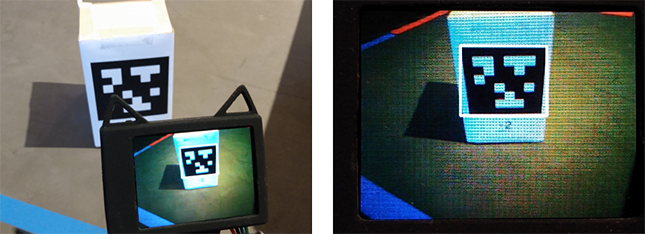
Uncategorized AprilTag Detected
The HuskyLens’ small screen will show the recognized AprilTag, surrounded by a thin white Bounding Box.
Here’s the corresponding DS Telemetry:
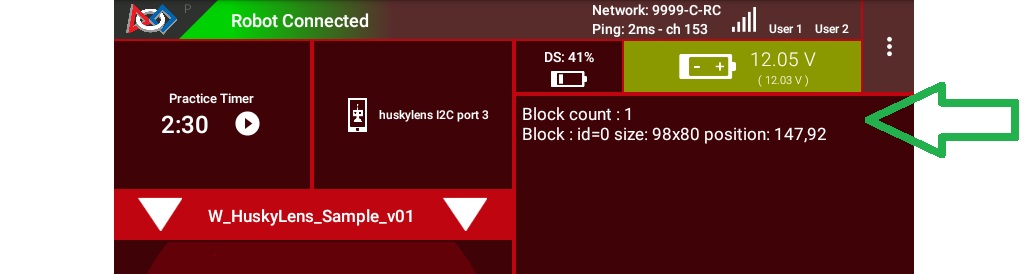
AprilTag Telemetry
The data includes:
number of objects (called “blocks”) detected
ID code of object (might not be correct or meaningful)
size of Bounding Box, in pixels
center position of Bounding Box, in pixels, with (X, Y) origin at the top left
The HuskyLens device screen is 320 x 240 pixels, with center at position (160, 120).
Congratulations! At this point, you have validated the HuskyLens device, its connection to the REV Hub, and the Sample OpMode program.
AprilTag Detection
Now you can test whether the HuskyLens can detect the AprilTag’s position on the CENTERSTAGE Spike Marks. This is not a real game scenario, since a Team Prop (Team Game Element) cannot use an AprilTag. This simply verifies whether your robot could aim the HuskyLens to “see” 2 or 3 Spike Marks in a single view.
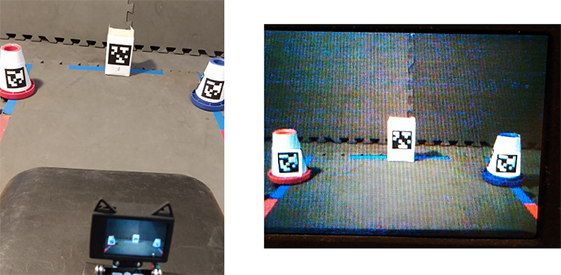
HuskyLens Viewing 3 Uncategorized Tags
Here the HuskyLens was placed in a feasible position, about 10 inches from the mat, near the middle of the foam tile before the Spike-Mark tile. The view does include the middle of all three Spike Marks.
All three AprilTags were recognized:

Telemetry Showing 3 Blocks
This validates the possibility that HuskyLens could recognize a trained object in one of various known positions – useful for the Autonomous phase of the CENTERSTAGE game.
Single Color Training
Soon you will try a different algorithm called COLOR_RECOGNITION.
But first you need the HuskyLens to “learn” a single color, using its
built-in AI feature.
Choose any object, about 3 to 4 inches in size, that’s completely one color – any color. Here we use a flat square beverage coaster (LEGO!), with a uniform red color.
Place this object in the position and lighting that you expect to use for detection. This could be on a CENTERSTAGE Spike Mark, if available.
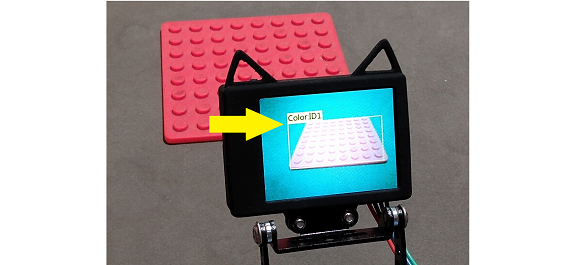
Red Color ID
In the above image, the trained color is shown as ``Color:ID1`` with a rectangular Bounding Box. The following steps describe how to do this training.
The HuskyLens instructions for learning a color are posted online. You could try to follow those, or use the equivalent description here. Some practice may be required!
On the top of the HuskyLens, the wheel at the left side is called the Function button (actually a dial and button). At the right side is the small Learning button.
Dial the Function button to the right or left until “Color Recognition” is displayed at the bottom of the screen.
This is Step 1 only, under Operation and Setting of the HuskyLens
instructions. For now, do not try to “learn” more than one color with
Steps 2-4.
Point the plus-sign “+” icon in the center of the HuskyLens screen at your object’s main color area. A white frame appears on the screen, targeting the main color. Aim the HuskyLens so the white frame includes only the target color.
This is Step 1 of Learning and Detection. Next comes Step 2, Color
Learning.
With the main color framed, long press (press and hold) the small Learning button (right side). A yellow frame is displayed on the screen, indicating that HuskyLens is learning the color. During this long press, move the HuskyLens while pointing at the color area, to let HuskyLens learn the color from various distances and angles. Then, release the Learning button to complete learning that color. Do not press the button again (ignore the prompt); allow the 5-second time-out to finish.
The long-press learning period can last for just a few seconds. After releasing the Learning button, you allowed the training to time-out – no more colors to learn. Training is done!
As shown above, the trained color will be shown on-screen as ``Color:ID1`` with a rectangular Bounding Box. This “block” (of color) will be reported in the Sample OpMode (next step).
If you want to do this over again, short-press the Learning button, then short-press again to Forget the learned color(s). This will make the plus-sign “+” icon appear again. Aim the plus-sign at the center of the color area, and repeat the learning (long-press the Learning button). Release and let the time-out finish.
This section showed how to train a single color. After completing this tutorial, you may wish to train two colors (e.g. a Red shade and a Blue shade). This is described near the end of this tutorial.
HuskyLens documentation refers to the color zone as a “block” of color. This is not the same as a physical block or cube. HuskyLens uses the same word “block” for recognitions.
Note the official warning:
Warning
“Color recognition is greatly affected by ambient light. Sometimes HuskyLens may misidentify similar colors. Please try to keep the ambient light unchanged.”
Single Color Detection
Aim the HuskyLens at one or more of your color-trained objects.
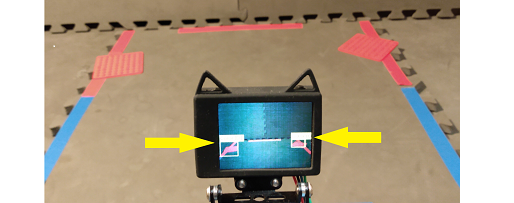
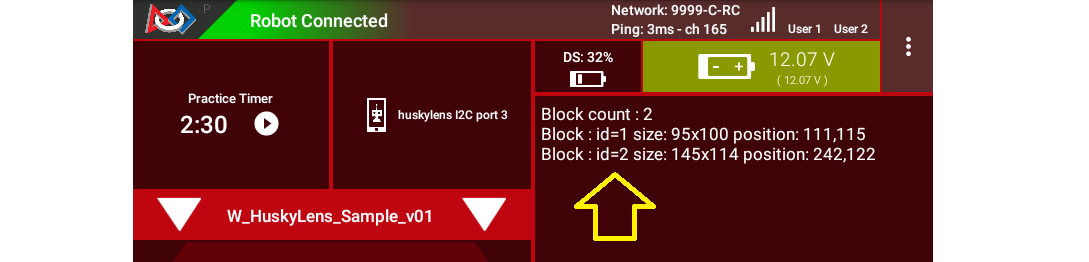
HuskyLens Detecting Two Red Objects
As shown above, the HuskyLens should recognize and label your colored objects with ``Color:ID1``. Here, both red objects are identified (yellow arrows).
In the programming software (same OpMode), now select a different
algorithm called COLOR_RECOGNITION:
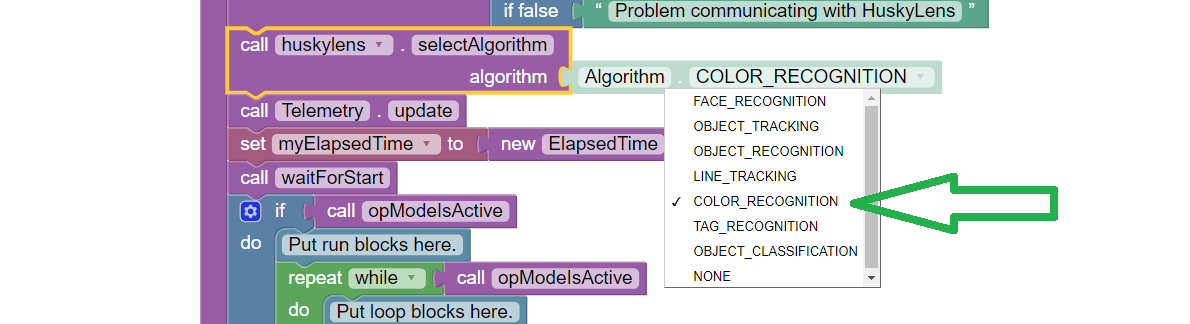
Selecting COLOR_RECOGNITION algorithm
In the Java sample OpMode, change the algorithm selection as follows:
huskyLens.selectAlgorithm(HuskyLens.Algorithm.COLOR_RECOGNITION);
Save this OpMode, then select and run it on the Driver Station. Make sure the active configuration includes the HuskyLens.
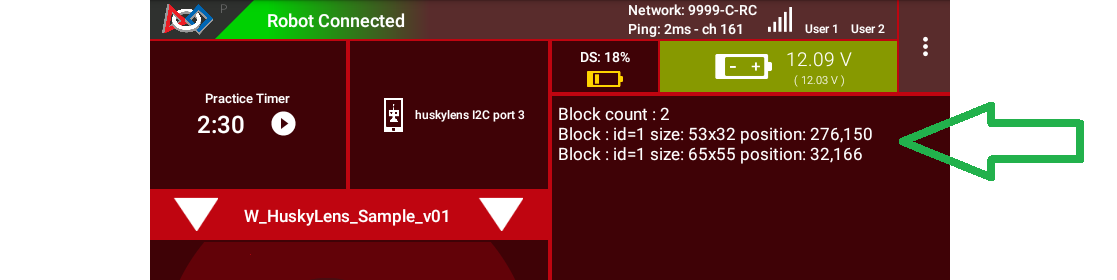
DS Telemetry Two Objects
As shown above, the OpMode provides the size and location of the white Bounding Boxes (called “blocks”). This is done in a FOR loop; multiple recognitions are processed one at at time.
In the Java sample OpMode, inside the FOR loop, you could save or
evaluate specific info for the currently recognized Bounding Box:
blocks[i].width, blocks[i].height, blocks[i].left,
blocks[i].top, and (for the Box’s center) blocks[i].x and
blocks[i].y. The Color ID blocks[i].id is always 1 here, for
single-color detection. These values have Java type int.
Even if your Team Prop’s color closely matches the color of the red or blue Spike Mark, you could write OpMode code to reject the narrow shape (aspect ratio) of an empty Spike Mark’s Bounding Box.
Here’s an example with a trained blue object:

HuskyLens Two Blue Objects
Both blue objects were recognized by the OpMode:
Telemetry for Two Blue Objects
Again, your code can evaluate the size and location of any provided Bounding Box, to verify a “real” recognition of your object.
Competition Notes
1. Team Prop
Now you are ready to experiment with color recognition of an actual Team Prop, also called a Team Game Element. Study Game Manual 1 and the FTC Q&A for the Team Prop requirements. Choose your shades of “red” and “blue” (see note below), and follow the same steps as above.
2. Color
The above trained blue object is not the same shade of blue as the blue Spike Mark. This difference increases the chance of a distinct and correct recognition of the object color.
Game Manual 1 (Rule TE2) specifically allows the Team Prop to be a different shade of Red or Blue, compared to the official tape color of Spike Marks:
“The Team Game Element may include multiple shades of the assigned color.”
…and emphasized in the FTC Q&A:
“Light blue and pink are acceptable colors providing it is obvious to the field personnel which alliance the Team Prop belongs to.”
3. Lighting
The HuskyLens documentation provides a warning (shown above) that ambient lighting can impact recognition of a trained color.
For this reason, competition training should ideally be done with the Team Prop (Team Game Element) on the Spike Mark, and the HuskyLens in its planned match start position, “on-robot”.
Also, the trained ambient lighting must be similar to expected match conditions. This may suggest performing the final color-training as part of tournament or match set-up. With practice, it could be done in a few seconds.
4. Programming
In this Sample OpMode, the main loop ends only upon touching the DS Stop button. For competition, teams should modify this code in at least two ways:
for a significant recognition, take action or store key information – inside the FOR loop
end the main loop based on your criteria, to continue the OpMode
As an example, you might set a Boolean variable isPropDetected to
true, if a significant recognition has occurred.
You might also evaluate and store which randomized Spike Mark (red or blue tape stripe) holds the Team Prop.
Regarding the main loop, it could end after the HuskyLens views all three Spike Marks, or after your code provides a high-confidence result. If the HuskyLens’ view includes more than one Spike Mark position, perhaps the Bounding Box size(s) and location(s) could be useful. Teams should consider how long to seek an acceptable recognition, and what to do otherwise.
In any case, the OpMode should exit the main loop and continue running, using any stored information.
Multi-Color Training
After completing the above tutorial with a single trained color, you may wish to train two colors (e.g. a Red shade and a Blue shade).
This would avoid the need for multiple color-training sessions during an FTC tournament. With single-color, you would train for Red before playing an FTC match as Red Alliance, and train for Blue before playing as Blue Alliance.
With multi-color, your Red-Alliance Autonomous OpMode could seek Red as ``Color:ID1``, for example, and your Blue-Alliance Autonomous OpMode could seek Blue as ``Color:ID2``.
The HuskyLens instructions for learning multiple colors are posted online. You could try to follow those, or use the equivalent description here. Again, some practice may be required!
Reminder: on the top of the HuskyLens, the wheel at the left side is called the Function button (actually a dial and button). At the right side is the small Learning button.
Step 1. Dial the Function button to the right or left until “Color Recognition” is displayed at the bottom of the screen.
Long press (press and hold) the Function button to select Color Recognition.
Step 2. This brings up the next menu, containing the choice “Learn Multiple”. If needed, dial the Function button to highlight “Learn Multiple”.
Short press (press and release) the Function button to select Learn Multiple.
This brings up the OFF-ON slider bar for “Learn Multiple”. If needed, dial the Function Button to move the blue square to the right side of the blue slider bar. See yellow arrow:
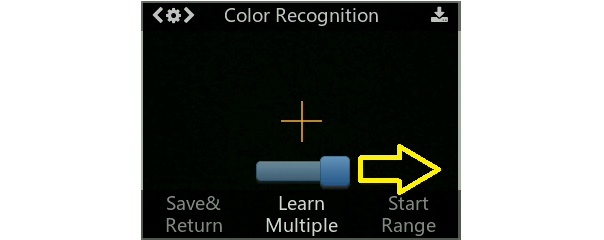
HuskyLens - Learn Multiple
Short press the Function button to set “Learn Multiple” to ON.
Step 3. Dial the Function button to the left, and short press to select “Save & Return”.
At the screen prompt “Do you want to save the parameters?” or “Do you save data?”, short press the Function button to select “Yes”. This saves the mode (again) as “Learn Multiple” and exits the settings menu.
Now ready for learning!
Step 4. As before, point the plus-sign “+” icon in the center of the HuskyLens screen at your object’s main color area. A white frame appears on the screen, targeting the main color. Aim the HuskyLens so the white frame includes only the target color.
With the main color framed, long press (press and hold) the small Learning button (right side). A yellow frame appears on the screen, indicating that HuskyLens is learning the color.
During this long press, move the HuskyLens while pointing at the color area, to let HuskyLens learn the color from various distances and angles. Then, release the Learning button to complete learning that color.
The long-press learning period can last for just a few seconds. After releasing the Learning button, ``Color:ID1`` is now trained, with its label shown on-screen. Easy!
HuskyLens - RED (Color 1) Trained
Step 5. As prompted on the screen, short press the Learning button again (before the 5-second time-out). This prepares for learning the next color.
Step 6. Point the lens at your second color, and repeat the previous Step 4. Namely, long press the Learning button, aim and move, then release to complete learning that color.
Now ``Color:ID2`` is trained, with its label shown on-screen.
Step 7. As prompted, short press the “other” button, the Function button. Or, allow the 5-second time-out to complete. In either case, this completes the multi-color training. All done!
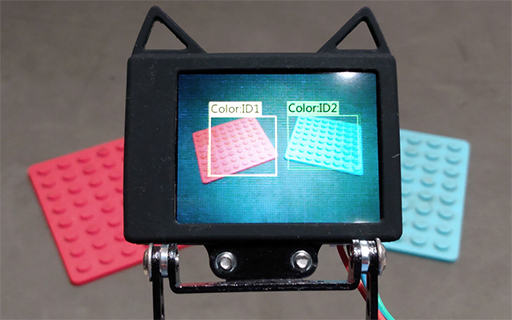
HuskyLens - Two Colors Trained (ID1 and ID2)
If you want to do all this over again, short-press the Learning button, then (as prompted) short-press again to ``Forget`` all of the learned colors.
This makes the plus-sign “+” icon appear again. Repeat the above, from Step 4, to train colors again.
Multi-Color Detection
For your OpMode code to read ``Color:ID2``, for example, the
Algorithm must be set to COLOR_RECOGNITION and the field
HuskyLens.Block.id will be the value 2. This can be seen in the
Telemetry portion of the Sample OpMode you used above.

Adding Telemetry for Colors
Here’s the DS Telemetry from the Sample OpMode used above for single color, with no coding changes:
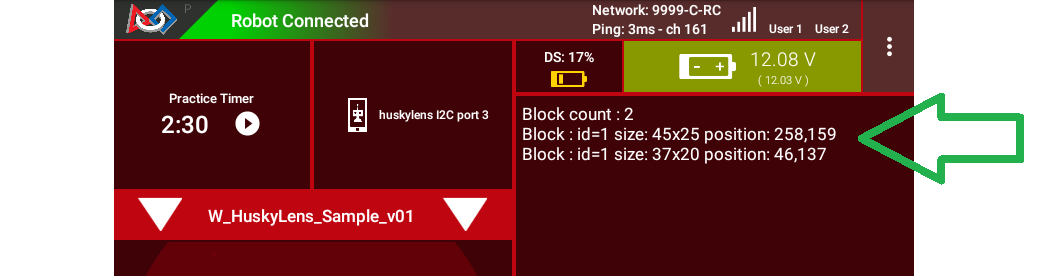
Example Telemetry showing Both Colors
Now there are two trained and recognized colors, with ID Codes 1 and 2 – see yellow arrow above.
These two lines of Telemetry are generated in different cycles of the
same FOR Loop. They display together, since the Telemetry.update
Block appears after the FOR Loop has completed all of its cycles.
Namely, the FOR Loop has processed each HuskyLens “color block” in the
List of HuskyLens “blocks”.
In the Java sample OpMode, add these lines inside the FOR loop:
int thisColorID = blocks[i].id;                      // save the current recognition's Color ID
telemetry.addData("This Color ID", thisColorID);     // display that Color ID
Besides .id, other Java fields are available for the currently
recognized Bounding Box: .width, .height, .left, .top,
plus .x and .y (center location).
The color ID numbers are assigned in order of training. You cannot renumber these later, so plan your training and OpMode coding to agree with each other.
Tip
Advanced tip: If your color recognition is heavily affected by ambient lighting, you could try training your object in various lighting conditions as different HuskyLens colors. Namely, the Red-shade Team Prop could be trained as ``Color:ID1`` in bright light, and trained as ``Color:ID2`` in dim light or shadow. Your OpMode could accept either Color ID (1 or 2) as “Red”. Likewise, Blue shades could have Color IDs 3 and 4.
Object Training
This tutorial ends with HuskyLens color training. Now you are familiar with the basic steps for HuskyLens operation, training, and FTC programming.
You are encouraged to proceed with training the HuskyLens to recognize an actual object. This could be one of its 20 pre-trained models (“Object Recognition”) or a custom model or image that you train (“Object Classification”). In each case, follow a process similar to color training, using the HuskyLens documentation.
You may find that HuskyLens object recognition provides more (educational) exposure to the process of AI and Machine Learning, along with more reliable results than color recognition.
Best of luck this season!
Questions, comments and corrections to westsiderobotics@verizon.net